The My Profile page allows you to:
- View your NiCE CXone user and account information
- Change your password
- Access the Support and Downloads page
- Launch other apps like Salesforce or other tools you often use
- Manage your accessibility settings
- View and manage your access keys
- Read the NiCE CXone accessibility statement, which explains how to provide feedback about the accessibility of the platform
Access My Profile
There are two ways to access your My Profile page:
-
From any page in the platform, click your initials
 in the upper right corner and then select My Profile.
 -
Click the app selector
 and select My Zone, then click My Profile on the left.
View Account Information
The General tab in My Profile shows your user information. You can't change this information because it's read-only. You might need to share some of it if you contact NiCE CXone support or your company’s NiCE CXone administrator.

The following information is available:
- Your name, role, and team: At the top of the page you can see your name. Beneath that you can find:
- Role: This shows what you can do in the NiCE CXone. Your administrator gives roles certain permissions, which let you view, use, or manage parts of the system. In the example image in this section, the user's name is Gilbert Blythe, his role is Agent, and his team is Sales-Oz.
- Team: This is team you're assigned to. Not everyone is assigned to a team. If no team is listed, you are not assigned to one.
- User Information: This section provides information about your NiCE CXone user account.
- Username: The name you use to log in.
- Email: The email address linked to your account. It might be different from your username. NiCE CXone may send important messages to this account, such as password resets.
- User ID: A special code that identifies your account.
- General Information: This section shows information about the NiCE CXone system that you are using.
- Account: The name of your NiCE CXone system, also called a tenant
 High-level organizational grouping used to manage technical support, billing, and global settings for your NiCE CXone system..
 - Tenant ID: A special code that identifies your system.
- Account: The name of your NiCE CXone system, also called a tenant
Change Your NiCE CXone Password
Your password must follow rules set by your NiCE CXone administrator. When you start typing a new password, a list pops up showing what your company requires. As you meet each rule, the text on the pop up changes from red with an  to black with a
  .
.
Every company has different password rules. Passwords might be different for each person or groups of users. Password requirements can include:
- At least one uppercase letter, such as A, B, C.
- At least one lowercase letter, such as a, b, c.
- At least one number, such as 1, 2, 3.
- At least one special character, such as !, #, @.
- A minimum number of characters.
- Not using the same passwords again for a certain amount of time.
To change your password, you need to know your current password. If you cannot remember it, your NiCE CXone administrator must reset your password.
-
Click your initials
in the right corner of the NiCE CXone top navigation bar and select Change Password.You can also change your password from the My Profile page. On the Account tab, click Change Password.
-
Enter your Current Password.
-
Enter your New Password, then enter it again to Confirm New Password.
-
Click Save. If the button is disabled, your password does not yet meet your company's minimum requirements. The system sends an email notification to the email address associated with your user account.
Access the Support and Downloads Page
Permission: Admin > General > View Support and Downloads: On
The Support and Downloads page displays applications that are available for download and installation on computer systems.
-
Click your initials
in the right corner of the NiCE CXone top navigation bar and select Support and Downloads.You can also access Support and Downloads from the My Profile page. On the Account tab, click Support and Downloads.
- Locate the application you want to download and click the Download button next to it. If installation instructions are available, click the link.
Launch Other Apps
You can open other apps that are not part of NiCE CXone from the My Profile page. An administrator must set up a link to the external application. After doing so, the link is available on the Additional Applications tab.
For example, you could launch another application that you often use, like Salesforce.
-
Click your initials
in the right corner of the NiCE CXone top navigation bar. -
Click My profile from the drop-down.
-
Click the Additional Applications tab.
-
Click any of the available links. This opens the application in a new browser tab.
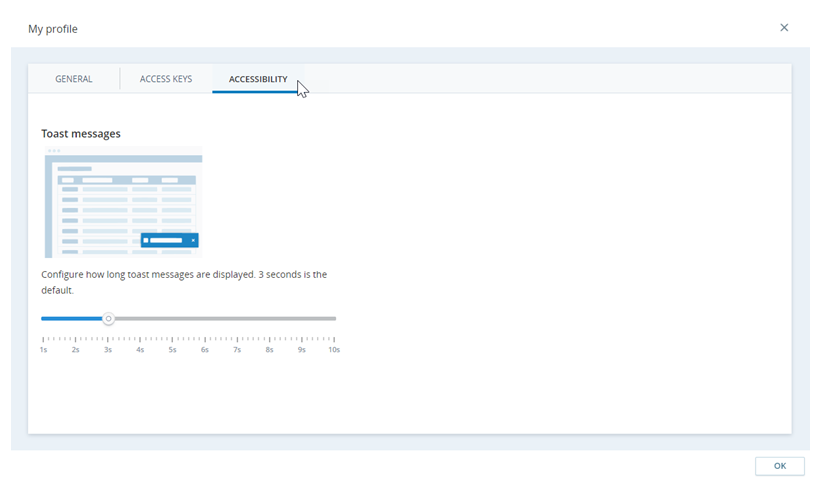
Configure Toast Message Duration
You can adjust how long toast messages![]() Small, temporary pop-up messages on the bottom of the screen indicating things like errors and successes. stay on your screen. This is helpful if you need more time to read them. You can set the time from one to ten seconds. By default, messages appear for three seconds. If you hover over the message, then it can stay for up to 30 seconds.
Small, temporary pop-up messages on the bottom of the screen indicating things like errors and successes. stay on your screen. This is helpful if you need more time to read them. You can set the time from one to ten seconds. By default, messages appear for three seconds. If you hover over the message, then it can stay for up to 30 seconds.
-
Click your initials
in the right corner of the NiCE CXone top navigation bar. -
Click My profile from the drop-down.
-
On the Accessibility tab, click and drag the marker to set the toast message display time.
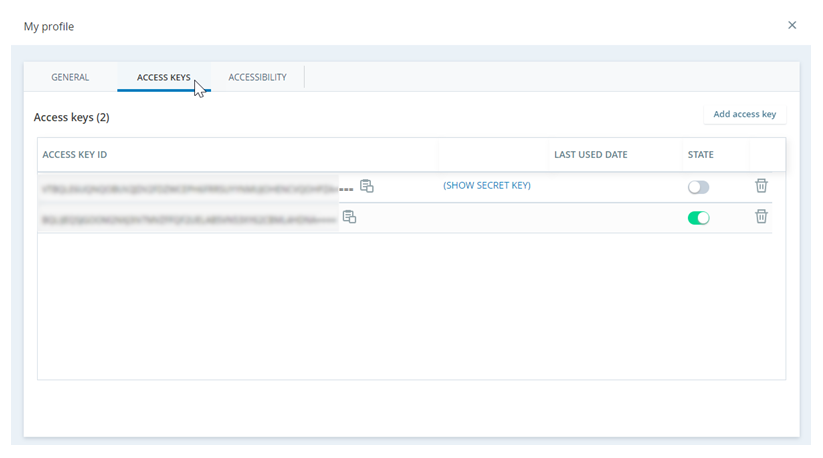
Generate Access Keys
Permission: Admin > General > My Access Keys: Create
Access keys let your account use different parts of NiCE CXone. The Access Keys tab in My Profile allows you to see, create, or delete access keys. If you don't see this tab, your account does not have permission to use it. If you can see this tab, you don't need to create access keys unless your administrator asks you to.
An access key has two parts: the Access Key ID and the Secret Access Key. When you enter an Access Key ID into the system, NiCE CXone checks it against the Secret Access Key it has saved. If they match, you get access.
-
Click your initials
in the right corner of the NiCE CXone top navigation bar. -
Select My Profile from the drop-down.
-
On the Access Keys tab, click Add access key.
-
Copy
 the Access Key ID and paste it somewhere you can save it.
 -
Click (SHOW SECRET KEY).
-
Copy the Secret Access Key and paste it where you want to save it. Treat the secret access key like a password.
You can only see the Secret Access Key while the My Profile window is open. After you close it, you cannot see the secret key again. Make sure to save both parts of the access key. If you lose the secret key, you'll have to create a new one and share it.
-
Activate or deactivate the access key in the State column.
-
Only share the Access Key ID with users that you want to share permissions with. Do not share the Secret Access Key.