The Configuration Update feature allows admins and supervisors to manage Desktop Discovery client configurations. They can create new client configurations and easily assign them to teams based on their requirements.
If the Desktop Discovery Client is installed on any VDI, the configuration manager and installation update should be disabled.
Prerequisites
-
To access the Configuration Update feature, the Desktop Discovery application must be enabled on the CXone tenant. Refer to Manage Tenants to enable the NiCE CXone applications.
-
You must select Desktop Discovery from the list of applications, turn the toggle switch On, and then select Desktop Discovery Advanced from the features list.
-
To manage the Configuration Update, the users with Edit permission will be able to assign and review configuration update. For agents and other users, refer to Permissions.
If you cannot see the application on your tenant, contact the NiCE support team.
Access Configuration Update
Go to Workforce Engagement > Desktop Discovery > Client Management > Configuration Update.
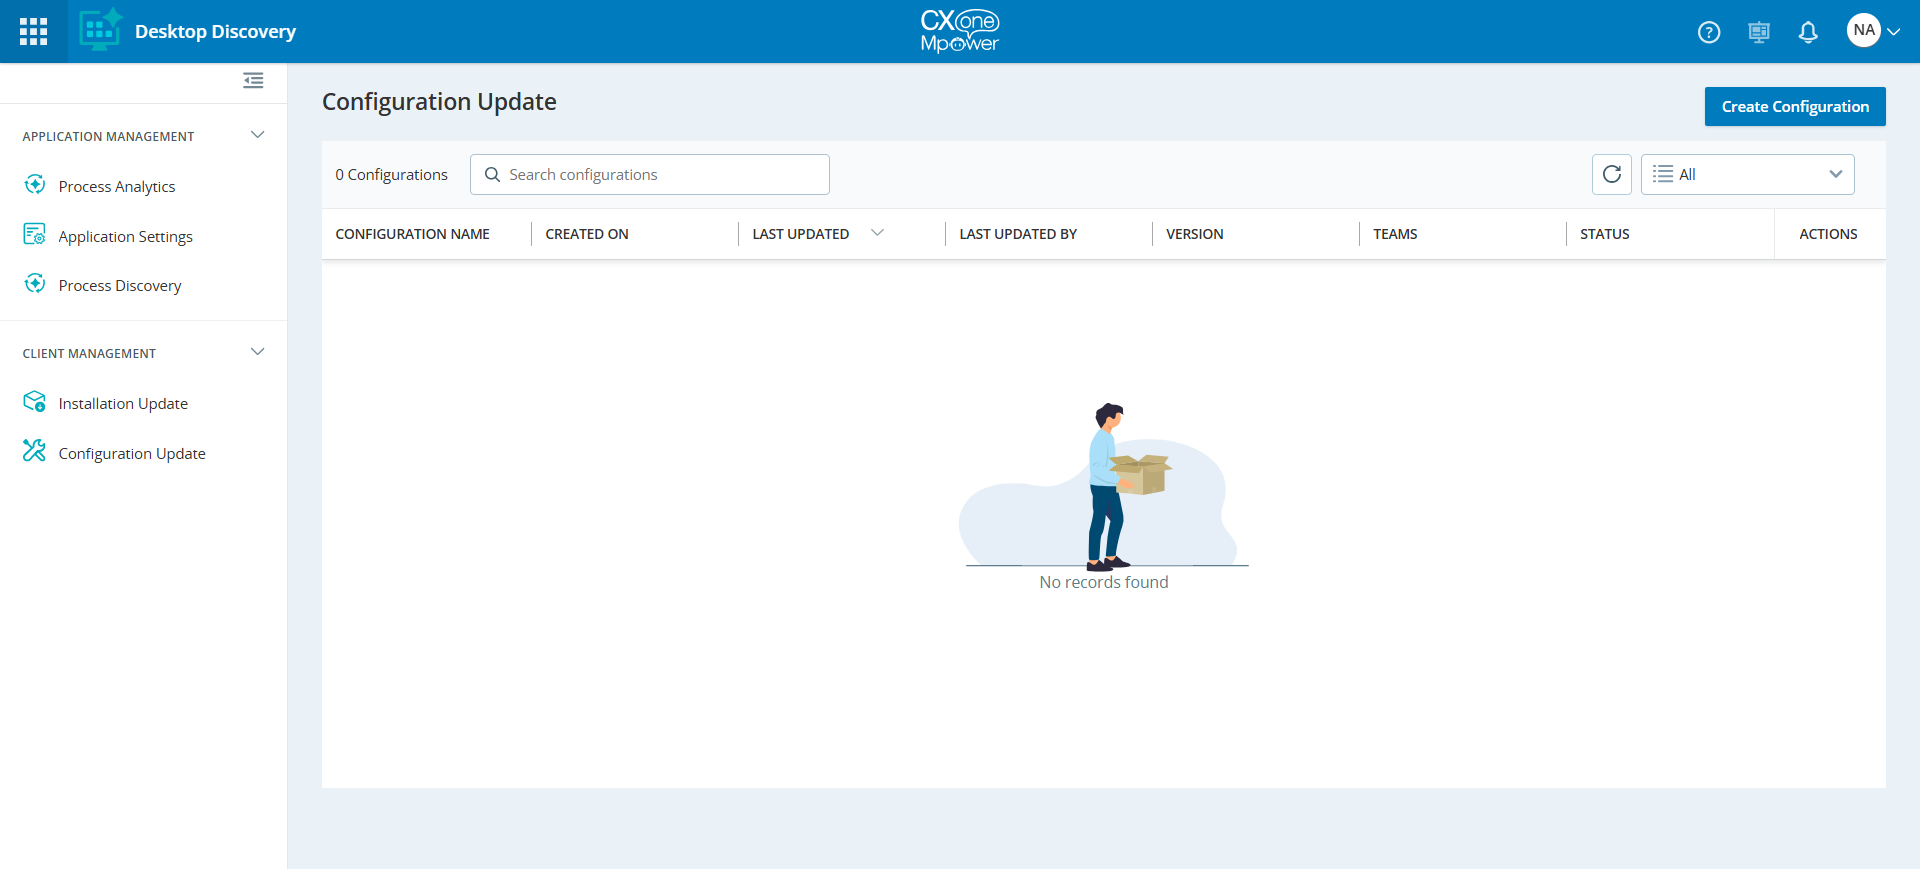
When first installed, the Desktop Discovery Client uses default settings. Opening the Configuration Manager will show an empty state, where you can create a new configurations.
Once created, this new configuration will replace the default settings for the Desktop Discovery Client.
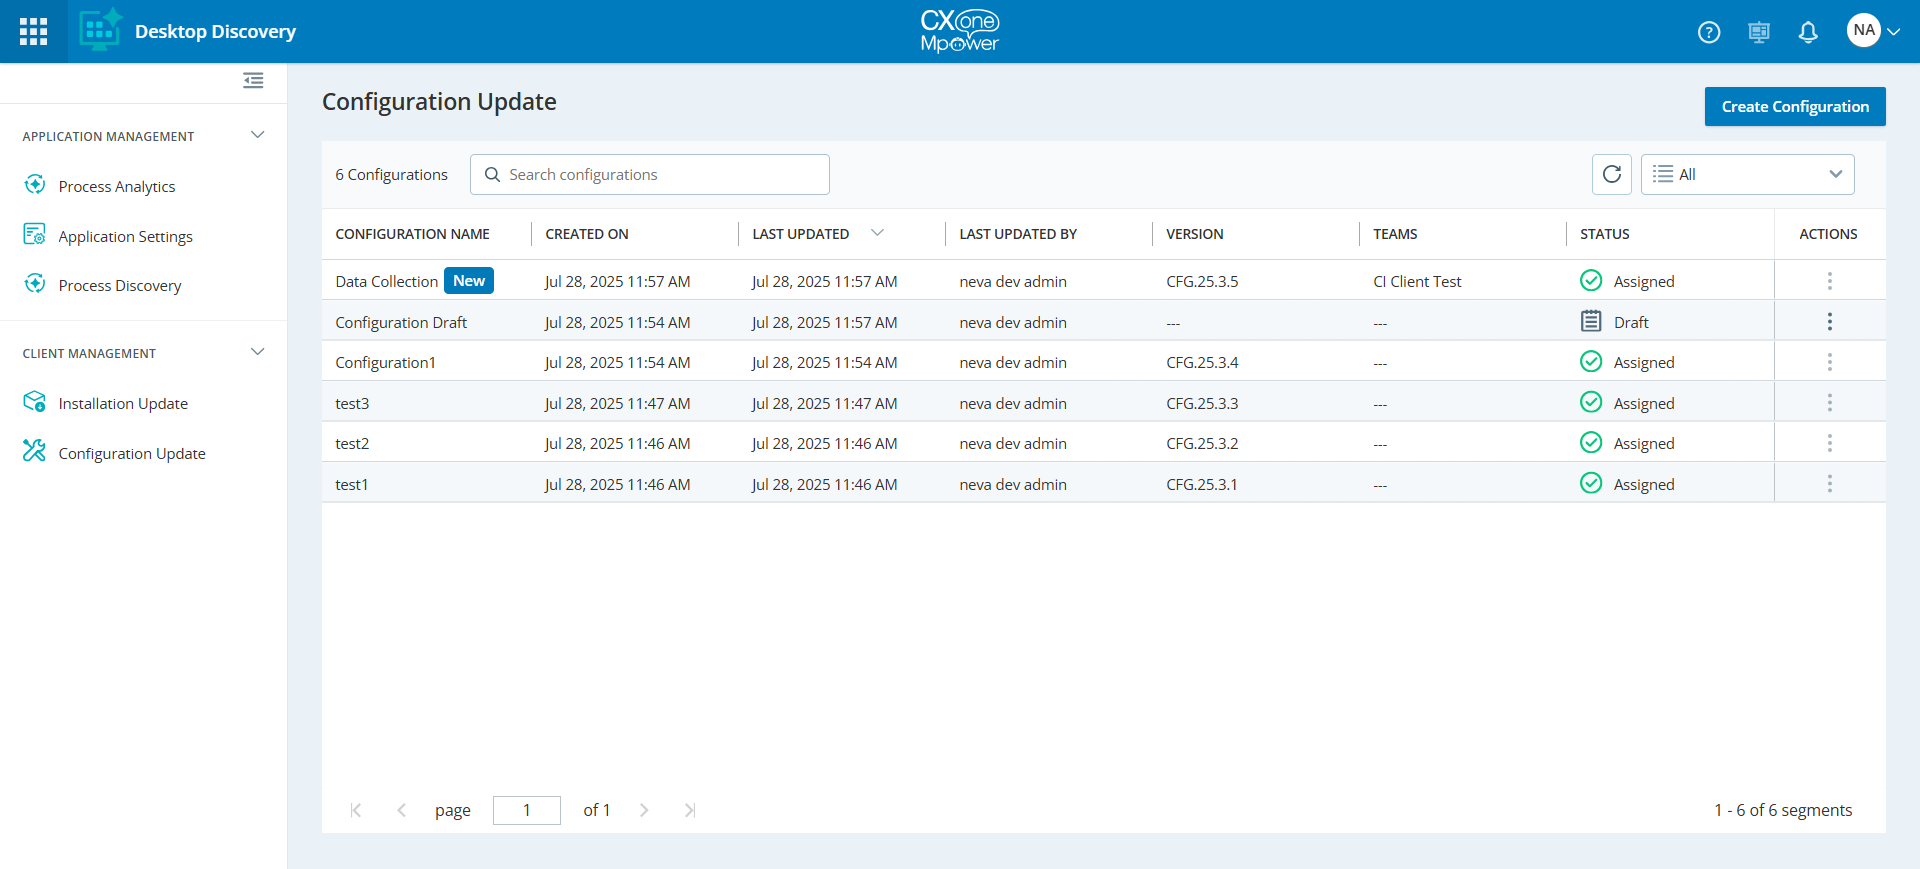
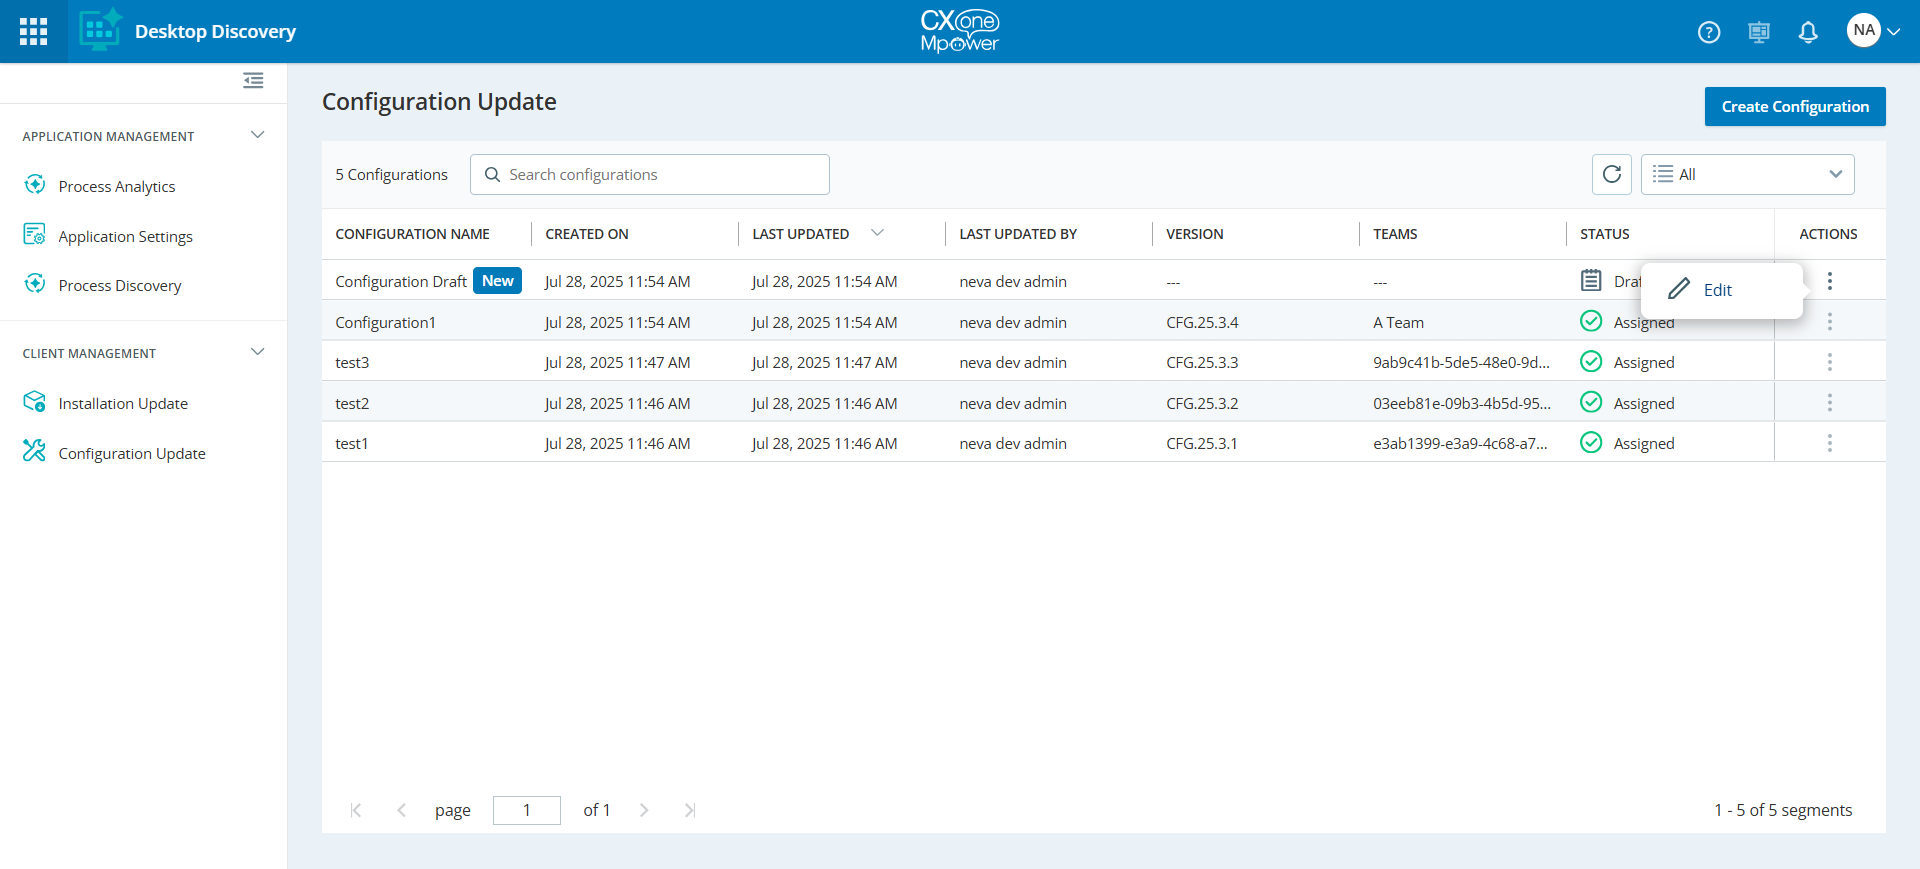
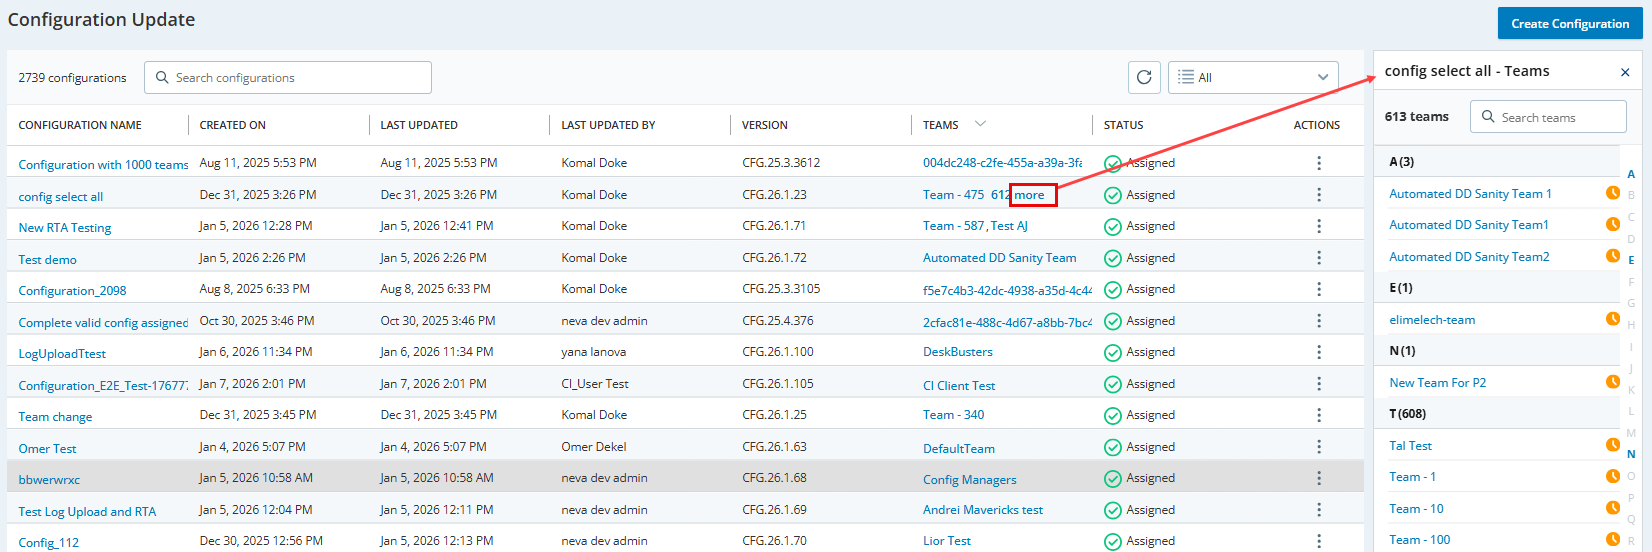
The Configuration Management page displays the following information:
|
Column |
Details |
|---|---|
|
Configuration Name |
The name of the configuration. |
| Created On | The date the configuration was created. |
| Last Updated | The last date of configuration modification. |
| Last Updated By | The user who last updated the configuration. |
| Version | The version of the configuration created. This version is automatically generated when the configuration is assigned. |
| Teams | Number of teams to which the configuration is assigned. To view the team details, see Team Details. |
| Status |
The current status of the configuration. The following options are available:
|
| Actions |
The following options are available:
|
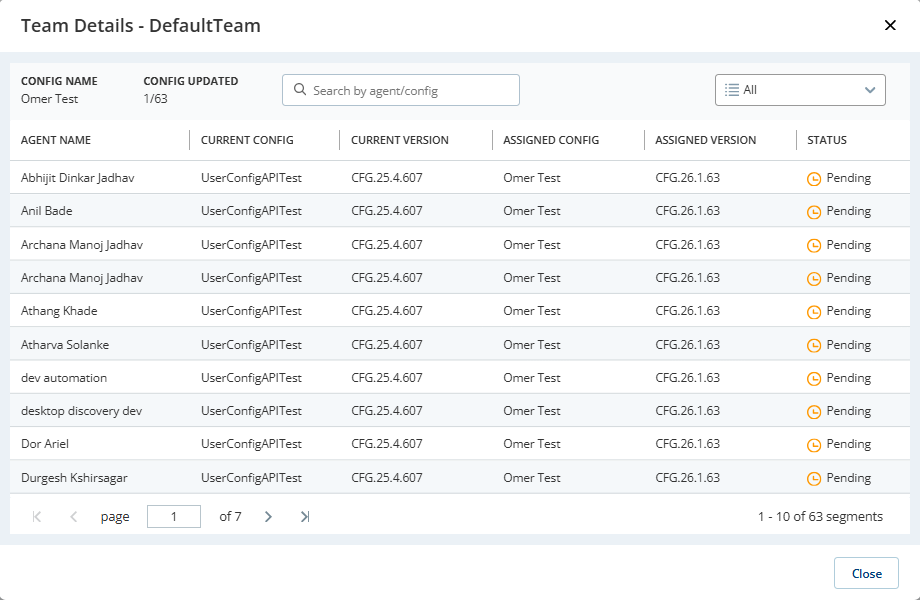
Team Details
The Team Details dialog displays the configuration details and status assigned to each agent within a team.
-
On the Configuration Update page, click the required team name next to the respective configuration.
If the configuration is assigned to more than two teams, user can click more to view the list of all teams, and drill-down on the individual team to view the configuration assignment status.
The Team Details dialog appears.
The page displays the following information:
-
Agent Name: Name of the agent.
-
Current Config: Name of the configuration currently applied by the agent.
-
Current Version: Version of the configuration currently applied by the agent.
-
Assigned Config: Name of the new configuration assigned by the Admin/Supervisor.
-
Assigned Version: Version of the new configuration assigned by the Admin/Supervisor.
-
Status: The current status of the assigned configuration at agent level. The following options are available:
-
Updated: When the agent has applied the latest assigned configuration.
-
Pending: When the agent has not applied the latest assigned configuration.
-
-
-
Click Close.
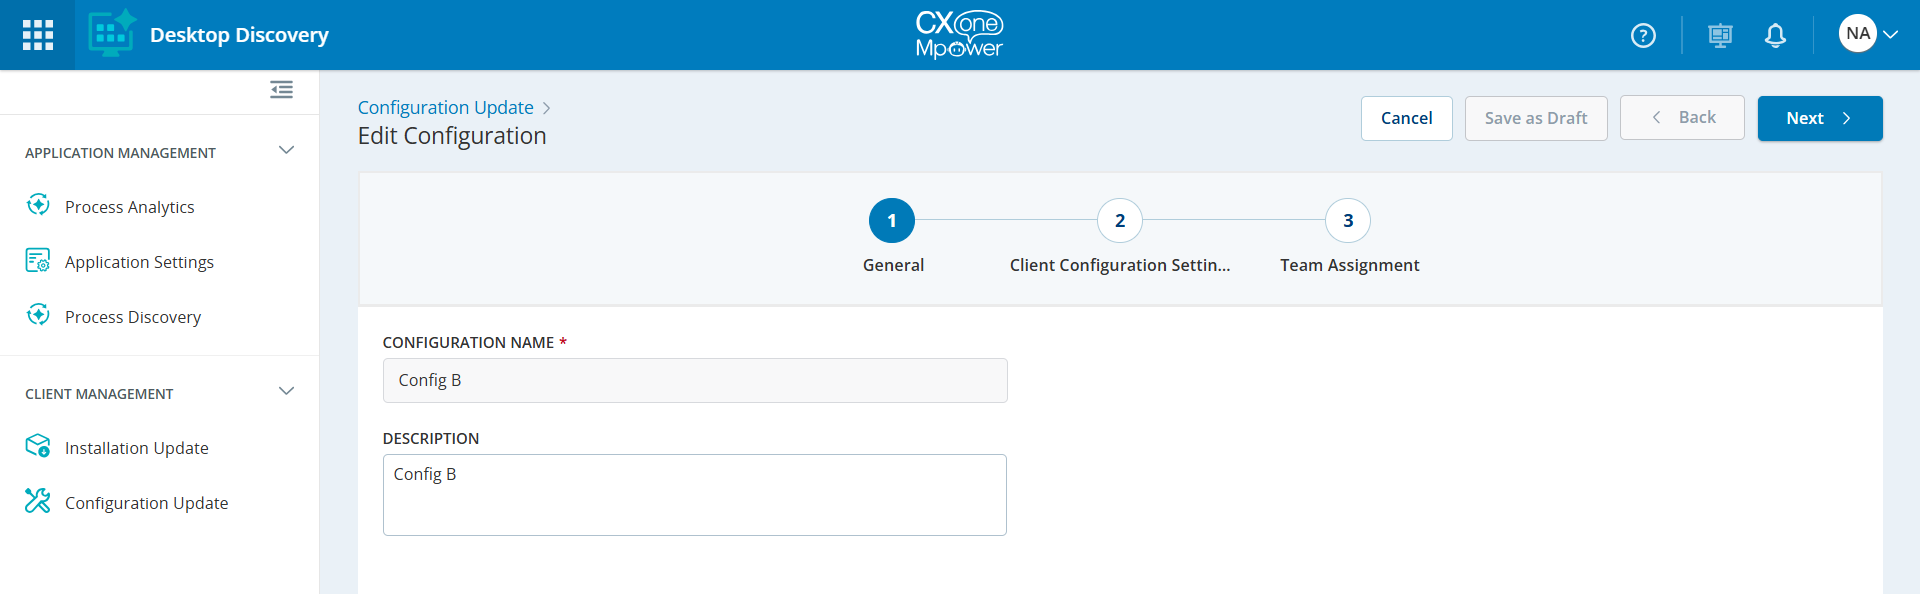
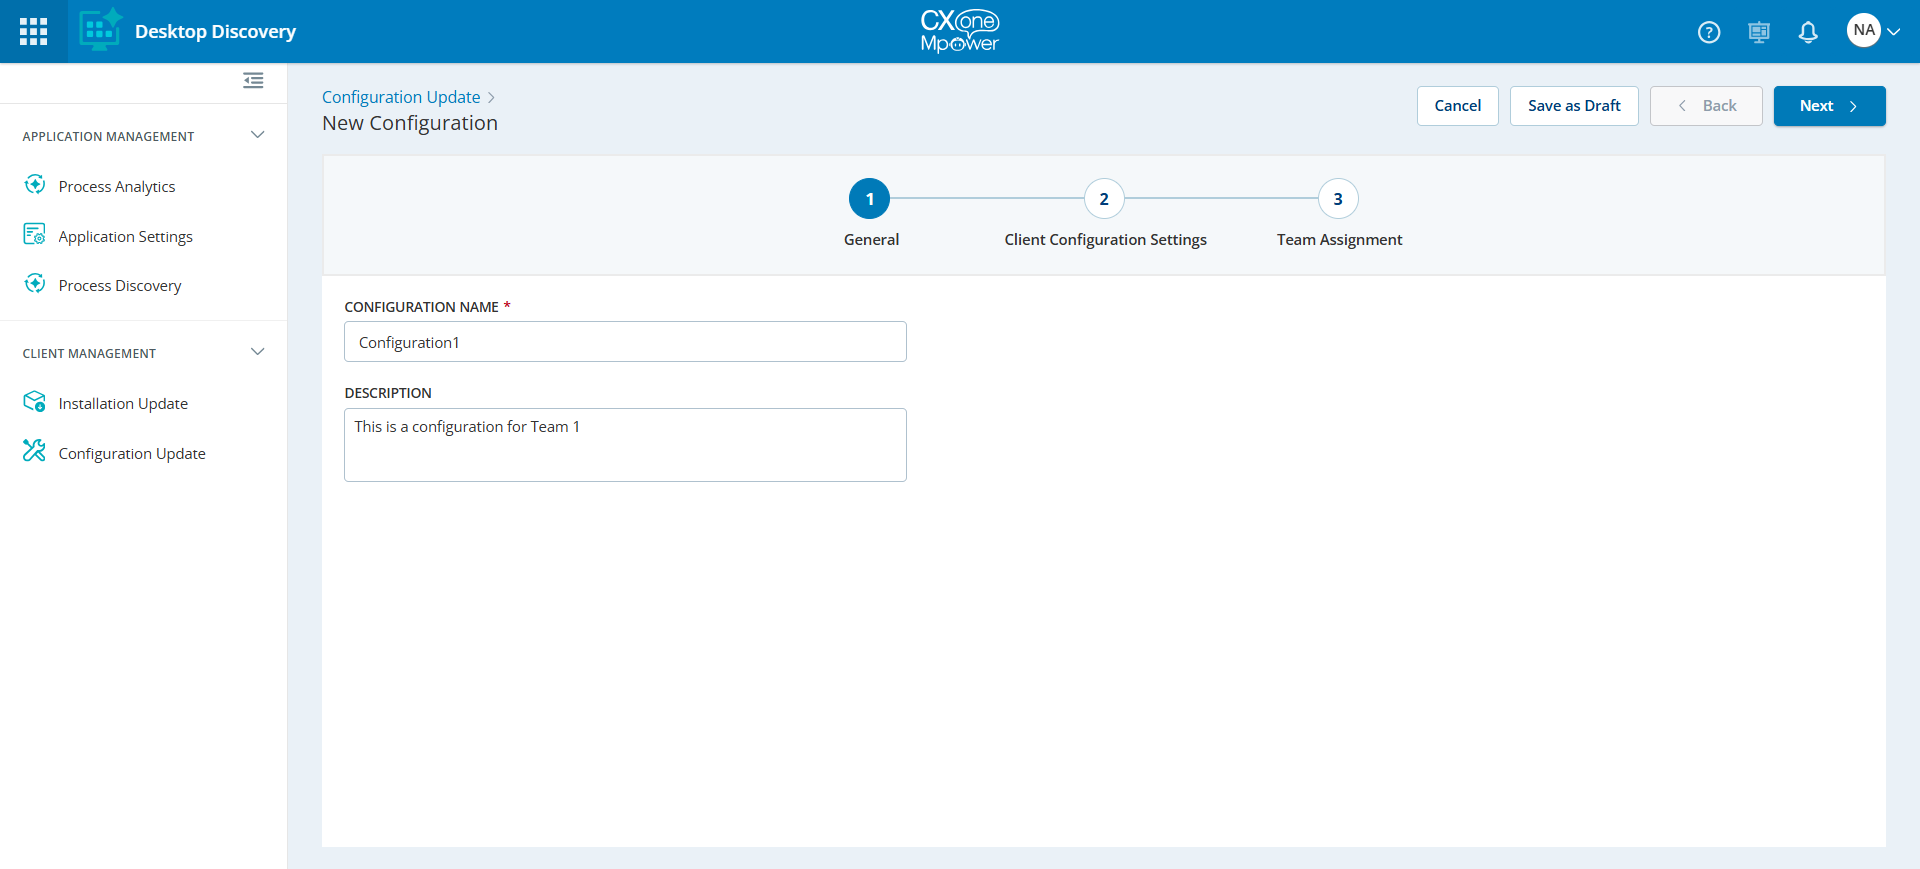
Create a Configuration
If you want to revert a configuration to its default version, create a new configuration file and assign it to the required teams without changing the configuration settings. This will restore the default configuration on the desktop discovery client.
-
Click Create Configuration at the top-right corner of the Configuration Update page.
-
On the General page, do the following:
-
Configuration Name: Type the name for the configuration. This is a mandatory field.
Guidelines for configuration name are as follows:
-
The configuration name can only contain letters, numbers, hyphens (-), and underscores (_).
-
The configuration name must be between 3 and 50 characters.
-
The configuration name cannot end with a period (.), hyphen (-), or space.
-
Space is allowed between two words (Example: My first test configuration).
-
Do not start or end with special characters: Avoid starting or ending names with a space, period, hyphen, or underscore.
-
-
Description: Type a brief description of the configuration.
-
-
Click Next.
-
On the Client Configuration Settings page, update the default configurations for the following parameters:
-
 Core Configuration
This setting displays the authentication and authorization URLs for the Desktop Discovery clients. This section is read-only and cannot be edited.
-
Desktop Discovery URL: The CXone region and environment URL (production, test, and staging).
-
API Discovery URL: This URL sets the API URL before using the API. It is built from the environment URL.
-
Authorization URL: This URL sets the authorization URL. It is built from the environment URL.
-
Authorization Retry Interval: The time the system waits before trying authorization again. Two retries are allowed: the first after 60 minutes, and the second after 120 minutes.
-
Feature Modules: Modules available for this configuration.
-
-
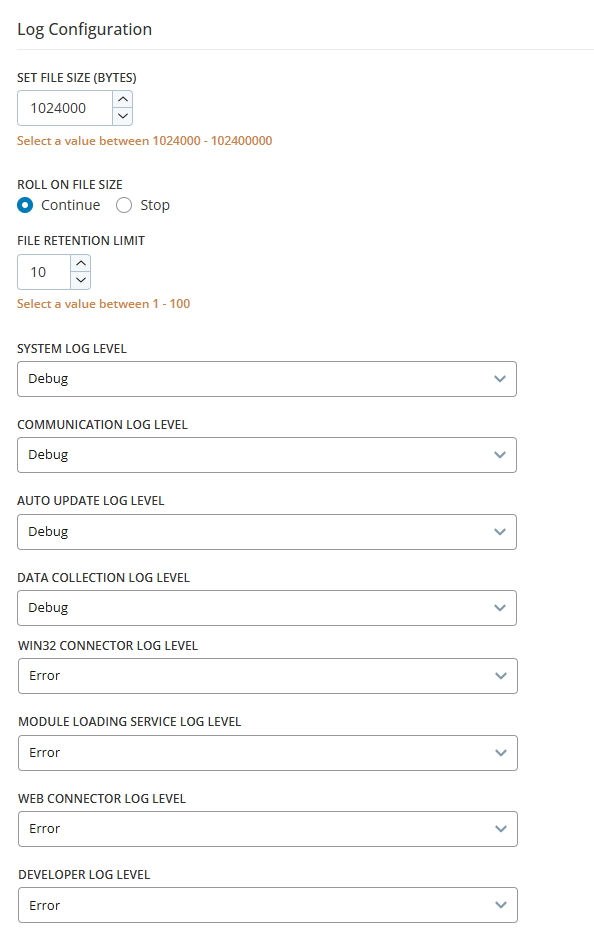
Log Configuration
This section contains configuration parameters for managing Desktop Discovery Client log files.
-
Set File Size (Bytes): This setting defines the maximum log file size before creating a new file for continued logging. Once the log file exceeds this limit, a new file is generated. You can select a value between 1024000 and 102400000.
-
Roll On File Size: This setting determines whether the client should create a new log file when the file size limit (Set File Size (Bytes)) is reached. There are two options:
-
Continue: Select this option to ensure that a new log file is initiated once the current file reaches its size limit.
-
Stop: Select this option to stop creating a new log file once the current one reaches its size limit.
-
-
File Retention Limit: This setting defines the maximum number of log files to retain before the older ones are deleted. Once the set limit is exceeded, the client automatically removes the oldest log files to free up memory for new log files. By default, the client stores 10 log files. You can select a value between 1 and 100.
-
System: Sets the logging level for system-related logs.
-
Communication: Sets the logging level for the communication module.
-
Auto Update: Sets the logging level for the auto-update module.
-
Data Collection: Sets the logging level for the Data Collection module.
-
Win32 Connector: Sets the logging level for the Win32 Connector module.
-
Module Loading Service: Sets the logging level for Module Loading Service.
-
Web Connector: Sets the logging level for the Web Connector module.
-
Developer: Sets the logging level for Developer components.
-
Utilities: Sets the logging level for Utilities components. For example: File operations and JSON operations.
-
Infrastructure: Sets the logging level for Infrastructure components.
-
Configuration: Sets the logging level for Configuration Update components.
-
Java Connector: Sets the logging level for Java Connector components.
-
Keyboard Hoo: Sets the logging level for Keyboard events.
-
Mouse Hook: Sets the logging level for Mouse events.
-
Realtime Adherence: Sets the logging level for RTA events.
The following options are available for the above log levels:
-
Error: Logs only critical issues that indicate an application or system component failure.
-
Debug: Logs general operational messages that highlight the progress and state of the application under regular operation.
-
Information: Logs detailed diagnostic valuable information for developers or administrators when troubleshooting problems.
-
-
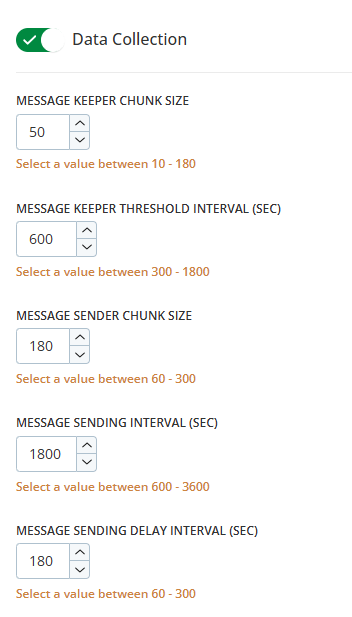
Data Collection
This setting controls real-time data collection. When the Data Collection toggle is ON, you can set specific values. Turning it OFF stops data collection for the team. To restart data collection, create and assign a new configuration with this toggle turned ON, then restart the Desktop Discovery client.
-
Message Keeper Chunk Size: Sets the number of messages stored in each chunk before processing. You can select a value between 10 and 180 actions. The default value is 50.
-
Message Keeper Threshold Interval (Sec): Time interval threshold for retaining new messages before triggering message keeper actions. You can select a value between 300 and 1800 seconds. The default value is 600 seconds.
-
Message Sender Chunk Size: Sets the batch size for sending messages to the server. You can select a value between 60 and 300 actions. The default value is 180.
-
Message Sending Interval (Sec): Time interval threshold for sending messages to the server. You can select a value between 600 and 3600 seconds. The default value is 1800 seconds.
-
Message Sending Delay Interval (Sec): Delay before initiating a send operation after data becomes available. You can select a value between 60 and 300 seconds. The default value is 180 seconds.
In the Desktop Discovery context, an action refers to the agent's activity, such as a mouse click or keyboard input. A message is a collection of these actions, each containing 50 actions by default. For more information, refer to Data Collection.
-
-
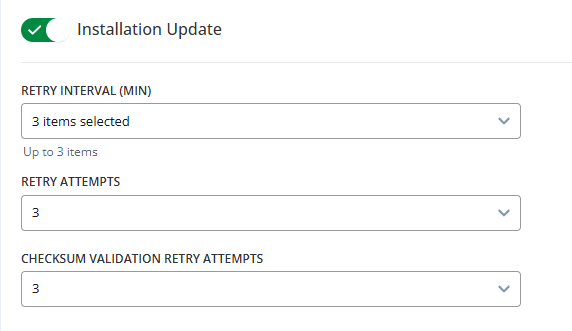
Installation Update
This setting controls updates for the Desktop Discovery Client. When the toggle is ON, you can configure update settings. When it's OFF, client updates are disabled for the team.
To restart client updates, create and assign a new configuration with this toggle turned ON, then restart the Desktop Discovery Client.
-
Retry Interval (Min): The time interval between each installation update retry attempt. You can select a time interval between 30 and 360 minutes, in steps of 30 minutes (30, 60, 90 minutes, etc.). You can select up to three different time intervals for these retries.
-
Retry Attempts: Number of times the system will retry an installation update on failure. You can select a value between 1 and 5.
-
Checksum Validation Retry Attempts: Number of retry attempts for checksum validation during installation update. You can select a value between 1 and 5.
-
-
Server Configuration
This setting controls configuration updates for Desktop Discovery Client.
-
Retry Attempts: Number of retry attempts to fetch the Desktop Discovery Client configuration if a previous attempt fails. You can select a value between 1 and 5. By default, the value is set to 3.
-
Retry Interval (Min): The time interval between each attempt to fetch the Desktop Discovery Client configuration. You can select a time interval between 30 and 360 minutes, in steps of 30 minutes (30, 60, 90 minutes, etc.). You can select up to three different time intervals for these retries.
-
-
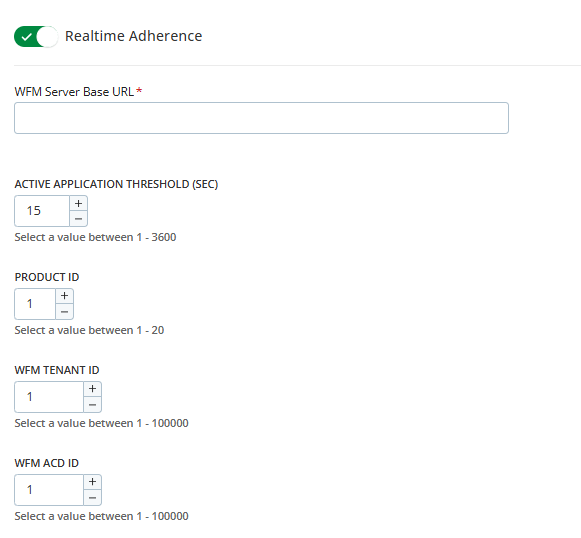
Realtime Adherence
This setting controls the transmission of real-time adherence data from the Desktop Discovery Client to Workforce Management (WFM).
-
When set to ON: You can configure the WFM server properties for the Real-Time Adherence (RTA) feed. Once enabled, all applicable mandatory fields must be filled before proceeding to the next step.
-
When set to OFF: The client does not send desktop events to WFM.
To restart the RTA feed, create and assign a new configuration with this toggle turned ON, then restart the Desktop Discovery Client. By default, this configuration is disabled.
-
WFM Server Base URL: The WFM server URL. This is a mandatory field.
This is usually fixed and defined as:
https://<WFM Server URL>:<Port>/path
For example: http://10.234.46.241/ascws/v1/api
-
WFM Tenant ID: The numeric identifier configured in WFM that specifies the tenant to which the agent belongs. This is a mandatory field.
-
WFM ACD ID: The numeric identifier configured in WFM that specifies the Automatic Call Distributor (ACD) to which the agent is assigned. This is a mandatory field.
-
Active Application Threshold (Sec): The minimum number of seconds between sending sampled data to the Workforce Management (WFM) system. Data is transmitted only when this threshold is exceeded. By default, the value is set to 15.
-
Product ID: The numeric identifier configured in WFM. It represents the assigned product ID for the Desktop Discover Client. By default, the value is set to 1.
-
-
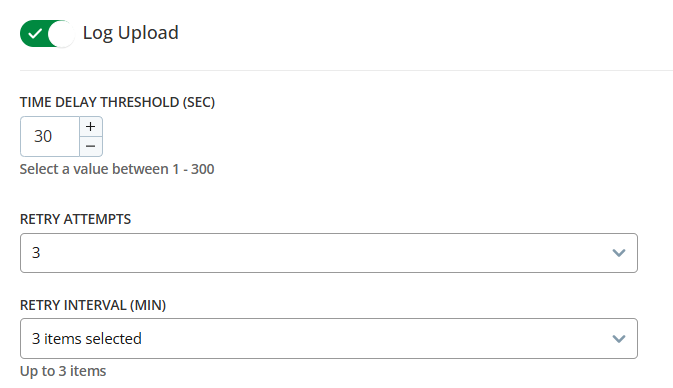
Log Upload
This setting controls whether log files from the agent’s workstation, where the Desktop Discovery Client is installed, are uploaded to a secure, centralized S3 bucket. Only the NiCE Internal Support team has access to this bucket.
-
When set to ON: Log file uploads are enabled.
-
When set to OFF: No logs are uploaded.
By default, this setting is disabled.
This configuration is available only to users with specific roles, such as admin and supervisor.
-
Time Delay Threshold (Sec): The number of seconds after the last modification of a log file before it is considered closed and ready for upload.
-
Retry Attempts: Number of retry attempts to re-upload a file if the initial attempt fails. You can select a value between 1 and 5. The default is 3.
-
Retry Interval (Min): The number of minutes between retry attempts. You can select a value between 30 and 360 minutes, in increments of 30 minutes (30, 60, 90, and so on). You can select up to three different time intervals for these retries.
-
-
-
Click Next.
-
On the Team Assignment page, assign the relevant teams to the new configuration.
-
Click
 icon to add a team.
 -
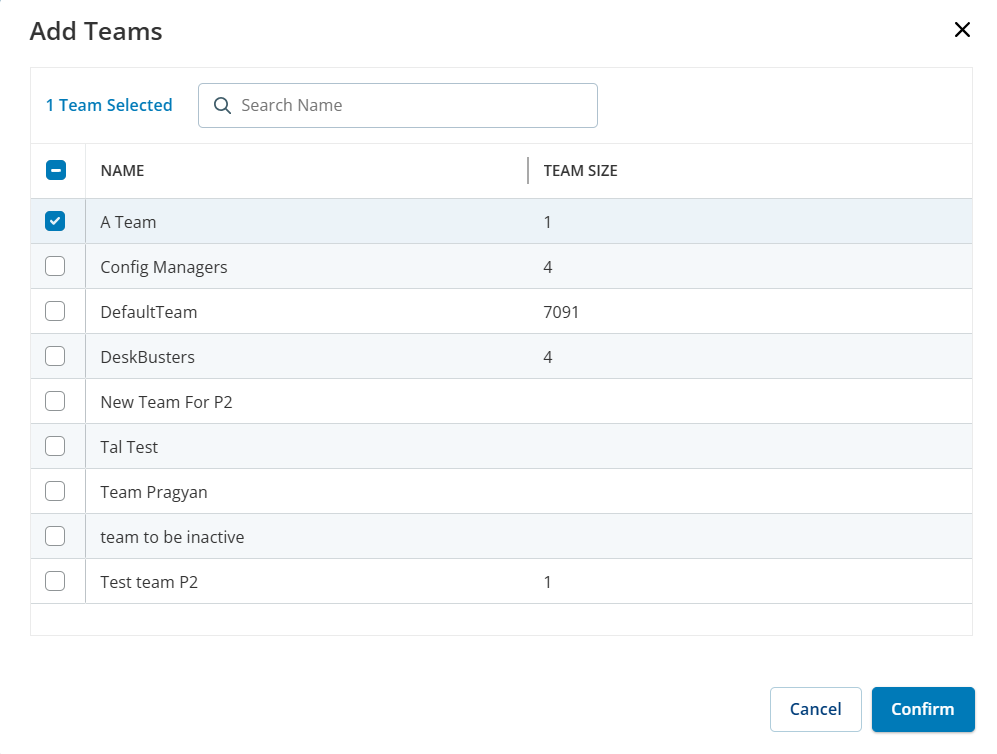
In the Add Teams dialog, select the check-box next to the team name you want to add. You can select multiple teams.
To select all teams, select the check-box in the Name column.
-
Click Confirm.
The configuration is assigned successfully to the selected team.
-
(Optional) Click Edit Team to add or remove any team from the list of selected teams. To remove a team, click
 icon next to the team name.
 -
Click Submit.
The configuration is now created and appears in the list of configurations on the Configuration Update page.
-


Create a Configuration Draft
-
Refer to steps 1-4 from Create a Configuration.
-
On the Configuration Settings page, click Save as Draft.
The configuration draft is created and shows up with the status Draft on the Configuration Update page. You can edit it. For more details, see Edit a Draft Configuration.
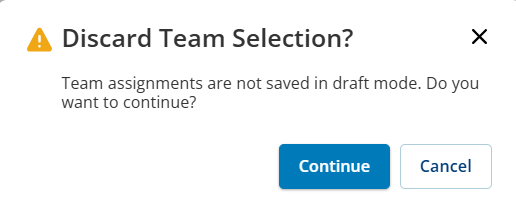
If you go back and save the configuration as a draft, the added teams will not be saved.
On the Discard Team Selection message dialog, do one of the following:-
Click Continue to discard the team selection and save the draft configuration.
-
Click Cancel to go back to the previous page.
-
Edit a Draft Configuration
You can edit a configuration with the status Draft.
-
Go to Workforce Engagement > Desktop Discovery > Client Management > Configuration Update.
-
In the Actions tab, click
 icon next to the configuration name.
 -
Click Edit.
The Edit Configuration page appears which enables you to edit the configuration settings.