

You can create and upload a calling list manually, or you can work with your NiCE CXone account representative and Professional Services to enable Proactive XS. Proactive XS uses Studio scripts to automatically pull contact information from your CRM. After Personal Connection (PC) dials calls, send texts, or sends emails, the Studio scripts check the contacts back in to the CRM with the interactions and interaction attempts recorded.
While not a mandatory part of the setup process, you can set up automatic rules for deleting or expiring calling lists, which helps you meet storage requirements and prevents additional billing for extra storage. The NiCE CXone system can keep up to 1,000,000 total active records (both calling records and do not call records) at once. If your upload passes these thresholds, your upload will fail and return an error message.
You can use the same calling list to call and text contacts, but you can't use the same list to handle phone interactions and email interactions. As an alternative, you can upload the same calling list twice to use one for phone interactions and another for email interactions.
Complete each of these tasks in the order given.
Create a Calling List
Required permissions: Calling List Create
Calling list files can't exceed 256 MB in size or 500,000 records. Smaller calling lists result in faster upload and fresher records. Each individual record in a calling list cannot exceed a length of 512 Unicode characters. Calling list uploads support Unicode UTF-8 encoding, which includes Chinese characters and all other languages. If you're creating or editing calling lists in Microsoft Excel, take care to preserve the UTF-8 encoding format.
NiCE CXone strips the formatting from phone numbers in calling lists and stores the phone numbers in a universal format. This allows phone numbers to pass between calling lists and do not call (DNC) lists without conflict.
- Open a spreadsheet editor or a text editor.
- You can use the first row to label your columns. This helps with automatic field mapping when you upload the calling list. If you're using a text editor, decide whether to separate the values with commas or tabs.
-
Create the columns for your list.
For a Proactive Voice calling list, you must have a unique identifier column and a phone number column.
For a Proactive SMS calling list, you must have a unique identifier column and an SMS phone number column.
For a Proactive Email calling list, you must have at least an external identifier column and an email address column.
 Learn more about other system fields you can map to
Field
Details
External ID Required. An alphanumeric string that is the unique identification of the record. Score
A relative numeric value you can use to sort records a certain way. For example, if you want PC to dial one record before another, you could give the first record a Score of 1 and the second record a Score of 2 and sort the calling list by score.
Customer Field 1 and 2 A numeric value you can use for any purpose. For example, it could be an alternate record ID or an amount due.
These fields are not a method for creating custom fields in the agent application. To do that, configure the Custom Display fields in List Management PC skill parameters.
Caller ID The phone number you want to display as the caller ID for this contact. The number here replaces the default caller ID value set in the skill. This number can be a 10-digit number, NANP format, or E164+ phone numbers. You are required by law to display a valid phone number that contacts can use to reach you. Priority A boolean value that indicates whether the record is a priority record. Compliance Required A boolean value that indicates whether the record requires compliance handling. Time Zone The time zone of the contact. You can use either the full name or the list of approved abbreviations for the time zone.
- AFT: Afghanistan Time
- AKST: Alaska Standard Time
- AST: Atlantic Standard Time
- ACST: Australian Central Standard Time
- AEST: Australian Eastern Standard Time
- AZOST: Azores Summer Time
- CVT: Cape Verde Time
- AMT: Caucasus Standard Time
- CST: Central Standard Time
- BTT: Bhutan Time
- BST: British Summer Time
- CET: Central European Time
- CEST: Central Summer European Time
- SBT: Soloman Islands Time
- BIT: Baker Island Time (Dateline)
- EAT: East Africa Time
- EAST: Easter Island Standard Time
- EEST: Eastern European Summer Time
- ESAST: E. South American Standard Time
- EST: Eastern Standard Time
- EET: Eastern European Time
- EGST: Egypt Standard Time
- YEKT: Yekaterinburg Time
- FJT: Fiji Time
- GMT: Greenwich Mean Time
- GNST: Greenland Standard Time
- GST: Gulf Standard Time
- HST: Hawaiian-Aleutian Standard Time
- IST: Indian Standard Time
- IRST: Iran Standard Time
- IST: Israel Standard Time
- KST: Korea Standard Time
- MYT: Malaysia Time
- MST: Mountain Standard Time
- MMT: Myanmar Standard Time
- NCAST: N. Central Asia Standard Time
- NPT: Nepal Standard Time
- NZST: New Zealand Standard Time
- NST: Newfoundland Standard Time
- KRAT: North Asia Standard Time
- IRKT: North Asia East Standard Time
- PST: Pacific Standard Time
- PSAST: Pacific SA Standard Time
- RST: Romance Standard Time
- MSK: Russian Standard Time
- SAEST: SA Eastern Standard Time
- SAPST: SA Pacific Standard Time
- SAWST: SA Western Standard Time
- SMST: Samoa Standard Time
- THA: SE Asia Standard Time
- SAST: South Africa Standard Time
- SLT: Sri Lanka Standard Time
- TIST: Taipei Standard Time
- TAST: Tasmania Standard Time
- TST: Tokyo Standard Time
- PHOT: Tonga Standard Time
- VLAT: Vladivostok Standard Time
- AWST: W. Australia Standard Time
- ECT: W. Central Africa Standard Time
- WET: W. Europe Standard Time
- PKT: West Asia Standard Time
- WPST: West Pacific Standard Time
- YAKT: Yakutsk Standard Time
Preview Required A Boolean value that indicates whether the record requires preview handling. This setting will be ignored when Deliver Numbers Serially is enabled in the PC skill or when the record is being delivered as a callback. Agent Requests a specific agent to speak with the contact. The value is the agent ID. Override Finalization A boolean value overriding the system finalization reason. Use it to upload a record that was previously finalized and continue dialing it. If you map this column and set a contact record to False and any previous final outcomes exist for the record on this skill, PC rejects the record.
If you don't map an Override Finalization column, you can override finalized records by re-uploading them as long as the record was finalized more than two hours ago. If you upload a record that was finalized less than two hours previously, PC rejects the record.
Overriding finalized records can corrupt reporting. If you want to place additional calls as a follow-up to a previous interaction, you should upload the record to a new skill and manage it as a new interaction effort.
Call Request Date/Time The date and time when PC begins delivering a scheduled callback to a skill or agent. The field contains both the date, time, and time zone in the following format: MM/DD/YYYY HH:MM:SS [-H:MM|Z].
Call Request Stale Minutes The number of minutes after the Call Request Date/Time that PC continues to try to deliver a call request before retiring it. After the stale time expires, PC finalizes the record and no longer attempts it. Expiration Date The date and time when the contact record expires. PC ceases all attempts to reach the contact after the specified date and time. This is an optional field that overrides the expiration date configured for the skill and the Batch Expiration Date configured for this calling list. Start Time The number of minutes after midnight PC begins dialing the record. For example, if you want PC to begin attempting the record at 8:00 AM in a record's respective time zone, set the value in the calling list to the value of 480. If you map this field to a calling list, PC ignores the default start time for any applicable records.
End Time The number of minutes after midnight the dialer stops dialing the record. For example, if you want PC to stop attempting the record at 12:00 PM in a record's respective time zone, set the value in the calling list to 720. If you map this field to a calling list, PC ignores the default end time for any applicable records.
-
Enter the data for each record in its own row.
- Save the file in one of the approved formats shown in the following images.
XL or XLS.
Comma-delimited TXT or CSV
Tab-delimited TXT or CSV
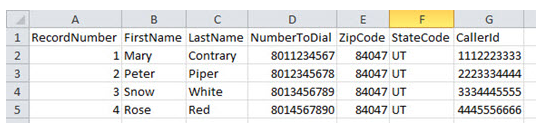


Create Custom Fields
Create custom fields to map columns from your calling list to fields that are not hard-coded in the system. System fields include address, agent, call request date/time, call request stale minutes, caller ID, city, compliance required, confirmation required, customer field 1 and 2, expiration date, external ID, first name, last name, notes, override final statuses, phone number, priority, score, state, time zone, and zip. See Filter Calling Lists for details about what each of these fields is for.
These instructions cover any custom field types besides phone numbers (voice or SMS) and email addresses. For instructions for creating those types of custom fields, see Create Custom Phone Number or Email Address Fields.
Learn more about fields in this step
|
Field |
Details |
|---|---|
| Type | The type of field you want to create. Options are:
|
|
Value Required |
Available for fields with Type set to Boolean, Date, Decimal, Integer, or Value String. Every record in the calling list must have a value for this field. Selecting Value Required disables the Default field, so any contacts with null values in the corresponding column fail the list processing step of the calling list upload process. |
| Default |
Available for fields with Type set to Boolean, Date, Decimal, Integer, or Value String. Sets a default value for the field. When a calling list does not specify a value for the field, NiCE CXone automatically applies the value provided here. |
-
Click the app selector
 and select ACD.
 -
Go to Lists > Custom Data Definitions.
-
Click Create New.
-
Enter a Field Name. Don't give a custom field the same name as a system field. If you plan to make the field visible to agents, make the name readable by adding spaces. If you're using this field as a script variable, you cannot use spaces. If you want the field to be both a script variable and visible to agents, you can use underscores to improve readability or create two mappings to the same field.
- Select a field Type.
-
If you want to set a default field value and your selected Type supports it, enter the Default value. The value you entered applies to all records that don't specify a value for that field.
-
If your selected Type supports it and you want to prevent the system from assigning a default value to contacts without an assigned value for the field, select Value Required.
-
Click Add.
Create Custom Phone Number or Email Address Fields
The hard-coded system fields include 1 phone number field and no email address fields. If you're including an email address or more than one phone number for each record in the calling list, you must create custom fields for the email address and each additional phone number.
Learn more about fields in this step
|
Field |
Details |
|---|---|
| Type | The type of field you want to create. Options are:
|
| Caller ID | Available for fields with Type set to Phone or SMSPhone.
Sets a previously created custom field as the number displayed on the caller ID for the contact. To create a caller ID field with custom data definitions, create a Value String field and set the value to a phone number. |
| Compliance |
Available for fields with Type set to Phone or SMS Phone. Links the phone number to a compliance field. You can select Compliance Required to always require compliance for this custom phone number, or you can create a custom field with a Type of Boolean and link it to the phone number to only require compliance for some records. For example, if you're creating a custom field called WorkPhone, you might also want to create a field called WorkPhoneCompliance that handles the compliance for work numbers on a per-record basis. |
| Attempts |
Available for fields with Type set to Phone or SMS Phone. Sets a previously created custom field as the maximum number of times PC attempts the number before retiring it. |
| Description |
Available for fields with Type set to Phone, SMS Phone, or Email. Sets a previously created custom field as the text description of the phone number or email address field. For example, in a record in your contact list, you may want to add note that a phone number belongs to the contact's spouse. |
| Start Time | Available for fields with Type set to Phone, SMS Phone, or Email.
Sets a previously created custom field as the start time in the allowable contact time range for the phone number or email address. To create a start time field with custom data definitions, you must create an Integer field and set the value to the number of minutes after midnight that you want NiCE CXone to start attempting to reach the phone number or email address. For example, to set the start time to 8:00 AM in a record's respective time zone, you would create a new IntegerType custom field definition and set the value to the number of minutes past midnight that 8:00 AM is: 480. |
| End Time | Available for fields with Type set to Phone, SMS Phone, or Email. Sets a previously created custom field as the end time in the allowable contact time range for the phone number or email address. To create an end time field with custom data definitions, you must create an Integer field and set the value to the number of minutes after midnight that you want NiCE CXone to stop attempting to reach the contact. For example, to set the end time to 12:00 PM in each record's respective time zone, you would create a new IntegerType custom field definition and set the value to the number of minutes past midnight that 12:00 PM is: 720. |
| Constraints | Available for fields with Type set to Phone and SMS Phone.
Sets the default allowable time ranges for calling or sending SMS messages. You can create different windows for weekdays and weekends, and each one can have multiple time ranges. Because these constraints set the default calling time ranges, values specified for Start Time and End Time fields override the Constraints. |
-
Click the app selector
and select ACD. -
Go to Lists > Custom Data Definitions.
-
If you're creating a new phone or SMS field and want to have associated caller ID, compliance, attempts, description, start time, or end time fields, create those fields first. The associated fields have the following requirements:
Field
Requirements
Caller ID Value StringType Compliance
BooleanType
Attempts IntegerType Description IntegerType Start Time IntegerType. This setting overrides the default value if you set one. End Time IntegerType. This setting overrides the default value if you set one. -
Click Create New.
- Enter a Field Name and select the Phone, SMSPhone, or Email Type.
-
If you created an associated caller ID, compliance, attempts, description, start time, or end time field to apply to this field, select them in their respective fields.
- If you're creating a Phone or SMSPhone field and you want to set default allowable time ranges for calling or sending SMS messages to contacts, use the Contraints fields. You can create different windows for weekdays and weekends, and each can have multiple time ranges. Because these constraints set the default calling time ranges, the constraints you specify are overridden by values of Start Time and End Time, if you set up related fields.
-
Click Add.
Upload Calling List
Required permissions: Calling List Create
If you want to use the same calling list for both Proactive Email and either Proactive SMS or Proactive Voice, you must upload the calling list twice and assign one instance to a phone ACD skill Used to automate delivery of interactions based on agent skills, abilities, and knowledge. and the other to an email skill.
If you're re-uploading a calling list after making critical updates, stop the associated ACD skill. Restart the ACD skill when you're done uploading calling lists.
-
Click the app selector
and select ACD. -
Go to Lists > Calling.
-
Click Select File.
-
Read the compliance agreement and click Accept to continue.
-
Enter a List Name. Select the Upload New radio button if you want to select a new list from your computer, or Select Existing if you want to modify a list you already uploaded.
If uploading, click Choose File. If modifying, type the File Name or click Browse. Find and select the calling list you want to upload or use. Configure any optional fields as needed.
Learn more about fields in this step
Field
Details
List Expiration Date The date the calling list is removed from NiCE CXone. This setting doesn't affect the expiration of the individual records in the list. To set the expiration date for the records in the list, use the Batch expiration date field in the next step of the upload wizard. Skill If you want to assign the calling list to a specific ACD skill Used to automate delivery of interactions based on agent skills, abilities, and knowledge., select one from the Skill drop-down. You cannot upload the list to a Proactive SMS skill if there is no message template assigned to the skill.Start Skill When Completed
The Skill you selected starts automatically when NiCE CXone finishes processing the calling list.
- Click Next.
- If you used the first row of your calling list to label the columns, select Use First Row as Column Names next to Header. Review the automatic mapping done by PC, map any unmapped fields, and configure time zone handling and an expiration date. Learn more about fields in this task
Field
Details
No time zone found? The action NiCE CXone takes if it can't use calling list data to map a time zone to the record. NiCE CXone checks the record first for a time zone, then a zip code, then a city and state, and finally the area code of the primary phone number.
If NiCE CXone can't match a time zone to the record, it takes the action you specify here:
- Reject: Removes the record from eligibility for dialing.
- Select time zone: Attaches a default time zone to the record. Use the drop-down to select the default time zone.
If you live outside of North America, or if you believe the automatic time zone mapping won't work for your calling list, designate the appropriate time zone for each record on your list. See Time Zone for a list of time zone abbreviations and full names.
Batch expiration date The default expiration date for all records in this batch. Once the contact expires, PC no longer attempts to reach that contact. You can specify expiration dates for individual records in the calling list by including an expiration date column in the calling list itself and then mapping the column to the Expiration Date field.
The expiration occurs at the beginning of the date you select (12:00 AM).
-
If it's not already done for you, map your phone numbers and email addresses in Map Destinations. Add and remove destinations as needed.
If you map a phone field to a specific ACD skill, it appears under the cadence options for that skill. If you don't want to include a specific phone number in the Maximum Attempts or cadence calling order, don't map those phone number to fields. Once you map the field, you can't remove it from the cadence settings.
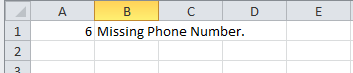
- When the file uploads, PC displays the progress and the number of records that loaded successfully and unsuccessfully. If the calling list contains invalid records, use the following steps to fix the errors.
Click Download Link in the warning box that appears.
Open the file to view the problems with the upload. In this example, the record in row 6 doesn't have a phone number:
- Fix the problem in the calling list and save it.
- Upload the updated file.
Filter Calling Lists
Required permissions: Skills Edit
Filters restrict records in your calling list so only records matching certain criteria are attempted. They apply to all calling lists associated with an ACD skill Used to automate delivery of interactions based on agent skills, abilities, and knowledge.. Filters apply to uploaded lists that result from the Proactive XS Create Prospects v2 action in Studio.
Filtering, do not call (DNC) lists, and call suppression are similar tools that should be used for different situations. The following list highlights the unique differences between these 3 features:
- Call Suppression — intended to suppress calls to entries of a calling list based on unique criteria in the calling list (not specifically a phone number). You can set a unique disposition for a call suppression record to indicate the purpose of the call being suppressed. This feature includes a start and end date for the call to be suppressed, and is intended to suppress calls for the duration of a campaign (or longer). For example, if an organization lost licensing for the state of New York, they could suppress calls to New York until re-establishing their licensure. Any suppressed call could be dispositioned with a unique "NYLicenseLapse" disposition.
- Do Not Call (DNC) List — used to stop calls to a specific phone number. DNC lists are intended to be permanent solutions for contacts who request not to be contacted.
- Filtering — intended to filter certain calling list entries within the scope of a campaign. For example, if an organization wanted to increase productivity to hit a monthly quota early in a campaign, they could temporarily filter out low-probability prospects to focus on high value prospects. The organization still intends to contact low-probability prospects, but not necessarily right now. Another common situation for filtering is for severe weather impacts, such as tornadoes or hurricanes.
You configure each filter statement individually based on one operand. You can configure multiple statements to create a more complex filter. Each filter statement builds upon the last with an unspecified 'and'. While the filtering tool doesn't support 'or' between statements, you can use the In operator to produce a similar result as explained in the following steps.
-
If filtering isn't already enabled for your business unit, enable it.
-
Click the app selector
and select ACD. -
Go to ACD Configuration > Business Units.
-
Click Edit in the Details tab.
-
In the Outbound Strategy section, select Enable Filtering.
-
Click Done.
-
-
Click the app selector
and select ACD. -
Go to Contact Settings > ACD Skills
-
Click the skill you're modifying to open it.
-
Click the Parameters tab.
-
Click Configure or Edit for the Filter section.
-
Select the Active checkbox.
-
Select or clear the Exclude Priority Records and Exclude Callback Records fields as needed and choose an Apply Option.
When the dialing queue pauses or resets due to your selected Apply Option, agents receive a notification that says "Please Wait — The system is identifying the best records to call."
Learn more about fields in this step
Field
Details
Exclude Priority Records The filter doesn't apply to records with a priority Skill-based designation of the importance of contacts that determines delivery order. flag.Exclude Callback Records
The filter doesn't apply to records marked as callback
Holds a customer's place in queue and automatically calls the customer when they move to the front of the queue..Apply Option How you want this filter to affect the dialing queue when you click Apply. The options are: - None: The filter applies to new records as they're uploaded, but it doesn't affect the existing dialing queue.
- Stop skill until filter is applied: The skill stops while the filter is applied to the existing records and the dialing queue is regenerated.
- Do not feed queue until filter is applied: No new numbers are added to the dialing queue until the filter is applied to it. After that, all records added to the dialing queue have the new filter applied.
- Flush queue immediately: The queue empties and the dialing queue starts fresh with the filter applied.
- If you want to use filters from another PC skill, click Copy From Another Skill. Select the skill you want to copy filters from and click OK.
- To add a new filter condition, click Add Condition.
From the Column drop-down, select the mapped calling list field that you want to use to filter the calling list .
Select the Operator you want to use to compare the selected Column to a value.
Enter or select the Value you want to compare with the Column you chose.
If you upload a calling list without specifying record values for a system field, the records receive the default values. When you filter by that system value, the filter considers that default value for those records.
Learn more about fields in this stepField
Details
Column The calling list field that filters the list. It can be a system field or a custom field. System fields include:
- Address: String value. The default value is a blank string.
- Agent: String value. The default value is a blank string.
- Call Request Date/Time: Supports a date value. The default value is null.
- Call Request Stale Minutes: The maximum number of minutes after the Call Request Date/Time a call should be attempted. Together, Call Request Stale Minutes and Call Request Date/Time create a calling time range. Supports a decimal value. The default value is 0.
- Caller ID: Supports a string value. The default value is a blank string.
- City: Supports a string value. The default value is a blank string.
- Compliance Required: Whether the record requires compliance handling. Supports a boolean value. The default value is false.
- Confirmation Required: Whether the record requires agents to manually accept the call prior to dialing. Supports a boolean value. The default value is false.
- Customer Field 1 and Customer Field 2: A number that can apply to any custom field your organization wants to use. Supports a decimal value. The default value is false.
- Expiration Date: The date and time when contact record expires and no more attempts are made on it. Supports a date value. The default value is null.
- External ID: Supports a string value. The default value is a blank string.
- First Name: Supports a string value. The default value is a blank string.
- Last Name: Supports a string value. The default value is a blank string.
- Notes: Supports a string value. The default value is a blank string.
- OverrideFinalizationStatuses: Overrides the system finalization reason. Supports an integer value. The default value is 0.
- Phone Number: Supports a string value. The default value is a blank string.
- Priority: Supports a boolean value. The default value is false.
- Score: A relative numeric value you can set to sort records in a custom way. If you set one record to 1 and another to 2, the record set to 1 receives a call before the record set to 2. Supports an integer value. The default value is 0.
- State: Supports a string value. The default value is a blank string.
- Time Zone: Supports a string value. The default value is a blank string.
- Zip: Supports a string value. The default value is a blank string.
Operator
How the Column relates to the Value. The list of options changes based on your Column selection.
A record is added to the dialing queue if:
Equal: Column is the same as the Value. For example, if Column is Last Name and Value is Johns, the filter accepts Johns and excludes Johnson.
Not Equal: Column is not the same as the Value. For example, if Column is Last Name and Value is Johns, the filter accepts Johnson and excludes Johns.
Greater than: Column has a greater numeric value than the Value.
Greater than or Equal: Column has the same value as or greater value than the Value.
Less than: Column has a lower numeric value than the Value.
Less than or Equal: Column has the same value as or lower value than the Value.
Like: Column is similar to the value of Value.
Contains: Column contains the value of Value. For example, if Column is Last Name and Value is mit, the filter accepts Smith and Mithoff but excludes Johnson.
Starts with: Column begins with the value of Value. For example, if Column is Last Name and Value is Johns, the filter accepts Johns and Johnson and excludes Smith.
Ends with: Column ends with the value of Value. For example, if Column is Last Name and Value is son, the filter accepts Johnson and excludes Johns and Smith.
Not Like: Column is not similar to the value of Value.
Not Contains: Column does not contain the value of Value. For example, if Column is Last Name and Value is o, the filter would exclude Johnson and accept Smith.
Not Starts with: Column does not begin with the value of Value. For example, if Column is Last Name and Value is Johns, the filter accepts Smith and excludes Johnson.
Not Ends with: Column does not end with the value of Value. For example, if Column is Last Name and Value is mith, the filter accepts Smith and excludes Johnson.
In: Column matches any of the values of Value. In supports 'or' logic between statements. For example, if you set Column to State, Operator to In, and Value to 'UT','NY','CA', then the filter would accept only records where the contact's state is one of Utah, New York, or California.
Not in: Column doesn't match any of the values of Value. Not In supports 'or' logic between statements. For example, if you set Column to State, Operator to Not In, and Value to 'HI','AK', then the filter would accept all records where the contact's state is not Hawaii or Alaska.
Value The value you're matching against the Column. -
Click Preview. A pop-up displays the number of records that remain in the queue if you apply the filter.
- Repeat the process to add any other filters you want to apply to the dialing queue. Remember that filters have 'and' behavior, so all filters apply to the list at the same time.
-
Remove filters you no longer want to apply by clicking the remove icon to the left of the filter.
-
Click Apply.
Sort Calling Lists
Required permissions: Skills Edit
By default, PC sorts calling list records in the following order:
- Callbacks Holds a customer's place in queue and automatically calls the customer when they move to the front of the queue.
- Priority Skill-based designation of the importance of contacts that determines delivery order.-flagged records
- Fresh records
- Non-fresh records, such as retries
You can sort the calling list based on custom criteria.
-
Click the app selector
and select ACD. -
Go to Contact Settings > ACD Skills.
-
Click the PC ACD skill
Used to automate delivery of interactions based on agent skills, abilities, and knowledge. you want to modify. - Click the Parameters tab.
- If you are sorting the calling list for a Proactive Voice or Proactive SMS skill and want to add or remove fresh, non-fresh, or callback records from your calling list, select or clear the corresponding checkboxes in General Settings. To do so:
- Click Edit in the General Settings parameters.
- To add or remove callbacks, fresh records, or non-fresh records, select or clear Load Callbacks, Load Fresh, or Load Non-Fresh, respectively.
- Click Done.
-
Click Edit in the List Management parameters.
-
Add new sorting criteria by clicking Add under List Ordering Options. When the Add List Order Type form appears, select an Order Type from the drop-down. Specify whether you want the list to sort in ascending or descending order according to the order type with the Sort Order. Click OK.
Learn more about fields in this step
Field
Details
Order Type The category you want to use to sort calling list. You can choose from the following: - Attempts: Number of times the record has been dialed.
- Preview Required: Whether the record requires the agent to manually accept the call before dialing.
- Compliance Required: Whether the record requires compliance handling.
- Created Date: Date and time of the record's creation. This is the only configured order type by default.
- Customer Field 1: Data in the field you specified for Display Field 1 in Agent UI Displayed Fields.
- Customer Field 2: Data in the field you specified for Display Field 2 in Agent UI Displayed Fields.
- Score: The relative numeric value you gave the record compared to others.
- Priority: Whether or not records have been flagged for priority handling.
- Random: Random. This is applied to all order types as the last criterion unless you select six criteria.
- External ID: External IDs assigned to the records.
- Contact Source: List source designation assigned during the upload.
Sort Order
Whether the records are sorted in ascending (Asc) or descending (Desc) order.
-
Remove any sort criteria you no longer want to use by selecting the corresponding checkbox and clicking Delete.
-
Use the up and down arrows to prioritize the sort criteria.
-
Click Done.