

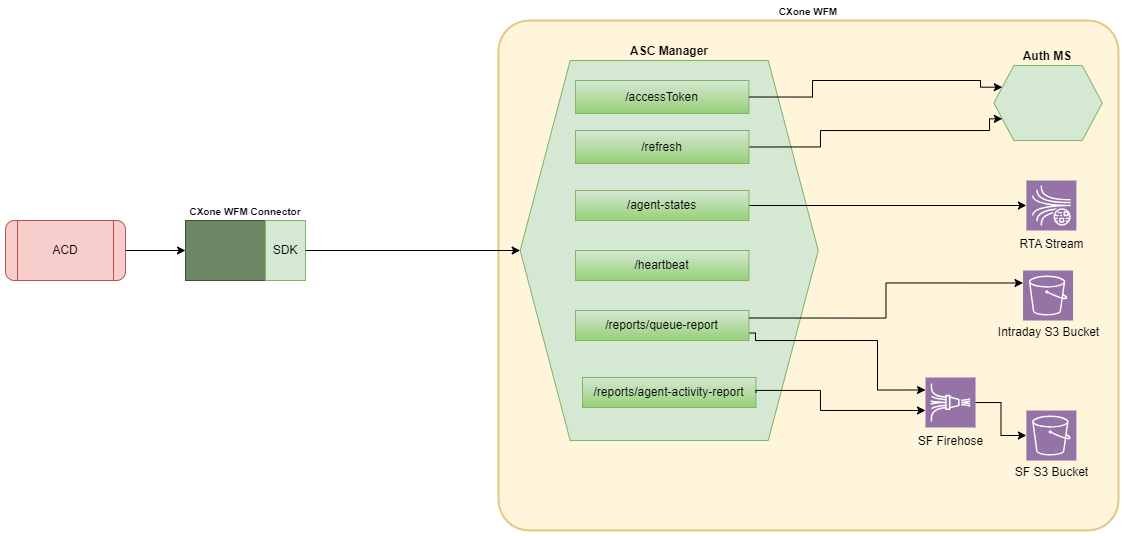
The Zendesk agent state connector connects to CXone Mpower WFM via SDK for data integration. This includes both Real Time Adherence(RTA) and historical data.
How each type of data is used in WFM:
-
Historical skill-based data: This is used in the Forecasting.
-
Historical adherence data: This is used in the Adherence Report and in the CSV report you export from the Real Time Adherence.
-
Intraday data: This is used to monitor skill performance and compare with forecasted data in the Intraday Manager.
-
Real-time agent states data: This is used to calculate Real Time Adherence and show it on the RTA.
Functional Description
Here is a breakdown of what Zendesk ASC supports:
-
Real-time data:
Data
Support
RTA Yes Method of Integration RESTFUL APIs
Reason Codes Yes
-
Historical data:
Data
support
Skills Yes Method of Integration RESTFUL APIs Interval Setting 15 minutes -
Data types:
data
support
Inbound Voice No Outbound Dialer No Email yes Chat
Yes
Fax
No
Text (SMS)
Yes
Web
Yes
-
Historical adherence:
data
support
Agent Activity Log Historical adherence data is pulled every 15 minutes -
Reports:
Reports
support
Agent Adherence Report Yes Real Time Adherence Yes -
Other information
LOGON ID SUPPORTED User ID
Steps to installing the Zendesk ACD Connector:
Generating the Access Key
The access key grants the Zendesk ACD access to CXone Mpower. You generate the key in CXone Mpower and later enter it when running the installation wizard.
Create a specific user for ACD Integration. This user’s Access Key information will be used for the integration. Do not assign any permissions to this user.
The following steps need to be performed by the Admin to obtain the Access Key details for this user:
To generate the access key:
-
Create a role for the Zendesk connector In CXone Mpower:
-
Click the app selector
 and select Admin.
 -
Go to Security > Roles and Permissions.
-
Click New Role, and enter a relevant name for the role. For example, Role for Zendesk ACD.
-
Remove all permissions for the role.
-
Save & Activate the role.
-
-
Create an employee for the Zendesk connector:
-
Click the app selector
and select Admin. -
Click Employees.
-
Click New Employee and enter a relevant name for the employee. For example, name the employee Zendesk ACD.
-
From the Primary Role drop-down list, select the role you just created for the connector.
-
In the General tab, deselect all the attributes.
-
Create the connector employee. Activate the employee account by clicking the Activate Account button in the activation email (the Access Keys tab will only appear after you create the account).
-
-
Open the connector employee again, then go to the Access Keys tab and generate an access key.
-
Copy both the Access Key ID and Secret Access Key. Save them in a text file and share it with the user, integrating the APIs.
If you don't copy the Secret Access Key or lose it, you'll need to create a new one.
Use this access key ID and secret access key when integrating the connector.
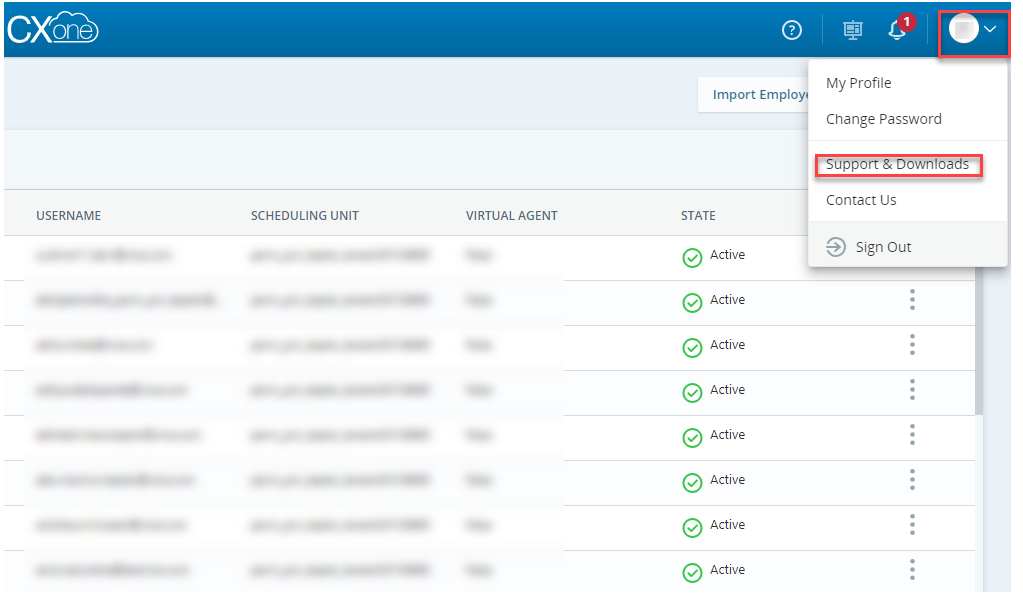
Download and Configure SDK
To download and import SDK:
-
In the CXone Mpower application, proceed to your profile and click on it.
-
Click on Support and Downloads.
-
Find the CXone Mpower WFM SDK listed under External ACD and click Download.
-
Import the downloaded SDK into your ACD project.
To configure SDK:
-
Follow these steps for application initialization.
 See steps
var(--codeSnippetCopyLabel)
See steps
var(--codeSnippetCopyLabel)WFMConnectionConfig wfmConnectionConfig = new WFMConnectionConfigBuilder()
.setServiceUrl("<Provide Service URL>")
.setAccessKey("<provide Access Key>")
.setSecretKey("<Provide Secret Key>")
.build();
WFMConnection wfmConnection = WFMConnection.getConnection(wfmConnectionConfig);
wfmConnection.connect();This will initialize the required class to connect to the WFM to send the data. The data include:
-
Agent states
-
Agent activities
-
Queue report.
-
-
Once initialized, use these classes to transmit agent states, agent activities, and queue reports.
See steps
var(--codeSnippetCopyLabel)// send Agent States
AgentStateListDTO agentStateListDTO = generateAgentStateDTO(); // Add implementation for method generateAgentStateDTO()
AgentStatesService agentStatesService = AgentStatesServiceImpl.getInstance();
try {
agentStatesService.processAgentStates(agentStateListDTO);
} catch (CXoneWfmException e) {
WFMReportResponseDTO wfmReportResponseDTO = e.getResponse();
// implementation to read error response
}
// send Agent Activity report
try {
ReportService reportService = ReportServiceImpl.getInstance();
AgentActivityReportDTO agentActivityReportDTO = generateAgentActivityReportDTOForAgentActivity(); // add implementation for this method generateAgentActivityReportDTOForAgentActivity()
reportService.processAgentActivityReport(agentActivityReportDTO);
} catch (CXoneWfmException e) {
WFMReportResponseDTO wfmReportResponseDTO = e.getResponse();
// implementation to read error response
}
// send Queue report
try {
ReportService reportService = ReportServiceImpl.getInstance();
ReportDTO reportDTO = generateQueueReportDTO(); // Add implementation for method generateQueueReportDTO()
reportService.processQueueReport(reportDTO);
} catch (CXoneWfmException e) {
WFMReportResponseDTO wfmReportResponseDTO = e.getResponse();
// implementation to read error response
}
For the ACD integration with CXone Mpower WFM, it's mandatory to provide the below within queue report:
-
Agent Queue Report
-
Agent System Performance Report
If there is no Activity for Agent Queue Report, Agent System Performance Report, add JSON object with empty array.