

Time-Off Planning
The Time Off Manager module is used to plan and manage time off for agents. Time Off Manager uses time-off rules to determine how time off is accrued. Time off can accrue based on a given number of days per year, or a percentage of hours per month.
A time-off rule can include one or more activity code. Once you have created rules, you can manage them directly from the Rules page.
When an agent requests time off, they can check their balance and see how many days they have available, per the rules you defined.
You can also review and approve time-off requests directly from WFM, in the Requests page.
Understanding how Full Day Time Off Requests are calculated:
-
Option 1: Weekly Rule
-
If the schedules have not been generated and published, the full-day time-off deduction is based on the Full Day Settings in the Advanced tab of the Weekly Rule configuration.
If the Full Day Settings has 8 hours defined, then 8 hours will be deducted for a full day request when the request is submitted for a day or date range where schedules have not been generated and published.
-
If the schedules have been generated and published, the full-day time-off deduction is based on the daily rule with the greatest shift length (minus non-working hours) mapped to the Weekly schedule assigned to the agent.
If the greatest shift length daily rule within the weekly rule (assigned to the agent) is 9 hours (with a one-hour lunch), then 8 hours will be deducted (9 hours minus 1 hour of non-working time).
The Working Hours attribute must not be checked in the Lunch activity code configuration.
The Working Hours attribute must be checked in the Open activity code configuration.
-
-
Option 2: FTE Value
-
Uses a fixed FTE value that is defined in the Time Off Rule and is used to determine how much time to deduct for a full day request.
-
Create Time-Off Rules
Creating rules for time off is done in the Time-Off Planning section.
-
Click the app selector
 and select WFM.
 -
Go to Time-Off Planning > Rules.
-
In the top right of the Rules page, click New Rule.
-
Enter a Name.
-
Select which Scheduling Unit you want to create the rule for. All agents in the scheduling unit will be assigned to the rule.
-
Select one or more Activity Codes.
-
You can assign multiple time-off activity codes to a single time-off rule. This allows you to manage related activities, such as Vacation and Unpaid Time Off, within the same rule instead of creating separate rules.
-
Use the Activity Code Settings tab to add activity codes and configure carryover and allotment settings for each activity. At least one activity code is required to create a rule.
-
-
Select Start and End to define the starting date of the rule and by when it should end, respectively. The rule start date will always be the 1st of the month, even if the selected start date is not the 1st.
-
Select the Renewal Period. This is the time after which the number of days allotted are renewed, within the policy period.
For example, if the start date of a policy is January 1, 2024 and the end date is December 31, 2025 with a renewal period 1 month. In this case, in the beginning of every month, that is the 1st of every month the policy will be renewed till December 31, 2025.
-
Select the Allow carry over checkbox if you want remaining days off at the end of the business year to carry over into the next year. Enter the number in the Max Carry Over field. These day can be carried over immediately after the renewal period or a specific days after the renewal period.
For example, Anne has 12 allotted vacation days. By the end of the year, she still has 5 remaining days off. Instead of these days being deleted when the new business year begins, if carry over is enabled, then Anne will begin the new business year with 5 additional days off for her personal use.
If you edit Carry Over values for a scheduling unit and activity code that are part of an active time-off rule with Allow Carry Over set to false, the changes cannot be reverted, reset, or rerun.
To update the values, manually edit them in the Summary page.
-
Define the Allotment of days to the scheduling unit for the activity.
-
If you select Fixed amount, enter a fixed number of Days Per Year.
This is the total allotted time for each of the members in the scheduling unit.
You can also define how many of those days, if they remain at the end of the year, can be carried over to the next year. Enter the number in the Max Carry Over field.
-
If you select Seniority based, a slider appears, and you can define a different number of days off for agents based on how many years they have worked at the company.
Use the Seniority slider to define the number of years, then enter the number of Days Per Year for that level of seniority.
You can also define how many of those days, if they remain at the end of the year, can be carried over to the next year. Enter the number in the Max Carry Over field.
Click the Plus sign to add more levels.
You can define up to five seniority levels.
-
Select the Time off accrual box. Enter a percentage of days off from your agents' yearly allotment that they will accrue per month.
If you don't define a value, then the accrual is equally distributed.
-
Click Save.
The rule is activated and will appear in the Rules page.
Edit Time-Off Rules
When the rule is active, only the rule name and end date can be edited. If the rule is set for a future date, all fields can be edited.
-
Click the app selector
and select WFM. -
Click the Time-Off Planning rule that you want to edit.
-
Select an End date of the rule.
-
Click Save.
The rule is edited and will appear in the Rules page.
Reset Carryover Process
Note: This feature is available with the Basic license.
You can use the Reset Carryover Process to undo the automatic carryover of time-off values. This option clears the last carryover values and updates the Last Carry Over column in the Time-Off Summary page to blank. Resetting helps you correct inaccuracies that occur when a carryover is applied with incorrect rules or when time-off activities are incorrectly maintained on the schedules.
Any manual edits made to Last Carry Over values in the Time Off Summary page can be undone via Reset, as well.
You can only reset carryover for Active rules where carryover is allowed, and the process has already run.
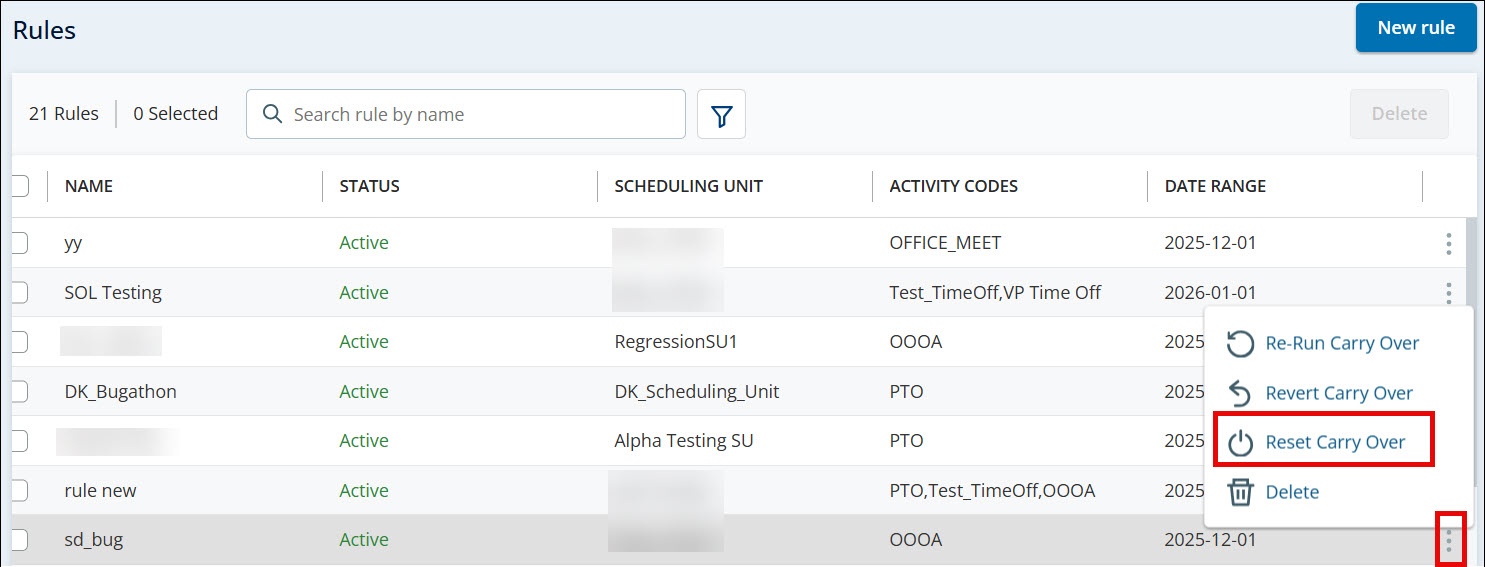
Refer to the following steps to Reset Carryover:
-
Go to Time-Off Planning and open the Rules page.
-
Locate the rule for which you want to reset carryover.
-
Click Reset Carry Over.
-
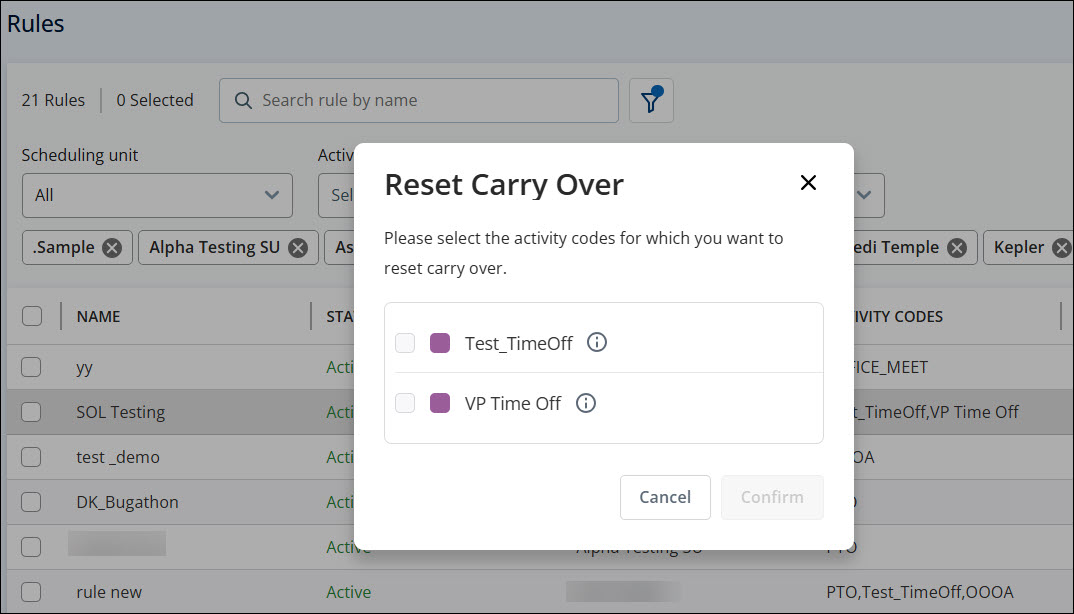
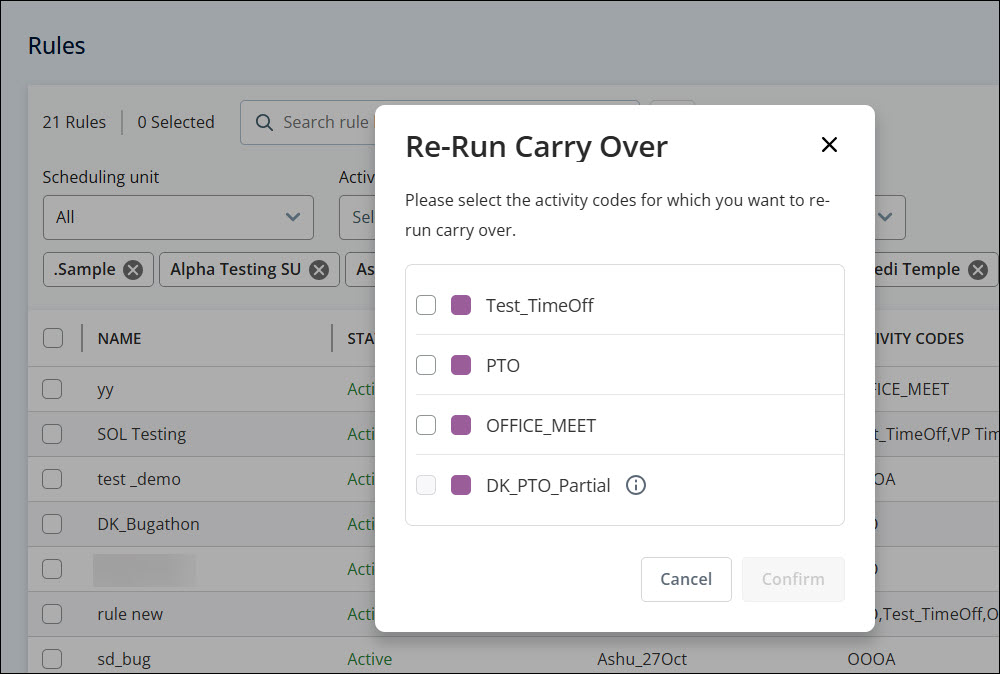
In the Reset Carry Over dialog, select the activity codes you want to include.
-
Click Confirm to rerun the carryover for the selected activity codes.
A message will be displayed when the reset initiation is successful. The message will be visible in the lower right corner of the page.
After Reset:
-
The Carry Over column in the Time-Off Summary page will be blank.
-
You can make adjustments to correct time off activities on the schedules and rerun carryover if needed (Advance license required for rerun).
Error Messages and Validation
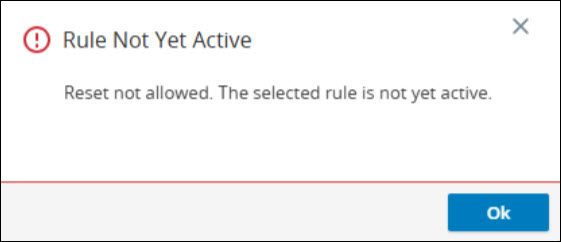
Reset is not allowed if:
-
The rule is not active.
-
Carryover is not permitted by the rule configuration.
-
Carryover process was not previously run.
If a rule does not qualify, you will see the following error message:
-
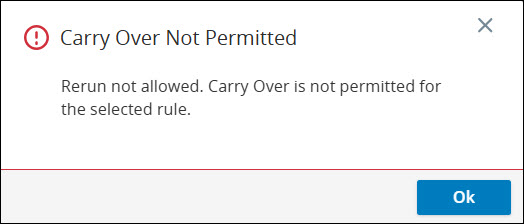
Carry Over Not Permitted: Reset not allowed for this rule.

-
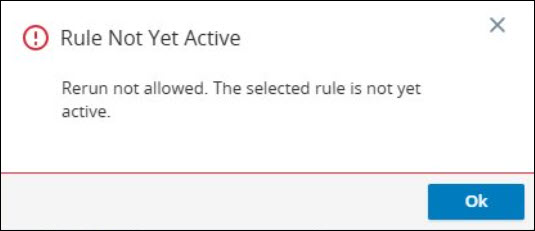
Rule Not Yet Active: Reset not allowed because the rule is inactive.
-
Renewal Period Incomplete: Reset not allowed because the rule hasn’t completed a renewal period.
Rerun Carryover Process
Note: This feature is available with the Advanced license.
Use the Rerun Carryover option to run the carryover process again after making necessary adjustments. This overwrites previous carryover values, ensuring that time-off allotments are accurate and aligned with your policies.
You can only rerun carryover if:
-
The rule is Active.
-
Carryover is allowed by the rule configuration.
-
The initial carryover process has completed.
Refer to the following steps to Rerun Carryover:
-
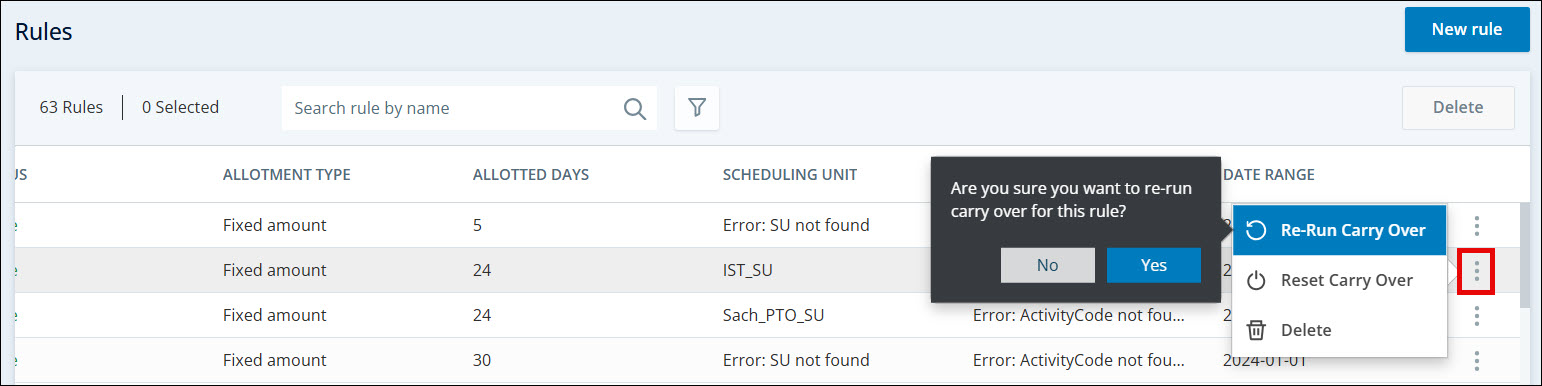
Go to Time-Off Planning and open the Rules page.
-
Locate the rule for which you want to rerun the carryover.
-
Click Re-Run Carry Over.
-
In the Re-Run Carry Over dialog, select the activity codes you want to include.
-
Click Confirm to rerun the carryover for the selected activity codes.
After Rerun:
-
The rerun process overwrites previous carryover values.
-
A message appears when the rerun is initiated:
-
“Re-run initiated successfully. You’ll receive a notification once processing is complete.”
-
-
A notification appears when the rerun completes:
-
“Re-run Carry Over Completed – Carry Over rerun for rule completed successfully.”
-
Error Messages and Validation
Rerun is not allowed if:
-
The rule is not active.
-
Carryover is not permitted by the rule configuration.
-
The initial carryover process was not previously run.
If a rule does not qualify, you will see the following error message:
-
Carry Over Not Permitted: Rerun not allowed for this rule.
-
Rule Not Yet Active: Rerun not allowed because the rule is inactive.
-
Renewal Period Incomplete: Reset not allowed because the rule hasn’t completed a renewal period.
View Allotted Time Off
The Summary page gives you a breakdown of the different types of activities for which you defined time off. By default, it is filtered by your scheduling unit. You can remove the filter to see the full list, or filter on other scheduling units. You can view the data in either Days or Hours:Mins format.
For each activity, you can see a list of agents who have time off allotted for that activity.
The Allotment Type column and filter are no longer available in the Time‑Off Rules grid. With support for multiple activity codes per rule, each activity code can use a different allotment type. Because a single allotment type cannot be accurately represented at the rule level, the column and filter were removed.
You can only see the users in the scheduling units (or teams) you have permission to see in the view assigned to you.
Each agent's number of earned, used, scheduled, and remaining days are listed. You can also see how many days or hours were last carried over when the new business year began.
Select an Activity Type on the left to view the list of agents with time off allotted for that activity.
You can filter the list by Agent to quickly find time-off information for a specific person. The agent filter applies across all pages, so results are not limited to the current page.
Export Time-Off Data
You can export time-off data based on scheduling unit and activity for easy review.
-
Click the app selector
and select WFM. -
Go to Time-Off Planning > Summary.
-
Select either Days or Hours:Mins.
-
Click the Actions
 icon at the top right of the page, and select Export.
 -
Select Scheduling Units and Activity Types. Time-off data will be exported only for your selection.
You must select at least one scheduling unit. If you don't select an activity, the data for all activities will be exported.
-
Click Export.
-
 The data is downloaded to your computer as a CSV file. Expand to see which fields are included.
-
Scheduling Unit
-
Activity type
-
Employee
-
Employee's allotment
-
Number of days earned
-
Number of days used
-
Number of days scheduled
-
Remaining days
-
Last carry over
-
Change an Employee's Time Off
Time-off rules are great for allotting time off on a wide scale, but what do you do if you want to edit a specific agent's time-off allotment?
You can use the summary page to directly edit an agent's allotment, without affecting anyone else's time off.
Keep in mind, if you change an agent's allotment, and then edit the time-off rule they belonged to, their time off will not be updated by the rule.
To manually edit time-off:
-
Click the app selector
and select WFM. -
Go to Time-Off Planning > Summary. Use the toggle at top right to view the time-off in either Days or Hours:Mins.
-
Select the Activity Type for the agent you want to edit.
-
Find the agent. You can use the search bar to find them more quickly.
-
Click on the number in the agent's Days Per Year column. Edit the number directly inline and press Enter.
-
Click Save.
Once you edit an agent's number of allocated days, they are removed from the time-off rule for that activity. Any changes you make to the time-off rule will not affect the agent. At the end of the year, the allocated days for the agent will reset, and they will be included in the time-off rule once again.
Conversion of hours to days and back to hours
Consider a scenario where a user enters 45 hours per year and then sets the toggle to Days. The system considers 8 hours as the default working hours per day. so the day's value comes to 45/8 = 5.625. The system rounds the value to two digits, which is 5.63.
Now when the user sets the toggle back to Hours:Mins, the hours are calculated based on 5.63, not 5.625. So the Days Per Year displays the value as 45.04 instead of 45.
Time-off Deduction for Full-Day Requests
Full-day time-off requests use one consistent deduction logic for both agents and managers. This logic applies when:
-
An agent submits a full-day time-off request from My Zone or the Mobile app.
-
A manager creates or edits a full-day time-off entry in Schedule Manager.
The time-off balance is calculated by using the working shift length:
-
Working shift length = Total shift length − Non-working activities
Only the working shift length is used for time-off deduction. The system then converts the working shift length to days by using the day-length option defined in the time-off planning rule (for example, an FTE value of 8 hours).
The FTE value for a full day is 8 hours.
Non-working activities (such as unpaid breaks) have already been removed from the shift to get the working shift length.
Tuesday (8-hour working shift length)
A full-day time-off request results in:
-
1 day deducted
-
8 hours deducted
Thursday (9-hour working shift length)
A full-day time-off request results in:
-
1 day deducted (limited to the 8-hour FTE value)
-
9 hours deducted
Friday (7-hour working shift length)
A full-day time-off request results in:
-
0.88 day deducted (7 ÷ 8)
-
7 hours deducted
The same calculation is used for both agent and manager actions. This ensures that full-day time off is deducted consistently and that balances remain accurate without manual corrections.