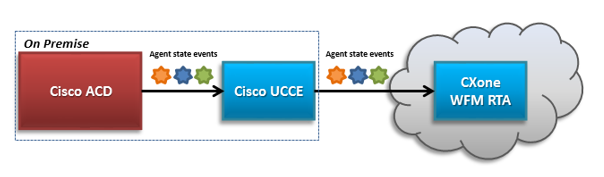
The Cisco Unified Contact Center Enterprise (UCCE) agent state connector, connects to WFM for data integration. This includes both Real Time Adherence (RTA) and historical data.
The Cisco UCCE connector is on-premise software that connects to your Cisco ACD to receive a stream of agent state information and relays this information to support RTA.
How each type of data is used in WFM:
Historical skill-based data: This is used in the Forecasting and Staffing pages.
Historical adherence data: This is used in the MSTR adherence report, and in the CSV report you generate in the Real Time Adherence page.
Intraday data: This is not supported.
Functional Description
Here is a breakdown of what Cisco UCCE supports:
-
Real-time data:
Data
Support
RTA Yes Method of Integration Cisco connector for ACD node
Reason Codes Supported Yes
-
Historical data:
Data
support
Skills Yes Method of Integration SQL queries on Cisco ACD database Interval Setting 15 minutes
-
Data types support:
data
support
Inbound Voice Yes Outbound Dialer No Email Yes Chat
Yes
Fax
No
Text (SMS)
No
Web
No
-
Historical adherence support:
data
support
Agent Activity Log Historical adherence data is pulled every 15 minutes.
-
Reports:
Reports
support
Agent Adherence Report Yes Real Time Adherence Yes
Installation
Steps to installing the Cisco UCCE Connector:
-
Generating an Access Key, which will be used in the installation.
Once the connector is installed, you must also verify that the PG data is configured correctly and verify that the correct server is configured in the Web. See Verifying Cisco UCCE Reporting Configuration for more information.
Prerequisites
NiCE CXone supports Cisco Unified CCE version 11.6.
In addition, the following prerequisites are needed for installing the Cisco UCCE connector:
-
Access to Cisco ACD devices via TCP/IP connection
-
MS SQL Database on the Cisco side
-
Verify that the Cisco Unified CCE Administration is configured properly. See Verifying Cisco UCCE Reporting Configuration.
-
Java Runtime Environment for Java version 1.8 - https://www.java.com/en/download/
This links to an external site that is not maintained by NiCE.
-
Over 100 MB disk space for installation, at least 1 GB for execution
-
Configure the firewall to allow outbound ports 443 and 80
-
Internet access
-
The following permissions must be granted to the user account where the installation and execution of the connector occurs:
-
Create and modify directories
-
Create and modify files
-
Open server sockets
-
Execute processes and services (daemons on Linux, Mac)
-
-
The user installing Cisco UCCE has Admin privileges on the agent computer
-
The user installing Cisco UCCE has these NiCE CXone permissions:
-
Access Key: Create
-
Can access support downloads: On
These permissions are located in Admin > Security > Roles and Permissions, under the Admin section.
-
Generating an Access Key
The access key grants the Cisco UCCE connector access to NiCE CXone. You generate the key in NiCE CXone and later enter it when running the installation wizard.
The access key receives all of the permissions of the NiCE CXone user who generates it. If this user is an administrator, then anyone with the access key would have administrator privileges.
Therefore, for security reasons, you must first create a NiCE CXone user and role for the connector, and then generate the key with that user.
To generate the access key:
-
Create a role for the Cisco UCCE connector:
-
Click the app selector
 and select Admin.
 -
Go to Security > Roles and Permissions.
-
Click New Role, and enter a relevant name for the role. For example, Role for Cisco UCCE Connector.
-
Remove all permissions for the role.
-
Save & Activate the role.
-
-
Create an employee for the Cisco UCCE connector:
-
Click the app selector
and select Admin. -
Click Employees.
-
Click New Employee and enter a relevant name for the employee. For example, name the employee Cisco UCCE Connector.
-
From the Primary Role drop-down list, select the role you just created for the connector.
-
In the General tab, deselect all the attributes.
-
Create the connector employee (the Access Keys tab will only appear after you create the account).
-
-
Open the connector employee again, then go to the Access Keys tab and generate an access key.
-
Copy both the Access Key ID and Secret Access Key and save them somewhere safe.
If you don't copy the Secret Access Key, or lose it, you'll need to create a new one.
Use this access key ID and secret access key when installing the connector on any computer.
-
Activate the connector employee account by clicking the Activate Account button in the activation email.
Running the Installation Wizard
Once you generate the access key, you are ready to install the Cisco UCCE connector.
-
If you haven't already, go to the Support-Downloads page, locate the acd-node-cisco-UCCE-installer-distribution file and click the Download button.
-
Once the download is complete, unzip the installer to a convenient location.
-
Right click on the install.bat file and select Run as Administrator to open the installation wizard.
-
In the first window, click Next. The Installation Path window opens.
-
Browse for the installation path. If the directory you select is not accessible, the wizard prompts you to alter the path or create a new directory.
-
Click Next. The Package Selection window opens.
The Cisco UCCE installer preselects the required package. There is no need to select or deselect any other packages.
-
Click Next. The Agent State Connector Configuration window opens.
-
Configure the following information for the Cisco UCCE Connector:
-
CTI Host: The machine where Cisco runs.
-
CTI Port: The port with which the connector will receive agent state events from the Cisco ACD CTI server.
-
ASC Manager URL: The base URL + the port of the service to which agent state events will be transmitted for use in the RTA application.
-
Access Key: This is the ID of the access key (Access Key ID) you generated in NiCE CXone using the connector employee.
-
Secret Key: This is the Secret Access Key you generated in NiCE CXone using the connector employee.
-
ACD Reports ACD ID: The ID of the ACD account from which data is coming in to the connector. For Example:
-
Tenant name
-
Account name
-
-
-
Configure the following information for the Historical Data DB:
-
Database Host: This is the IP address of the Informix database
-
Database Port
-
Database schema
-
Database username
-
Database password: You can find this password in the Cisco Unified CCE Administration. Go to Tools > Password Management. The Database password is the same as the Historical Reporting User password.
-
-
Click Next.
Once you click Next, you cannot go back and change the configuration.
-
Wait until the installation progress is complete, and then, click Next.
-
In the final installation wizard window, click Done.
-
Configure the Cisco UCCE connector as a service.
-
Navigate to C:\Program Files\acd-node-cisco-UCCE\wrapper\bat.
-
Right click on each of the following .bat files (in order) and select Run as Administrator:
-
stopService.bat
-
uninstallService.bat
-
installService.bat
-
startService.bat
-
The installation is complete, and the Cisco UCCE connector is configured as a service.
-
Verifying Cisco UCCE Reporting Configuration
Once the Cisco UCCE Connector has been installed, you must verify that the PG data is configured correctly and verify that the correct server is configured in the Web Setup.
To verify PG data:
-
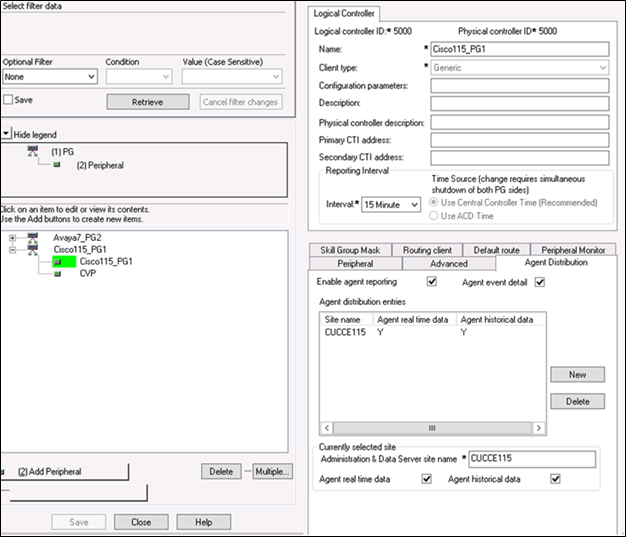
In the Configuration Manager, go to Configure ICM > Peripherals > Peripheral > PG Explorer.
-
Verify that the Logical Controller details, and the Agent Distribution details are configured as below.
The following screen is just an example. The Name for the Logical Controller, as well as the Site Name and Administration & Data Server site name in the Agent Distribution area vary for each customer.
-
If any changes are made, click Save.
To verify the Web Setup configuration:
-
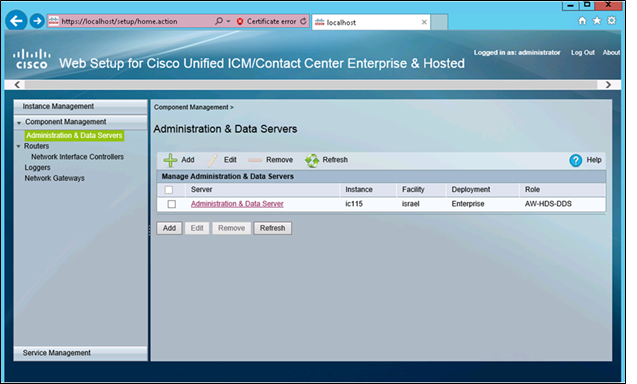
Open Cisco's Web Setup for Cisco Unified ICM/Contact Center Enterprise & Hosted.
-
Go to Component Management > Administration & Data Servers and verify that the Administration & Data Server Role is defined as AW-HDS-DDS.
-
If the Role is not defined correctly, click on the Administration & Data Server.
-
In the Edit Administration & Data Server page, select the Role tab.
-
Select Administration Server, Real-time and Historical Data Server, and Detail Data Server (AW-HDS-DDS), and click Next.
-
Click Next until you can click Finish.