

This page guides you, step-by-step, in setting up authentication for your NiCE CXone system using SecureAuth as your external identity provider (IdP).
Before You Begin
- Gain a basic understanding of authentication and authorization concepts and terminology if you've never set up a process like this before.
- Review the NiCE CXone-specific process if this is the first time you've worked with authentication in NiCE CXone.
- Consider your human users and the levels of access they need. Decide whether people with greater access should have greater levels of security.
- Decide whether you will use custom password requirements, multi-factor authentication (MFA), or both.
- Based on your decisions, make a list of login authenticators. The list should include the password requirements and MFA status you want to use for each login authenticator.
- Consider whether you need to include authentication and authorization for applications like bots or intelligent virtual assistants (IVAs). If so, you will need to create access keys.
- Gain an understanding of the SAML 2.0 authentication protocol. NiCE CXone supports SAML 2.0 for SecureAuth integration.
- Evaluate the combination of IdP and protocol to ensure your use cases and user flows are supported, and to identify potential issues. This should include actual testing.
- Implementing changes to authentication and authorization whenever a need comes up will likely cause issues in your system. You can avoid these problems by creating an implementation plan. Your NiCE CXone team can support and guide you in this planning process. Good planning makes for a smoother implementation.
Create and Configure the SecureAuth Application
-
Log in to your SecureAuth management account.
-
On the left side of the Identity Platform page, click Application Manager.
-
Click Add an Application.
-
From the list of application templates, select SAML Application.
-
On the Application Details page, set the following configurations:
-
Enter an Application Name. For example, you could enter NiCE CXone.
-
Select the Authentication Policy for this application.
-
Enter the Data Stores to authenticate and allow user access for this application.
-
Select any necessary Groups to allow access to this application.
-
-
Click Continue.
-
In the Configure Connection section, set the Connection Type to SP-initiated and select By Post.
-
In the User ID Mapping section, set the User ID Profile field and Name ID Format to your preference. The User ID Profile field will determine the value that you will enter in the External Identity field of the NiCE CXone user's profile.
-
In the SAML Assertion section, set the following configurations:
-
In the Assertion Consumer Service (ACS) field, enter https://cxone.niceincontact.com/need_to_change. You will change this value to the ACS URL you receive later from the NiCE CXone Login Authenticator.
-
In the Audience field, enter https://cxone.niceincontact.com/need_to_change. You will change this value to the Entity ID you receive later from the NiCE CXone Login Authenticator.
-
In the IdP Signing Certificate field, click Select Certificate, choose the IdP signing certificate to use, then click Select to close the box.
-
In the Signing Algorithm field, select SHA1 or SHA2. NiCE CXone supports both options.
-
In the Sign SAML Assertion field, disable signing the SAML Assertion. NiCE CXone doesn't support this.
-
In the Sign SAML Message field, enable signing the SAML Message.
-
In the Encrypt SAML Assertion field, disable encryption of the SAML Assertion. NiCE CXone doesn't support this.
-
-
Click Add Application.
-
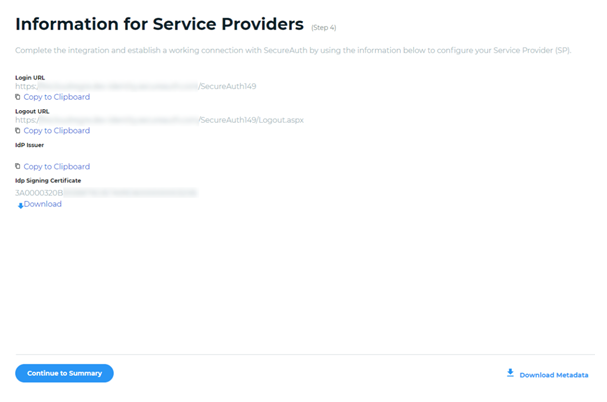
From the Information for Service Providers page:
-
Copy the Login URL. This will be used for the Endpoint URL in the NiCE CXone Login Authenticator.
-
Download the IdP Signing Certificate. This will be uploaded to the NiCE CXone Login Authenticator.
-
-
Click Continue to Summary.
-
Click Back to Application Manager to find the application now added to the list.
Set Up a Location
Required permissions: Location Management Create
If you want to require that users log in from a certain IP address, create a location with the IP addresses, IP address ranges, or IP address subnets you want to allow. When you require a configured location for a user, that user must have both the correct credentials and IP address to log in. Otherwise, their login attempt fails and they receive an error. You can have up to 20 locations at a time and up to 10 rules per location.
- Click the app selector
 and select Admin.
 - Go to Locations > Location Definitions.
- Click New Location.
- Give the location a descriptive Name. If you want to add more details about the location, enter a Description.
- You can select the Set as Default Location or Remote Location to indicate the type of location. You can only have one default location. These fields don't currently affect any functionality and selecting them is for your own reference.
-
Add any other information you would like using the remaining fields, including the physical address, country, GPS coordinates, time zone, or assigned groups. These fields don't currently affect anything, and the information entered there would be only for your own reference.
If you add groups to the Assigned Groups field, the users belonging to those groups appear on the Assigned Users tab. However, the location settings won't apply to them. If you assign a location to a login authenticator, the location applies to users who are assigned to that login authenticator and restricts their ability to log in based on their IP address. However, those users will not appear on the Assigned Users tab.
-
Click Save.
-
Back on the Location Definitions page, click the location you just created to open it.
-
Click the Auto-Detection Rules tab.
-
Create a new rule. To do so:
-
Click New Rule.
-
Give the rule a descriptive Name.
-
Select the Rule Type from the following:
-
List: A list of specific IP addresses allowed for this location. For example, 100.0.1.100, 100.0.1.101, and 100.0.1.102.
-
Range: An IP address range allowed for this location. For example, 100.0.1.100-100.0.1.125.
-
Subnet: A subnet allowed for this location. For example, 100.0.0.1/32.
-
-
Specify the IP Version as one of the following:
-
IPV4: A 32-bit IP address
-
IPV6: A 128-bit hexadecimal address.
-
-
Enter the actual IP addresses, range, or subnet in the Rule Definition field, following the formats of the examples in the preceding steps. If you selected List, you can enter up to 100 IP addresses. If you selected Range or Subnet, you can only enter one value.
-
Click Confirm.
-
-
Add more rules as needed. You can have up to 10.
-
Click Save.
Setup an External Login Authenticator in NiCE CXone
- In NiCE CXone, click the app selector and select Admin.
- Click Security > Login Authenticator.
- Click New Login Authenticator.
- Enter the Name and Description of the Login Authenticator.
- Select SAMLas the Authentication Type.
-
If you want to require that users log in from a certain IP address, select the Location you set up in the preceding section.
- Paste the Login URL obtained previously from SecureAuth into the Endpoint URL field of the Login Authenticator.
- Click Choose File and select the certificate saved previously from SecureAuth.
- Select the Assigned Roles tab and click one or more roles under All Unassigned Roles to assign them to the Login Authenticator you are creating.
- Click Save and Activate.
- Open the Login Authenticator you just created.
- Copy both the Entity ID and ACS URL, as you will need them in the next task.
Complete the SecureAuth Configuration
-
Log in to your SecureAuth management account.
-
On the left side of the Identity Platform page, click Application Manager.
-
Select the new application that you created.
-
Edit the Connection Settings:
-
In the Assertion Consumer Service (ACS) field, enter the ACS URL you copied from the NiCE CXone Login Authenticator.
-
In the Audience field, enter the Entity ID you copied from the NiCE CXone Login Authenticator.
-
Configure User External Identity
Ensure that the External Identity for each employee who uses the Login Authenticator is set to match the unique User ID Profile/NameID value for each user in SecureAuth.
- In NiCE CXone, click the app selector and select Admin.
- Click Employees, and search for an employee that will be signing in using SSO.
- Select the Security tab.
- Enter the Employee's unique NameID from SecureAuth in the External Identity field.
- Click Done.
Verify User Access with SecureAuth Single Sign-On
-
Have one or more test users log in by opening a browser and navigating to https://cxone.niceincontact.com. FedRAMP users will navigate to https://cxone-gov.niceincontact.com.
-
When you're ready, roll out your IdP Single Sign-on configuration to all NiCE CXone users.
For additional SecureAuth configuration information, refer to SAML application integration![]() .
.