

Data Share setup differs based on whether you're using a NiCE Snowflake account or if you have your own Snowflake account. You make this choice prior to setup. If you change your mind after setup, you can switch to a different account, but you must work with your Account Representative to do so.
Prerequisites
-
If you haven't already done so, contact your Account Representative to enable Data Share. Tell them you want to set up a new Snowflake account.
-
Decide whether you want to set up an integration with an external reporting tool. If you want to extract your data into an external tool, you need to create a Snowflake service user, explained in the steps below.
-
You need to define the IP addresses through which your data will be accessed. You may need to collect a list before performing the steps on this page. If you have issues accessing data, you may need to add both the WAN (public IP) and the LAN (local/private IP) for each user or application that will access data.
Create a NiCE Snowflake Account
Required permissions: Cloud Data Share On
The following steps lead you through the process of creating a primary Snowflake account that you can use to log in through the Snowflake interface. It also helps you create a Snowflake service user, if you need one. A service user lets you set up programmatic![]() Performing an action using computer code rather than a manual process or user interface. This automates tasks, since they are performed by a program or script, rather than a human. access to your data with an external application, like a BI reporting tool. The service user has key-pair authentication to allow the application to access data; you can think of it like a user account for the application. If you need help with this authentication type, contact your IT group or your NiCE Account Representative.
Performing an action using computer code rather than a manual process or user interface. This automates tasks, since they are performed by a program or script, rather than a human. access to your data with an external application, like a BI reporting tool. The service user has key-pair authentication to allow the application to access data; you can think of it like a user account for the application. If you need help with this authentication type, contact your IT group or your NiCE Account Representative.
-
Click the app selector
 and select Admin.
 -
Go to Account Settings > Data Share.
-
Click Create Account.
-
In the confirmation window, select Yes, I agree and click Confirm. The account creation process can take up to 45 minutes. You can continue to use CXone Mpower for other tasks while you wait.
-
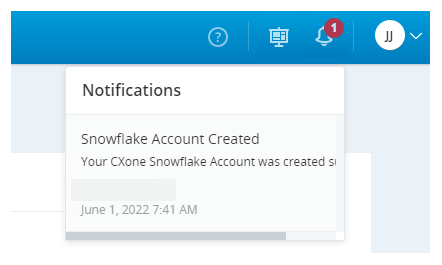
Periodically check Notifications
 in the toolbar on top of the screen. When a new notification appears, verify that your account creation was successful. If your account creation failed, don't try again. Instead, contact CXone Mpower Support.
 -
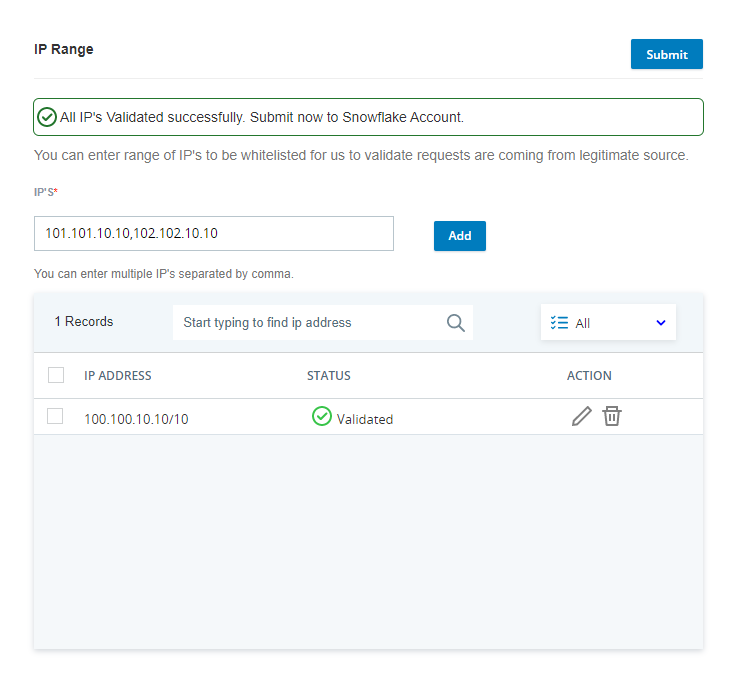
From the Data Share page, add the IP addresses and IP address ranges you want to give access to your Snowflake data. If you don't add any IP addresses, you will not be able to access your Snowflake account.
CXone Mpower doesn't verify that your entries are real IP addresses. It only verifies that the entry formats are valid. When a user logs in to your NiCE Snowflake account, CXone Mpower verifies that attempts to pull data are coming from one of the IP addresses in your allowlist.
- On the Data Share page in CXone Mpower, scroll down to IP Range.
- In the text box, type the IP addresses and IP address ranges you want to add to the allowlist in CIDR notation. If you're adding more than one at the same time, separate each entry with a comma.
- Click Add.
- Once CXone Mpower confirms each IP address and range is a valid format, click Submit to apply them to your NiCE Snowflake account.
-
If you want an application to access your data, create a Snowflake service user:
-
In the Service User section, click Generate Key-Pair. A pop-up opens.
-
To learn about the authentication for this service user, click Learn more to open the Snowflake online help content
 .
. -
Click Generate Key-Pair. After a moment your private key appears. Copy this and save it on your computer.
-
Click Close. Notice the CXONE_DATA_SHARE_SERVICE_USER entry that generated for User Name.
-
Copy the username and save it with the private key. You must enter these when setting up or updating authentication for your external application. These are sensitive credentials that you should handle and store securely.
-
-
Create a password for your primary Snowflake account:
-
On the Data Share page, click Generate New Link.
-
When the link appears in a pop-up, click Copy URL.
-
Paste the URL in a new browser window or tab.
-
Set your Snowflake password.
-
-
Log in to Snowflake:
-
From the Data Share page, copy the Access URL.
-
Paste the URL into a new browser tab or window.
-
Log in to Snowflake. Use the CXone Mpower Snowflake Username and the password you just created.
-
-
Once you're logged in, click CXONE_DATASHARE_<BU_ID> on the left to begin navigating the CXone Mpower shared data objects.
Manage CXone Mpower Snowflake Account
When you create a Snowflake account through CXone Mpower, you become dependent on NiCE for some of the maintenance tasks for the account. You need to contact your Account Representative if you want to:
-
Change the warehouse size.
-
Reset your password for your primary Snowflake account if you allow it to expire. Password expiration happens 90 days after your most recent password change.
If you are using Data Share with a NiCESnowflake account and no longer want these dependencies, contact your Account Representative for help arranging your own Snowflake contract.
Manage Data Access Allowlist
Required permissions: Cloud Data Share On
Use this section to add IP addresses and IP address ranges to your allowlist. This enhances security by limiting Snowflake data access to only users logging in from the IP addresses you specify.
CXone Mpower doesn't verify that your entries are real IP addresses. It only verifies that the entry formats are valid. When a user logs in to your NiCE Snowflake account, CXone Mpower verifies that attempts to pull data are coming from one of the IP addresses in your allowlist.
-
Click the app selector
and select Admin. -
Go to Account Settings > Data Share.
- On the Data Share page in CXone Mpower, scroll down to IP Range.
- In the text box, type the IP addresses and IP address ranges you want to add to the allowlist in CIDR notation. If you're adding more than one at the same time, separate each entry with a comma.
- Click Add.
- Once CXone Mpower confirms each IP address and range is a valid format, click Submit to apply them to your NiCE Snowflake account.
Integrate with Your Own Cloud Storage
Required permissions: Cloud Data Share On
This section helps you export data from Data Share into your own cloud storage. You can copy CXone Mpower data from your NiCE Snowflake account to your own AWS S3 bucket. From there, you can then download the data to your own data warehouse or BI tool.
Before performing this task, you may want to check that you have credentials to access your cloud storage account.
use role dl_customer;
use database cxone_export;
use schema export_data;

create stage s3_unload_stage
storage_integration = dl_s3_integration
url = 's3://destination-bucket/';

-- 2. Export agent dim
// SP and Task to unload agent DIM
create or replace procedure unload_agent_dim_sp()
returns string not null
language javascript
as
$$
var sql_command = "";
var curDate = new Date().toISOString();
var sql_command = sql_command.concat("copy into @s3_unload_stage","/agent_dim/", curDate,"/"," from cxone_shared.acd.agent_dim_view overwrite=true;");
var statement = snowflake.createStatement( {sqlText: sql_command} );
var result_set = statement.execute();
return sql_command; // Statement returned for info/debug purposes
$$;
create task unload_agent_dim_task
warehouse = dl_export
schedule = 'using cron */5 * * * * UTC'
as
call unload_agent_dim_sp();

alter task unload_agent_dim_task resume;

alter task unload_agent_dim_task suspend;

-- 3. Export Contact Type Dim
// SP and task to unload agent DIM
create or replace procedure unload_contact_type_dim_sp()
returns string not null
language javascript
as
$$
var sql_command = "";
var curDate = new Date().toISOString();
var sql_command = sql_command.concat("copy into @s3_unload_stage","/contact_type_dim/", curDate,"/"," from cxone_shared.acd.contact_type_dim_view overwrite=true header=true;");
var statement = snowflake.createStatement( {sqlText: sql_command} );
var result_set = statement.execute();
return sql_command;
$$;
create task unload_contact_type_dim_task
warehouse = dl_export
schedule = 'using cron */5 * * * * UTC'
as
call unload_contact_type_dim_sp();

alter task unload_contact_type_dim_task suspend;


// 'watching unload tasks status'
show tasks;
select *
from table(information_schema.task_history())
order by scheduled_time DESC;| Resource Name | Name | Details |
|---|---|---|
| Role | DL_CUSTOMER | The role assumed when running SQL queries. This role must have permissions to create STAGE, PROCEDURE, and TASK. |
|
Shared Database |
CXONE_SHARED |
All objects are shared with this database. Users can read data from the shared views of this database. |
| Export Database | CXONE_EXPORT | You can create new resources under this database. |
| Export Schema | EXPORT_DATA | The schema under the CXONE_EXPORT database. All new resources go inside this schema. |
| Storage Integration | DL_S3_INTEGRATION | Enable exporting data to an AWS S3 bucket. Once enabled, you can create the stage using this storage integration. |
| Warehouse | DL_EXPORT | The name of the warehouse that runs all SQL queries . |
-
Click the app selector
and select Admin. -
Go to Account Settings > Data Share.
-
In the Storage Integration - AWS Account section, enter your AWS details for S3 Path and IAM Role.
 Learn more about fields in this step
Field Details S3 Path The URL to your AWS S3 bucket. IAM Role
An IAM role with write access to your AWS S3 bucket. For information about configuring an IAM Role, see the Snowflake documentation
. -
Click Save.
-
Create a stage in Snowflake. Update your role with your AWS IAM user and external ID as described in the Snowflake documentation
. The storage integration name is dl_s3_integration. For example:create stage __STAGE_NAME__ storage_integration = dl_s3_integration url = '__S3_PATH__'; -
Create the store procedure. See the Snowflake documentation for help creating the store procedure
and creating the copy into stage SQL statement for the store procedure . For example:create or replace procedure __STORE_PROCEDURE_NAME__() returns string not null language javascript as $$ var sql_command = ""; var curDate = new Date().toISOString(); var sql_command = sql_command.concat("copy into @__STAGE_NAME__","/path/", curDate,"/"," from cxone_shared.__SCHEMA__.__VIEW_NAME__overwrite=true header=true;"); var statement = snowflake.createStatement( {sqlText: sql_command} ); var result_set = statement.execute(); return sql_command; $$; -
Create a task. See the Snowflake documentation to learn about tasks
and for help creating the task .create task __TASK_NAME__ warehouse = dl_export schedule = 'using cron */30 * * * * UTC' -- Give any required cron expression. For example we have given cron for every 30 mins as call __STORE_PROCEDURE_NAME__(); alter task __TASK_NAME__ resume;
Access CXone Mpower Data
- Open your Snowflake web interface.
- Go to Data Products > Private Sharing. You should see a CXone Mpower share.
- View and query the objects in the shared CXone Mpower database just as you would any other database in your account. You should see all shares available in your account. The Database column shows the name of the database created from the share. For more information, see the Snowflake documentation .
If the share creation fails, a notification appears in the top right corner of the screen . Contact your Account Representative for assistance.