If you haven't already done so, contact your Account Representative to enable CXone Mpower Data Share. Tell them you want to use your own Snowflake account.
Data Share setup differs based on whether you're using your own Snowflake account or if you're creating a CXone Mpower Snowflake account. You make this choice prior to setup and you can only change it by working with your Account Representative.
Create Data Share
Required permissions: Cloud Data Share On
Before you create a new data share, you must have:
-
Your own Snowflake account.
If you're creating a new Snowflake account for the Data Share application, you should start with a small warehouse. This is usually large enough for Data Share. If the performance isn't adequate, first optimize your queries. If that doesn't help, you should then upgrade your warehouse size.
-
A license for Data Share. To enable this for your system, contact your NiCE Account Representative.
- Click the app selector
 and select Admin.
 - On the left navigation pane, go to Tenant Configuration > Data Share.
- Click Create Data Share in the top right corner of the Data Share page.
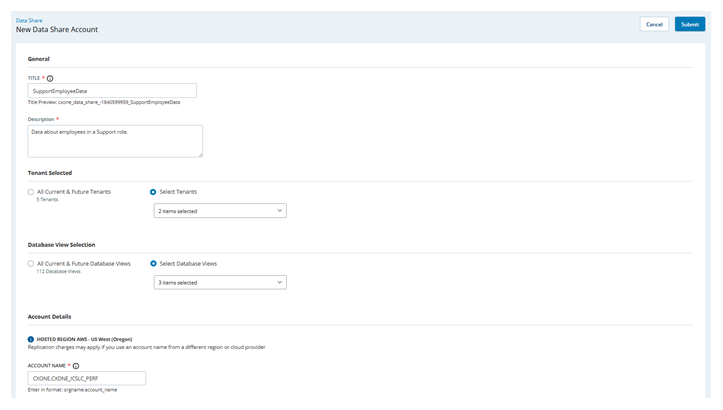
- In the General section of the form, give the data share a unique Title and a Description, if you want to provide users with details about the data share.
- In the Tenant Selected section of the form, specify which tenants' data to include in the data share.
- Select All Current & Future Tenants to include all the tenants you currently have and any tenants you add later.
- Select Select Tenants to mark the set of tenants you want to include. This enables the drop-down, which you must open to see a list of your tenants and select the checkbox corresponding to each tenant you want to include.
- In the Database View Selection section of the form, specify which database views you want the data share to include.
- Select All Current & Future Database Views to include all views you currently have and any views that are added later.
- Select Select Database Views to mark the set of views you want to include. This enables the drop-down, which you must open to see a list of your views and select the checkbox corresponding to each view you want to include.
-
In the Account Details section of the form, specify Your Snowflake Account Locator. The account locator must follow the format <org_name>.<account_name>. If you don't have your account name in this format, you can run this Snowflake query as the account administrator to find it: SELECT CURRENT_ORGANIZATION_NAME() || '.' || CURRENT_ACCOUNT_NAME();
You cannot have more than one data share with the same account name.
- When you're satisfied with the form, click Submit. You should receive one of the following notifications in about 10-40 seconds.
- If data share creation succeeds, a green toast notification
 Small, temporary pop-up messages on the bottom of the screen indicating things like errors and successes. appears. Click it to open the Data Share page and see your new data share in the table.
 If data share creation fails, a red toast notification appears and lets you know what went wrong. It will be one of these errors:
- Invalid target account: The Account Name you entered was invalid.
- Internal Error: There is a problem with CXone Mpower. You must contact NiCE Support
 to resolve the problem.
When data share creation fails, you cannot access the data share details.
- If data share creation succeeds, a green toast notification
Modify Data Share
Required permissions: Cloud Data Share On
You can only edit a data share with an Active Status.
- Click the app selector and select Admin.
- On the left navigation pane, go to Tenant Configuration > Data Share.
- Find the data share you want to modify in the table. Click the pencil
 to open the edit screen.
 - When the form opens, make the modifications you need.
- Click Submit. When the system finishes processing , you will receive a notification under the bell icon in the top right corner of CXone Mpower. This indicates whether the update succeeded or failed.
Delete Data Share
Required permissions: Cloud Data Share On
You can only delete a data share with an Active Status.
- Click the app selector and select Admin.
- On the left navigation pane, go to Tenant Configuration > Data Share.
- Find the data share you want to delete in the table. Click the trash can
 . A confirmation window appears.
 - Read the confirmation pop-up. If you still want to delete the data share, select Confirmation Deletion and click Delete. When the system finishes processing the deletion request, you will receive a notification under the bell icon in the top right corner of CXone Mpower. This indicates whether the deletion succeeded or failed.
Access Data in Snowflake
Required permissions: You must use the ACCOUNTADMIN role or another role with the CREATE DATABASE and IMPORT SHARE privileges enabled to access a listing.
See the Snowflake documentation ![]() for more detailed instructions.
for more detailed instructions.
-
Log in to Snowsight, the Snowflake web interface.
-
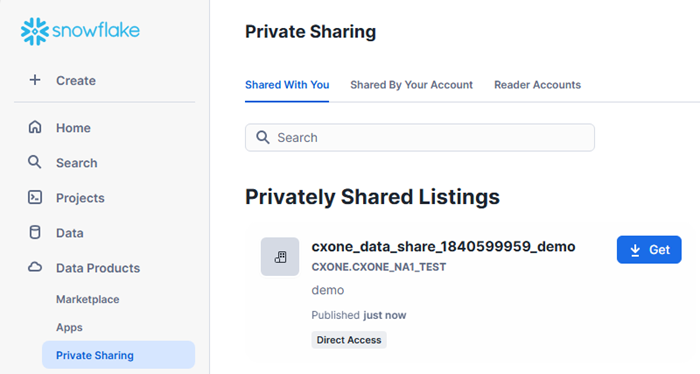
Go to Data Products > Private Sharing.
-
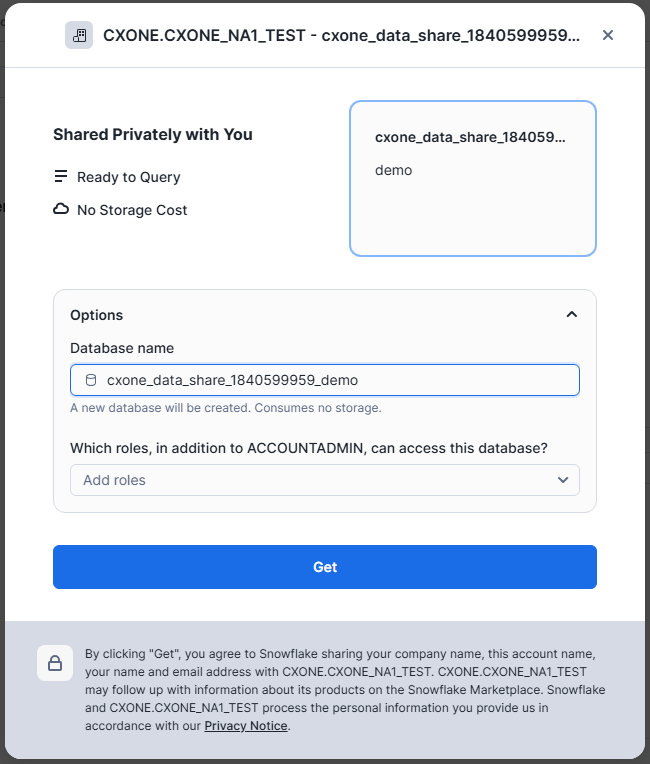
On the Shared with You page, under Private Listings, select the listing you want to access. Click Get.
-
In the pop-up window in the Options drop-down, enter a custom Data base name. Otherwise, the name will be the listing title. Click Get.
-
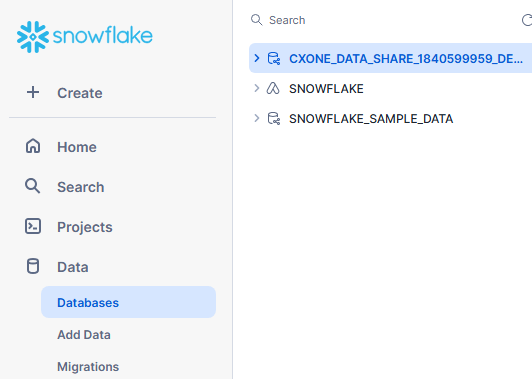
Navigate to Data > Databases. Once the request finishes processing, your new database appears here.