

This page is for administrators. If you're an Attendant user, see Attendant for Users.
You can configure Attendant users individually or by managing multiple users at once. Each user must have
You can configure Attendant for each user type: agent, rollover agent, business user, and general voicemail.
As an admin user, you can impersonate users to change their out of office status or view their voicemail messages, view users with Out of Office status, and create a list of all Attendant users.
Configure Attendant Access for a Single Agent
Use the Agent user type for anyone who is a NiCE CXone agent. For users who are not NiCE CXone agents, configure them with the Business User user type. For anyone who sometimes takes agent calls, but is sometimes away from their phone due to other job responsibilities, you can use the Rollover user type. Refer to the screenshot at the beginning of this page if needed.
- Click the app selector
 and select ACD.
 -
Click
- Click the row of the user you want to manage.
- Click the Attendant tab, then click Edit.
-
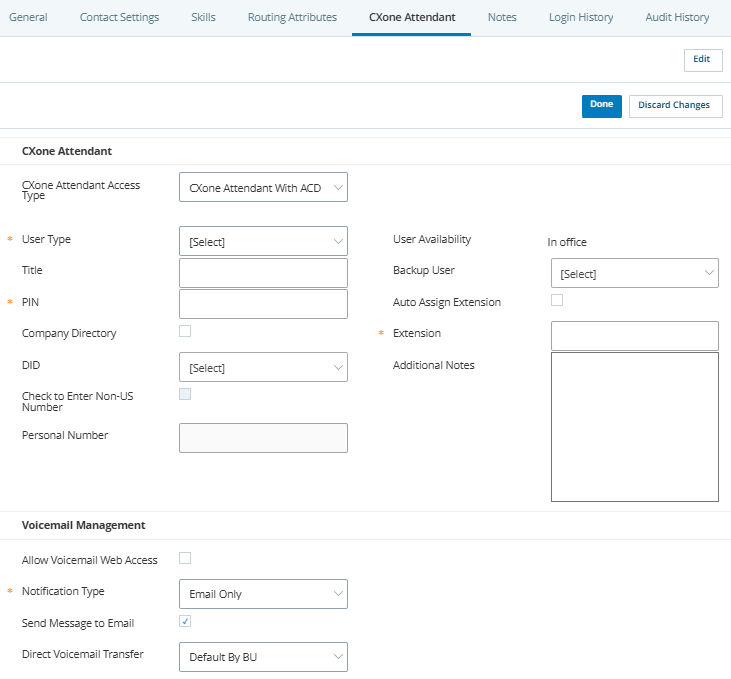
Select Attendant with ACD from the Attendant access type drop-down.
 Learn more about Attendant access types.
- Select Attendant with ACD to grant the user access to both the Attendant and ACD applications (for Agent and Rollover user types). With this type of access, users launch Attendant from the grid icon in the upper right corner of the NiCE CXone platform, where it appears along with any other applications available to them.
- Select Attendant only to grant the user access only to the Attendant application (for Business User and General Voicemail user types). With this type of access, users launch Attendant from the grid icon in the upper right corner of the NiCE CXone platform; the only options these users have within NiCE CXone are My Account, Browser Compatibility, and Attendant.
- On the Attendant tab, select Agent from the User Type drop-down.
-
If your organization has Attendant with voicemail, enter a PIN and select the default Notification Type for this user, if different from the
Learn more about fields in this step
Field
Details
PIN This option only applies if your organization has Attendant with voicemail.
The personal identification number the user enters when accessing their voicemail by phone. Valid values are numerals 0-9 with a maximum of 6 characters. The user can change this number as needed in the Attendant application.Notification Type This option only applies if your organization has Attendant with voicemail.
Select this user's default notification method, if different from the business unit default. Choose from these options:
- Email Only: The user receives an email notification for each new voicemail message or missed call. Requires that the user have access to voicemail messages via the Attendant application or by phone. The missed call notification requires Studio scripting to enable.
- Email with File Attachment: The user receives an email notification containing the voicemail message as an audio file attachment. This does not require additional access to voicemail messages (such as by phone or the Attendant application). The missed call notification requires Studio scripting to enable and will be an email with no attachment.
You may need to update your email server security to ensure these emails are not quarantined. - Web Only: The user sees new voicemail messages in the View Voicemail Message section of the Attendant application. For missed calls, this option will send the notification as an email. The missed call notification requires Studio scripting to enable.
- Via Agent: The user receives notification of new voicemails or missed calls via Agent messages. The user must be a NiCE CXone agent to use this option, and must have access to voicemail messages via the Attendant application or by phone. The missed call notification requires Studio scripting to enable.
-
Enter the user's Personal Number and then either enter their Extension or select Auto Assign Extension.
Learn more about fields in this step
Field
Details
Auto Assign Extension Select this checkbox to have Attendant generate a phone extension for this user. When you select this option, the Extension field automatically populates with the generated extension number. Extension The user's phone extension number that enables callers to reach the user directly. If Auto Assign Extension is selected, this field automatically populates with a generated extension and can't be modified. This number cannot start with a 0. -
Select Allow Voicemail Web Access if you want the user to be able to manage their out of office status or voicemail using the Attendant application. If you don't select this option, users must have the Email with File Attachment notification type or be able to use the phone to check voicemail messages.
-
- Select Company Directory to have this user added to the corporate directory . Callers will be able to search for this user with details such as name, extension, or DID.
- Configure the optional details as needed for this user and then click Done.
Learn more about fields in this step
Field Details Title The user's job title. DID Direct Inward Dialing Direct Inward Dial (DID). Service that assigns a unique phone number to each employee without a phone line for each number. (DID) number. Agents generally do not need a DID, as the system routes calls to agents based on their NiCE CXone agent ID. You can search for provisioned DIDs by number or point of contact (POC) name when assigning DID numbers to Attendant users.Backup User Select the default user who will receive forwarded calls when the user you are configuring sets their status to Out of Office. The user you are configuring can override their default backup user in the Attendant application any time they change their status to Out of Office. Check to Enter Non-US Number This option is disabled because phone calls are routed to agents via their agent ID or extension, not a personal phone number. Personal Number This option is disabled because phone calls are routed to agents via their agent ID or extension, not a personal phone number. If you want this user to have a personal number as a backup method for Attendant to route calls to this user, set their user type to Rollover.
Configure Attendant Access for a Single Non-Agent Employee
A non-agent employee is any user who is not a NiCE CXone agent. If the user you are granting access to sometimes takes agent calls, or if they only take calls as a backup for an agent when the agent is marked Out of Office, grant them access as a rollover user instead of a business (non-agent employee) user. Refer to the screenshot at the beginning of this page if needed.
- Ensure the user's NiCE CXone employee profile has the Attendant only role.
- Click the app selector and select ACD.
-
Click
- Click the row of the user you want to manage.
- On the CXone Attendant tab, click Edit.
-
Select Attendant only from the Attendant access type drop-down.
Learn more about Attendant access types.
- Select Attendant with ACD to grant the user access to both the Attendant and ACD applications (for Agent and Rollover user types). With this type of access, users launch Attendant from the grid icon in the upper right corner of the NiCE CXone platform, where it appears along with any other applications available to them.
- Select Attendant only to grant the user access only to the Attendant application (for Business User and General Voicemail user types). With this type of access, users launch Attendant from the grid icon in the upper right corner of the NiCE CXone platform; the only options these users have within NiCE CXone are My Account, Browser Compatibility, and Attendant.
- On the Cxone Attendant tab, select Business User from the User Type drop-down.
-
If your organization has Attendant with voicemail, enter a PIN and select the default Notification Type for this user, if different from the
Learn more about fields in this step
Field
Details
PIN This option only applies if your organization has Attendant with voicemail. The personal identification number the user enters when accessing their voicemail by phone. Valid values are numerals 0-9 with a maximum of 6 characters. The user can change this number as needed in the Attendant application. Notification Type This option only applies if your organization has Attendant with voicemail.
- Email Only: The user receives an email notification for each new voicemail message or missed call. Requires that the user have access to voicemail messages via the Attendant application or by phone. The missed call notification requires Studio scripting to enable.
- Email with File Attachment: The user receives an email notification containing the voicemail message as an audio file attachment. This does not require additional access to voicemail messages (such as by phone or the Attendant application). The missed call notification requires Studio scripting to enable and will be an email with no attachment.
You may need to update your email server security to ensure these emails are not quarantined. - Web Only: The user sees new voicemail messages in the View Voicemail Message section of the Attendant application. For missed calls, this option will send the notification as an email. The missed call notification requires Studio scripting to enable.
- Via Agent: The user receives notification of new voicemails or missed calls via Agent messages. The user must be a NiCE CXone agent to use this option, and must have access to voicemail messages via the Attendant application or by phone. The missed call notification requires Studio scripting to enable.
-
Enter the user's Personal Number and then enter their Extension or select Auto Assign Extension.
Learn more about fields in this step
Field
Details
Auto Assign Extension Select this checkbox to have Attendant generate a phone extension for this user. When you select this option, the Extension field automatically populates with the generated extension number. Extension The user's phone extension number that enables callers to reach the user directly. If Auto Assign Extension is selected, this field automatically populates with a generated extension and can't be modified. This number cannot start with a 0. Check to Enter Non-US Number Select this checkbox if the user's personal number is a phone number from outside of the United States. Personal Number The user's 10-digit personal phone number. If the user is unavailable by their primary number (either phone extension or DID), the system transfers the call to their personal number. - Select Allow Voicemail Web Access if you want the user to be able to manage their out of office status or voicemail using the Attendant application. If you don't select this option, users must have the Email with File Attachment notification type or be able to use the phone to check voicemail messages.
- Select Company Directory to have this user added to the corporate directory . Callers will be able to search for this user with details such as name, extension, or DID.
- Configure the optional details as needed for this user and click Done.
Learn more about fields in this step
Field Details Title The user's job title. DID Direct Inward Dialing Direct Inward Dial (DID). Service that assigns a unique phone number to each employee without a phone line for each number. (DID) number. Agents generally do not need a DID, as the system routes calls to agents based on their NiCE CXone agent ID. You can search for provisioned DIDs by number or point of contact (POC) name when assigning DID numbers to Attendant users.Backup User Select the default user who will receive forwarded calls when the user you are configuring sets their status to Out of Office. The user you are configuring can override their default backup user in the Attendant application any time they change their status to Out of Office.
Configure Attendant Access for a Single Rollover Agent
If a user takes calls as an agent occasionally, or only takes calls as backup for agents who are out of the office, then grant them access as a rollover agent. Rollover agents receive phone calls routed to their agent IDs or extensions, and also have a personal phone number that Attendant uses as a backup if they are unavailable at their primary number. Refer to the screenshot at the beginning of this page if needed.
- Click the app selector and select ACD.
-
Click
- Click the row of the user you want to manage.
- Click the Attendant tab, then click Edit.
-
Select Attendant with ACD from the Attendant access type drop-down.
Learn more about Attendant access types.
- Select Attendant with ACD to grant the user access to both the Attendant and ACD applications (for Agent and Rollover user types). With this type of access, users launch Attendant from the grid icon in the upper right corner of the NiCE CXone platform, where it appears along with any other applications available to them.
- Select Attendant only to grant the user access only to the Attendant application (for Business User and General Voicemail user types). With this type of access, users launch Attendant from the grid icon in the upper right corner of the NiCE CXone platform; the only options these users have within NiCE CXone are My Account, Browser Compatibility, and Attendant.
- On the Attendant tab, select Rollover from the User Type drop-down.
-
This option only applies if your organization has Attendant with voicemail.
Learn more about fields in this step
Field
Details
PIN This option only applies if your organization has Attendant with voicemail. The personal identification number the user enters when accessing their voicemail by phone. Valid values are numerals 0-9 with a maximum of 6 characters. The user can change this number as needed in the Attendant application. Notification Type This option only applies if your organization has Attendant with voicemail.
- Email Only: The user receives an email notification for each new voicemail message or missed call. Requires that the user have access to voicemail messages via the Attendant application or by phone. The missed call notification requires Studio scripting to enable.
- Email with File Attachment: The user receives an email notification containing the voicemail message as an audio file attachment. This does not require additional access to voicemail messages (such as by phone or the Attendant application). The missed call notification requires Studio scripting to enable and will be an email with no attachment.
You may need to update your email server security to ensure these emails are not quarantined. - Web Only: The user sees new voicemail messages in the View Voicemail Message section of the Attendant application. For missed calls, this option will send the notification as an email. The missed call notification requires Studio scripting to enable.
- Via Agent: The user receives notification of new voicemails or missed calls via Agent messages. The user must be a NiCE CXone agent to use this option, and must have access to voicemail messages via the Attendant application or by phone. The missed call notification requires Studio scripting to enable.
-
Enter the user's Personal Number and then either enter their Extension or select Auto Assign Extension.
Learn more about fields in this step
Field
Details
Auto Assign Extension Select this checkbox to have Attendant generate a phone extension for this user. When you select this option, the Extension field automatically populates with the generated extension number. Extension The user's phone extension number that enables callers to reach the user directly. If Auto Assign Extension is selected, this field automatically populates with a generated extension and can't be modified. This number cannot start with a 0. Check to Enter Non-US Number Select this checkbox if the user's personal number is a phone number from outside of the United States. Personal Number The user's 10-digit personal phone number. If the user is unavailable by their primary number (either phone extension or DID), the system transfers the call to their personal number. - Select Allow Voicemail Web Access if you want the user to be able to manage their out of office status or voicemail using the Attendant application. If you don't select this option, users must have the Email with File Attachment notification type or be able to use the phone to check voicemail messages.
-
- Select Company Directory to have this user added to the corporate directory . Callers will be able to search for this user with details such as name, extension, or DID.
- Configure the optional details for this user as needed and click Done.
Learn more about fields in this step
Field Details Title The user's job title. DID Direct Inward Dialing Direct Inward Dial (DID). Service that assigns a unique phone number to each employee without a phone line for each number. (DID) number. Agents generally do not need a DID, as the system routes calls to agents based on their NiCE CXone agent ID. You can search for provisioned DIDs by number or point of contact (POC) name when assigning DID numbers to Attendant users.Backup User Select the default user who will receive forwarded calls when the user you are configuring sets their status to Out of Office. The user you are configuring can override their default backup user in the Attendant application any time they change their status to Out of Office.
Create a General Voicemail Inbox
A general voicemail inbox is useful if you want a catch-all voicemail where callers can leave messages if they don't have a specific person or extension to reach. You can create a newNiCE CXone employee profile to use with the general voicemail inbox. If you assign the General Voicemail Inbox user type to an employee's user profile, that employee will not have a separate voicemail inbox for their own voicemail messages. This option only applies if your organization has Attendant with voicemail. Refer to the screenshot at the beginning of this page if needed.
-
- Click the app selector and select ACD.
-
Click
- Click the row of the general voicemail inbox user you created, or another user account. Note that if you assign the General Voicemail Inbox user type to an employee's user profile, that employee will not have a separate voicemail inbox for their own voicemail messages.
- Click the Attendant tab, then click Edit.
-
Select Attendant only from the Attendant access type drop-down.
Learn more about Attendant access types.
- Select Attendant with ACD to grant the user access to both the Attendant and ACD applications (for Agent and Rollover user types). With this type of access, users launch Attendant from the grid icon in the upper right corner of the NiCE CXone platform, where it appears along with any other applications available to them.
- Select Attendant only to grant the user access only to the Attendant application (for Business User and General Voicemail user types). With this type of access, users launch Attendant from the grid icon in the upper right corner of the NiCE CXone platform; the only options these users have within NiCE CXone are My Account, Browser Compatibility, and Attendant.
- On the Attendant tab, select General Voicemail from the User Type drop-down.
-
Enter a PIN and select the Notification Type for this user, if different from the business unit default.
Learn more about fields in this step
Field
Details
PIN The personal identification number the user enters when accessing their voicemail by phone. Valid values are numerals 0-9 with a maximum of 6 characters. The user can change this number as needed in the Attendant application. Notification Type - Email Only: The user receives an email notification for each new voicemail message or missed call. Requires that the user have access to voicemail messages via the Attendant application or by phone. The missed call notification requires Studio scripting to enable.
- Email with File Attachment: The user receives an email notification containing the voicemail message as an audio file attachment. This does not require additional access to voicemail messages (such as by phone or the Attendant application). The missed call notification requires Studio scripting to enable and will be an email with no attachment.
You may need to update your email server security to ensure these emails are not quarantined. - Web Only: The user sees new voicemail messages in the View Voicemail Message section of the Attendant application. For missed calls, this option will send the notification as an email. The missed call notification requires Studio scripting to enable.
- Via Agent: The user receives notification of new voicemails or missed calls via Agent messages. The user must be a NiCE CXone agent to use this option, and must have access to voicemail messages via the Attendant application or by phone. The missed call notification requires Studio scripting to enable.
-
Enter the user's Extension or select Auto Assign Extension.
Learn more about fields in this step
Field
Details
Auto Assign Extension Select this checkbox to have Attendant generate a phone extension for this user. When you select this option, the Extension field automatically populates with the generated extension number. Extension The user's phone extension number that enables callers to reach the user directly. If Auto Assign Extension is selected, this field automatically populates with a generated extension and can't be modified. This number cannot start with a 0. - Select Allow Voicemail Web Access if you want the user to be able to manage their out of office status or voicemail using the Attendant application. If you don't select this option, users must have the Email with File Attachment notification type or be able to use the phone to check voicemail messages.
- Select Company Directory to have this user added to the corporate directory . Callers will be able to search for this user with details such as name, extension, or DID.
-
Configure optional details as needed for this user and click Done.
Learn more about fields in this step
Field
Details
Title The user's job title. DID Direct Inward Dialing Direct Inward Dial (DID). Service that assigns a unique phone number to each employee without a phone line for each number. (DID) number. Agents generally do not need a DID, as the system routes calls to agents based on their NiCE CXone agent ID. You can search for provisioned DIDs by number or point of contact (POC) name when assigning DID numbers to Attendant users.Backup User Select the default user who will receive forwarded calls when the user you are configuring sets their status to Out of Office. The user you are configuring can override their default backup user in the Attendant application any time they change their status to Out of Office. Check to Enter Non-US Number This option is disabled for general voicemail users. Personal Number This option is disabled for general voicemail users.
Configure Multiple Attendant Users at Once
You can configure multiple Attendant users at the same time using the bulk upload template for ACD user profiles. The template contains the fields in the ACD user profile, which includes Attendant settings. The following fields are specific to Attendant:
- Attendant Access Type: Appears only if your organization uses Attendant and enables access to that product. Select the option based on each user's Attendant user type. For agents or rollover users, set this to AttendantWithACD. For business users or a general voicemail inbox, set this to AttendantOnly. Use None only if you want a user not to have access to any Attendant features (including the corporate directory).
- Attendant User Type: Appears only if your organization uses Attendant and indicates the type of Attendant user. Select the option for each user that matches their access type as defined in the Attendant Access Type column. Valid options are agent or rollover (for access type AttendantWithACD) or business-user or general-voicemail (for access type AttendantOnly).
- PIN: Appears only if your organization uses Attendant with voicemail. Enter the user's PIN to access voicemails by phone. Required field for all Attendant users.
- DID:
Appears only if your organization uses Attendant and indicates the user's assigned DID Direct Inward Dial (DID). Service that assigns a unique phone number to each employee without a phone line for each number. number. Agents generally do not need a DID, as Attendant routes calls to them based on their agent ID.
- Extension: Appears only if your organization uses Attendant and indicates the user's phone extension number. Required field for all Attendant users.
- Notification Type: Appears only if your organization uses Attendant with voicemail. Defines the default way this user will receive notification of new voicemails. Valid options are: email-only, email-with-attachment, web-only (user does not receive notification of new voicemails outside of Attendant) or via-my-agent (user must be an Agent user, and receives notification of new voicemails via their Agent messages; user must have web portal or phone access to voicemail messages).
- Personal Phone: Appears only if your organization uses Attendant. Indicates the 10-digit personal phone number for the user. For non-US users, format the number using + followed by the country code and then the phone number. Required field for all rollover and business, but not an option for agents or general voicemail users of Attendant.
- In Directory: Appears only if your organization uses Attendant. Set to True to make this user available in the corporate phone directory. Otherwise, set to False.
- Allow Voicemail Web Access: Appears only if your organization uses Attendant with voicemail. To allow the user to use the Attendant application, set to True. Otherwise, set to False. Users without access to the Attendant application must have the Email with File Attachment notification type or be able to check voicemail by phone.
- Direct Voicemail Transfer:
Impersonate a User
Required permissions:Impersonate
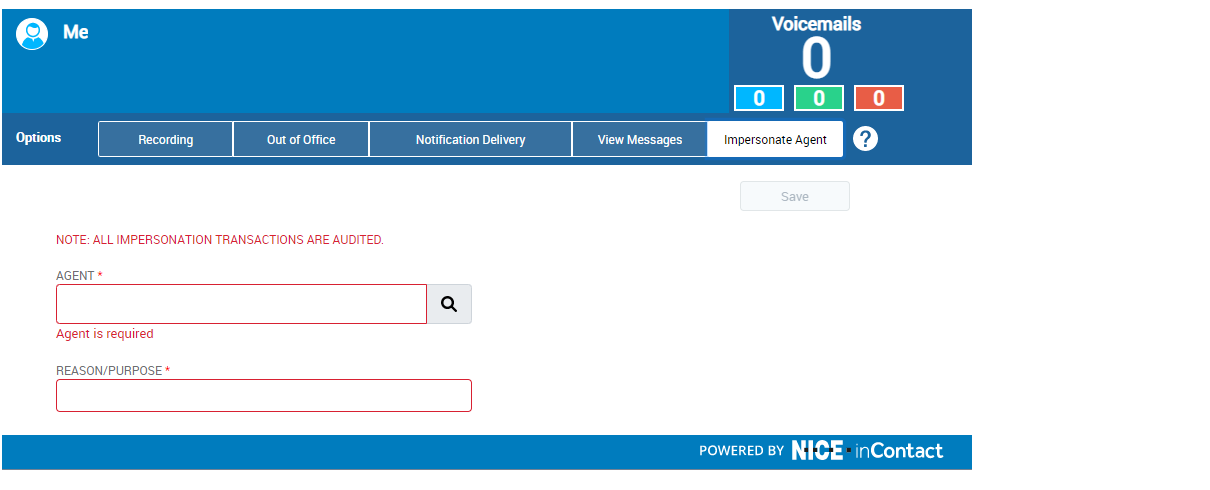
All impersonations require a reason and are logged for auditing purposes. Note that this log information is currently only available to NiCE CXone support staff.
- Launch the Attendant application.
- Click the Impersonate agent tab.
- In the Agent field, begin entering the name of the user you want to impersonate, then click the name in the list of matches.
-
Enter the Reason/Purpose for the impersonation.
-
Click Save. You are now impersonating the selected user.
- When you have completed the tasks you need to do as the selected user, end the impersonation session by clicking
 next to your name in the Impersonator bar below the name of the user being impersonated.

Access a User's Voicemail Messages
You can use the Impersonate User feature to access other users' voicemail messages.
-
In NiCE CXone, click the app selector
and select CXone Attendant. - Locate the user whose messages you want to view and start an impersonation session.
- Click View Messages.
- Complete the user tasks you need to do.
- End the impersonation session by clicking next to your name in the Impersonator bar below the name of the user being impersonated.
Change a User's Out-Of-Office Options
You can use the Impersonate User feature to change other users' out-of-office options.
-
In NiCE CXone, click the app selector
and select CXone Attendant. - Locate the user whose options you want to change and start an impersonation session.
- Click Out of Office.
- Change the user's out-of-office options.
-
End the impersonation session by clicking
next to your name in the Impersonator bar below the name of the user being impersonated.
View Users with Out of Office Status
You can view a list of Attendant users that currently have their status set to Out of Office.
- Click the app selector and select ACD.
-
Click
-
Click Manage Multiple Users.
-
Select Only Attendant fields from Fields to Include.
- Click Download Existing Users to download the bulk upload template containing the names, agent IDs, and email addresses of all existing users in the business unit.
- Open the bulk upload template in a program that can manage CSV files.
- Right-click the Status column and select Sort > Sort Z to A so that all users with the Out of Office status are grouped at the top of the list.
Create a List of Attendant Users
You can create a list of Attendant users from the bulk upload template.
- Click the app selector and select ACD.
-
Click
-
Click Manage Multiple Users.
-
Select Only Attendant fields from Fields to Include.
- Click Download Existing Users to download the bulk upload template containing the names, agent IDs, and email addresses of all existing users in the business unit.
- Open the bulk upload template in a program that can manage CSV files.
- If you are using a program with this feature, you can remove or hide all columns and rows that you don't want in the list of users.
- Select the columns and rows that you want to be part of the list, then copy and paste the list into a new file within the program you're using.