In the Outcome panel in CXone Mpower Agent Integrated, you can indicate the result of interactions. How you do this depends on the interaction type, such as call, chat, social message, voicemail, and so on. It also depends on the settings configured by your administrator. Indicating the result of an interaction may be required or optional. There are two ways to indicate the result of an interaction: statuses and dispositions.
Statuses
Statuses indicate the result of these kinds of interactions:
You cannot assign statuses to calls or voicemails.
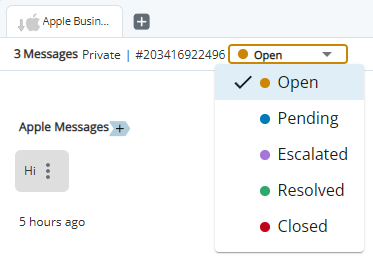
There are six possible statuses: New, Open, Pending, Escalated, Resolved, and Closed. You cannot change an interaction's status after it's set to Closed. In order to edit the Status of an interaction, it must be assigned to you. If you are previewing an interaction, you cannot edit its Status.
You can use the drop-down at the top of the
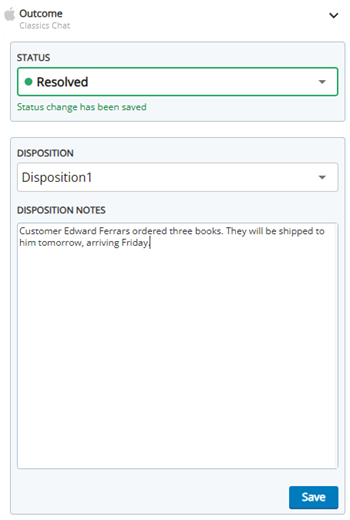
You can also select a status in the Outcome panel.
Dispositions
Dispositions indicate the result of calls and voicemails. Your administrator can also set up dispositions for any interaction type. For example, if dispositions are set up for your chat skill![]() Used to automate delivery of interactions based on agent skills, abilities, and knowledge., you can assign it both a status and a disposition. If a disposition is required, and you set the Status to Closed, you must assign a disposition to the interaction before you can unassign and dismiss it.
Used to automate delivery of interactions based on agent skills, abilities, and knowledge., you can assign it both a status and a disposition. If a disposition is required, and you set the Status to Closed, you must assign a disposition to the interaction before you can unassign and dismiss it.
Elinor Dashwood is an agent at Classics, Inc. She receives a call, an email, and a Facebook message. After the call, she assigns it a Disposition. She then opens the email and resolves the contact's issue. She assigns it a Status of Resolved. For the Facebook message, both the Status and Disposition fields appear. She resolved the contact's issue, but wants to call him later to make sure his order was delivered. She assigns the Facebook message a Status of Resolved and a Disposition of Rescheduled.
Tags and Notes
You may also see these fields in the Outcome panel:
-
Tags: Enter tags to help you find the interaction later. The Tags field can only appear for phone calls, voicemails, and work items.
-
Disposition Notes: Enter notes about the interaction.
In order to edit the Tags and Disposition Notes of an interaction, it must be assigned to you. If you are previewing an interaction, you cannot edit those fields.
Assign Statuses and Dispositions
- Open an interaction that is assigned to you. Click Options
 > Outcome
  .
. -
Select a Status, a Disposition, or both from the drop-downs.
- You can enter Disposition Notes about the interaction. You can also add Tags to help you find the interaction later.
- Click Save.


