

This overview is for agents. If you're an administrator, learn about administrative tasks for Copilot for Agents.
NiCE CXone Copilot for Agents uses artificial intelligence to help you handle interactions The full conversation with an agent through a channel. For example, an interaction can be a voice call, email, chat, or social media conversation.. It appears
-
Agent or self-service transfer summaries
You can prompt Copilot for Agents for help by entering text in the search bar at the bottom and pressing Enter. For best results, ask a specific question. One- or two-word submissions are handled as keyword searches. For example, if you enter dishwashers, Copilot for Agents converts your search to Tell me about dishwashers. It displays processing dots  while it scans your knowledge base for answers to your search. The dots disappear when Copilot for Agents finds and displays relevant results, or when it finds no relevant results.
Copilot for Agents appears when you're assigned an interaction and Copilot for Agents is enabled for the skill Used to automate delivery of interactions based on agent skills, abilities, and knowledge.. When you unassign and dismiss the interaction, Copilot for Agents closes. Based on how your administrator has configured Copilot for Agents, some of the features described below may not appear for you.
If your administrator has enabled Hide Copilot for Agent for your profile, Copilot for Agents does not appear in the App Space at all, even though features like Automated Summary (AutoSummary) continue to run in the background.
Real-Time Summaries
As you're handling an interaction, Copilot for Agents generates a summary for it. This summary tells you what's currently happening in the interaction. For example, "Edward is having a shipping problem with his book order." It appears at the top of Copilot 
 to read the full summary. You cannot edit real-time summaries.
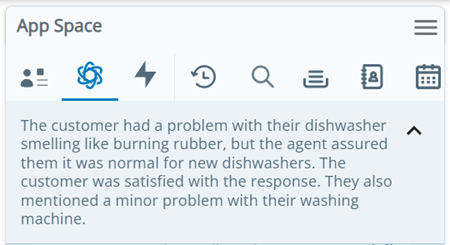
Real-time summaries help you remember what's happening in an interaction. They are especially useful for message threads that have been inactive for a while. You can catch up on the interaction without having to scroll through past messages.
Customer Sentiment
Copilot for Agents shows you the contact's sentiment, or current mood. Sentiment can be Positive  , Neutral
  , or Negative
  . It appears in a card in Copilot . When the contact's sentiment changes, a new sentiment card appears. These cards include the reason behind the contact's sentiment.
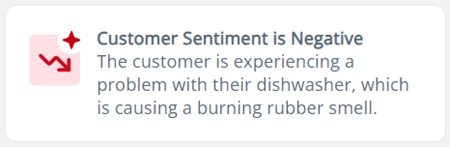
You can use customer sentiment to identify which contacts may need attention. Giving extra attention to contacts with Neutral or Negative sentiment may change their sentiment to Positive .
Email Responses
This content is for a product or feature in a public preview program and is not yet available for everyone. If you have questions not answered in the online help, talk to your manager.
If your administrator has enabled this feature, Copilot for Agents generates email responses you can send to contacts The person interacting with an agent, IVR, or bot in your contact center..
Here's how it works:
- Copilot for Agents collects text from the email thread.
-
It analyzes that text to generate a list of topics. It displays this list to you in an email card in Copilot
. -
In that email card, you select the topics you want Copilot for Agents to use to generate an email response. You can add custom topics to the list.
-
When you click Generate, Copilot for Agents generates a response based on those topics and places it in the response field. You can then edit the response before sending it to the contact. To do so, highlight parts of the response, click Copilot
 in the email text editor, and prompt Copilot for Agents to Simplify or Rephrase the highlighted text.
 -
After Copilot for Agents generates an email response, it compares the response to the topics in the email card and flags any topics the response did not address. Review flagged topics and manually add a response for them before sending the email to the contact.
-
Copilot for Agents also generates real-time summaries, sentiment, and an Automated Summary (AutoSummary) for email interactions, the same way it does for voice and chat interactions.
KB Answers
Copilot for Agents suggests responses with solutions to the contact's issue. For example, if a contact says they're having trouble with Product A, the suggested response could be, "Try resetting Product A. Go to Settings and click Reset."
Here's how it works:
- Copilot for Agents collects text from the contact's messages. For calls, it transcribes what the contact says into text.
- It analyzes that text to identify the contact's issue. It searches your organization's knowledge base A knowledge management system that hosts knowledge articles. (KB) for solutions to the issue. Using the KB content it finds, it generates appropriate, helpful responses.
-
It displays those responses in Agent Workspace (Agent). They appear as KB answer cards in Copilot
. Click Insert Article  to place the KB answer in the response field, where you can edit it before sending it to the contact. Click Send Article
  to send it as-is.
Depending on how your administrator has configured KB answers, you may need to manually prompt Copilot for Agents for KB answers by entering text in the search bar at the bottom and pressing Enter.
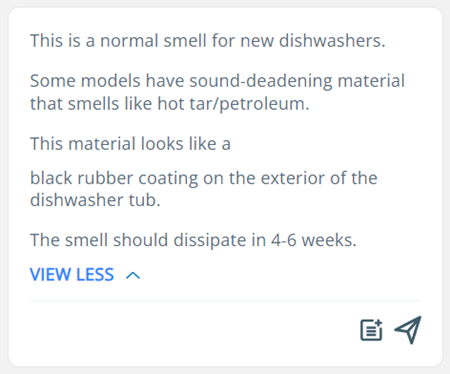
KB answers may include sub-cards with additional information. These sub-cards are separate sections in the KB answer card in Copilot . Your administrator may use these sub-cards to display information that's for internal use only. Your administrator may disable Insert Article and Send Article for these sub-cards.
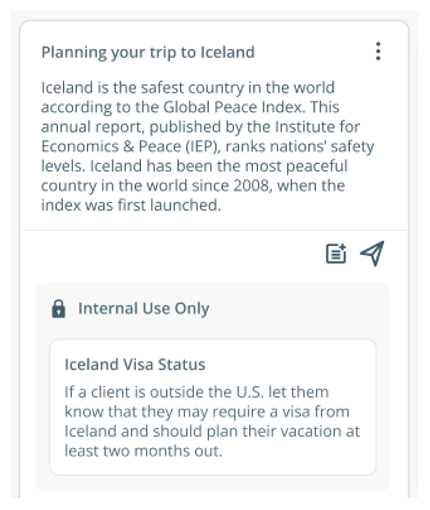
Filter KB Answers by Knowledge Management (Expert) Tags
If your administrator has enabled this, you can use tags to filter KB answers. After you apply tags, Copilot for Agents gives you a KB answer specific to the tags you selected.
-
When there are filters you can apply to the KB answer search, a Copilot Filters card appears. In this card, click Modify Filters.
-
Use the drop-downs to select the tags you want to apply.
-
In the Tag Inclusion drop-down, select one of the following:
-
Show results that contain any of the tags: The KB article can have any of the tags you've selected.
-
Show results that contain all the tags: The KB article must have all of the tags you've selected.
-
-
Click Apply. A green success message appears telling you that the filters have been applied. You can view the tags you've applied by clicking Filters
 in the search bar at the bottom of Copilot for Agents. When filters are applied, a number appears next to this icon.
Process Steps
If your administrator has enabled this, Copilot for Agents breaks down KB answers into individual steps. These steps appear in the KB answer card under a drop-down called Process.
For digital messages, you can:
-
Next to Process, click Insert All
to place all the steps in the response field. You can edit these steps before sending them to the contact. -
Next to Process, click Send All
to send all of the steps. -
Click Insert
next to a step to place it in the response field, where you can edit it before sending it to the contact. -
Click Send
next to a step to send it to the contact.
After you send a step to the contact, that step turns gray, and Insert and Send are disabled.
KB Web Links
Copilot for Agents provides you with links to the KB articles it used to generate the KB answer. These links appear in the KB answer card under a drop-down called Web Links.
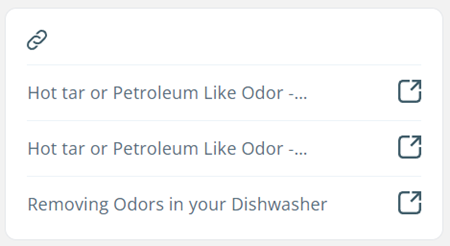
Click Pop Out  to open the full article in a new tab and read it. If you're handling a digital message, you can:
-
Click Insert
to place the link in the response field, where you can edit it before sending it to the contact. -
Click Send
to send the link to the contact.
If your organization uses a NiCE CXone Knowledge Management (Expert) KB and the linked article is marked as private, those icons aren't available.
KB Images
Copilot for Agents displays images from the KB articles it used to generate the KB answer. These images appear in the KB answer card under a drop-down called Images.
Click Expand Image  to enlarge the image. If you're handling a digital message, you can click Send Image to send the image to the contact. If your organization uses an Knowledge Management (Expert) KB and the image is from an article that's marked as private, Send Image isn't available.
AI Agents (Cognigy) for Process Automation (Task Assist)
If your administrator has enabled this, Copilot for Agents displays a AI Agents (Cognigy) for Process Automation (Task Assist) card with a list of tasks it can perform for you. These tasks involve collecting customer data from a CRM Third-party systems that manage such things as contacts, sales information, support details, and case histories. or other third-party application your organization uses. This saves you the time and trouble of collecting that data yourself.
Here's how it works:
- Copilot for Agents displays a AI Agents (Cognigy) for Process Automation (Task Assist) card with a list of pre-configured tasks. These tasks request Copilot for Agents to get customer data, such as an account number or bill balance.
-
When you select a task, Copilot for Agents gets the data from the application where your organization stores it. This could be a CRM
Third-party systems that manage such things as contacts, sales information, support details, and case histories., a ticketing or billing application, or another third-party application. -
Copilot for Agents displays the customer data to you in a new card in Copilot
. Click Insert to place the data in the response field. You can edit it before sending it to the contact The person interacting with an agent, IVR, or bot in your contact center.. -
When you're ready, click Send
.
Elinor Dashwood, an agent, is chatting with Edward Ferrars, a contact. Edward has an outstanding balance on a bill. He asks what this balance is. Elinor finds the AI Agents (Cognigy) for Process Automation (Task Assist) card in Copilot and selects a task called Find Bill Balance. Copilot for Agents collects this information from Classics, Inc.'s billing system. It displays Edward's balance in a card in Copilot . Elinor clicks Send to send the number to Edward.
Custom Cards
If your administrator has configured one, Copilot for Agents can display a Custom Card during an interaction. Custom Cards are built and activated by your administrator specifically for your organization — unlike cards Copilot generates automatically, such as sentiment or KB answers. Your administrator can configure four types of Custom Card:
-
Text Card: Displays predefined guidance in a visually rich card with an icon, color, body text, and optional links you can open.
-
Adaptive Card: Displays custom-formatted content — such as knowledge guidance, account details, or other reference information — laid out and formatted specifically by your administrator. This can include bold or italic text, bulleted or numbered lists, and clickable links, so information is easier to scan. Adaptive Cards are for reference only: you cannot edit, insert, or send their content, and they don't include buttons or fields to fill out.
-
Checklist Card: Walks you through a sequence of steps, such as escalating an issue or opening a ticket. You can mark each item as complete as you work through it.
-
Decision Tree: Guides you through a structured set of questions — either as a conversational interview or as a form you fill out and submit — to help you collect information consistently, such as for an insurance claim or a troubleshooting flow.
Depending on how your administrator has configured a Custom Card, it appears in one of two places:
-
In the Copilot Stream: The card appears inline in Copilot, alongside other cards such as KB answers and sentiment.
-
As a Copilot Page: The card is available as a separate page you open from the Copilot menu (⋮). Administrators typically use this option for longer or more detailed content you don't need to see immediately.
For information on how administrators create and configure Custom Cards, see Elements.
Print Decision Tree As PDF
Copilot for Agents displays a Decision Tree card that guides you through a structured set of questions during an interaction. This feature is available if your organization uses CXone Advanced and your administrator has configured a Decision Tree element in your Copilot for Agents profile.
-
In the App Space, the Decision Tree card opens automatically when an interaction begins. The card displays the Decision Tree name (for example, First Notice of Loss), the current form section, and the questions for that section.
-
Answer the questions in each section. Questions may include text fields, drop-downs, checkboxes, or other input types. Navigate through all sections until you have answered all required questions.
-
When you have completed all sections, the Wrap Up Interview pop-up appears. It displays a summary of the interview.
-
From the Wrap Up Interview pop-up, you can:
-
Click Review Responses to open the Interview Summary and review all answers before submitting.
-
Click Submit to submit the Decision Tree directly.
-
-
When you click Review Responses, the Interview Summary modal opens. It displays:
-
Contact name, date and time of the interview, and the agent name at the top.
-
All sections with their questions and captured answers in read-only format.
The Interview Summary is read-only. You cannot edit answers from this screen.
-
-
To include questions that were skipped based on pre-condition rules:
-
Turn the Show Skipped Fields toggle to ON. Skipped fields appear inline in their original section position with -- as the value, indicating no answer was captured.
-
To hide skipped fields again, turn the toggle OFF. The toggle defaults to OFF.
-
-
In the Interview Summary modal, click Print as PDF.
-
The system generates a PDF and downloads it to your local machine.
-
If Show Skipped Fields is ON, skipped fields are included in the PDF. If the toggle is OFF, skipped fields are excluded.
-
Click Submit in the Interview Summary modal to submit the completed Decision Tree.
Transfer Summaries
When an interaction The full conversation with an agent through a channel. For example, an interaction can be a voice call, email, chat, or social media conversation. is transferred to you, Copilot for Agents generates a transfer summary. This summary tells you what happened in the interaction before it was transferred to you. It appears in a card in Copilot . There are two kinds of transfer summaries:
-
Agent transfer summaries: What happened while a previous agent was handling the interaction. For example, "Agent Elinor helped Edward solve his shipping problem, but he's also having issues with billing."
-
Self-service transfer summaries: What happened while a bot
A software application that handles customer interactions in place of a live human agent. or IVR Interactive Voice Response. Automated phone menu contacts use via voice or key inputs to obtain information, route an inbound voice call, or both. menu was handling the interaction. For example, "Autopilot (Omilia) helped Edward solve his shipping problem, but he requested a live agent to help him with a billing issue."
You can use transfer summaries to catch up on interactions. Contacts The person interacting with an agent, IVR, or bot in your contact center. won't have to repeat information.
Journey Summaries
Journey summaries provide context about the contact's The person interacting with an agent, IVR, or bot in your contact center. past interactions with your organization. For example, "Edward called to place an order on 22 September 2024. Edward's book order was delivered on 30 October 2024." The journey summary appears in a card in Copilot . If your administrator has enabled this, click Expand  in the journey summary to view details about each of the past interactions.
Copilot Automated Summary (AutoSummary)
When you finish an interaction, Copilot for Agents generates a summary for it. This summary tells you what happened during the interaction. For example, "Edward had a problem with his book order. Elinor found that the issue was an invalid shipping address. Edward gave Elinor his correct address, and she updated it in the system. His order is now on its way." It appears in the Notes field in the Outcomes window. You do not need to write a summary yourself. The Copilot Automated Summary (AutoSummary) describes the interaction from beginning to end, focusing on why the contact The person interacting with an agent, IVR, or bot in your contact center. reached out and what you did to help them. You can edit a Copilot Automated Summary (AutoSummary) before saving it. A Copilot Automated Summary (AutoSummary) can be saved with the contact's CRM record, if your administrator has enabled this.
Provide Feedback
You can provide feedback to Copilot for Agents through:
-
Like and Dislike Icons: You can Like
 and Dislike
  each KB answer. Additionally, if you send a KB answer, it is marked as liked.
 -
Feedback Detail Card: Depending on how your administrator has configured the Feedback Detail card, you can use it to:
-
Enter general feedback about your experience with Copilot for Agents.
-
Add tags and enter comments to provide additional context about the KB answers you liked and disliked.
-
Like
and Dislike the KB answers you didn't like or dislike during the interaction The full conversation with an agent through a channel. For example, an interaction can be a voice call, email, chat, or social media conversation.. -
Review all the KB answers that Copilot for Agents generated during the interaction.
For calls, the Feedback Detail card appears when the call ends. It disappears when you assign it a disposition
Result assigned by the agent or system at the end of a voice (disposition) or digital (status) interaction..For digital
Any channel, contact, or skill associated with Digital Experience (DX). messages, the Feedback Detail card appears after you select a Status of Resolved or Closed. It disappears when you click Save in the Outcomes window for a Status of Closed. -
How to Retry Automated Summary (AutoSummary) Manually
If Automated Summary (AutoSummary) fails to generate a summary for an interaction, you can manually retry the process.
-
Check the Notes field in the Outcome Panel. If Automated Summary (AutoSummary) times out, the Notes field becomes manually editable.
If the Notes field is disabled but Automated Summary (AutoSummary) Card is enabled, you can enter text manually in the Automated Summary (AutoSummary) Card.
-
Click the Retry icon (⟳) next to the Notes field or Automated Summary (AutoSummary) Card. You can retry up to 3 times. After 3 attempts, the icon disappears.
The retry option is available only when Automated Summary (AutoSummary) times out.
-
If the retry is successful, the Notes field updates with the retrieved summary. If Send Automated Summary (AutoSummary) to Outcome Panel is active, the Automated Summary (AutoSummary) Card also updates.
-
If retry fails, a notification appears: “Unable to retrieve the summary at this time.”
After retries fail, you can manually enter notes in the editable field.
-
If Automated Summary (AutoSummary) times out after the interaction ends and the card is enabled, an empty Automated Summary (AutoSummary) Card appears with the message: “Error generating AutoSummary.”
-
If the card is editable, you can enter text manually.
Retry success updates both the Automated Summary (AutoSummary) Card and Notes field if linked.