

The Account Settings page in the Admin application lets you control general settings related to NiCE CXone user accounts.
Configure the Idle User Timeout
Required permissions: Admin > Account Settings > Edit
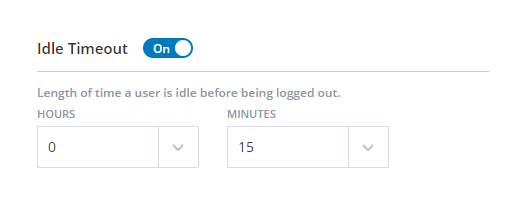
By default, NiCE CXone automatically logs users out when they have been inactive for 20 minutes. You can adjust this setting to better meet the needs of your organization. This setting affects all users, but only when they are logged in to the NiCE CXone platform. It does not impact users logged in to applications such as MAX.
- Click the app selector
 and select Admin.
 - Go to Tenant Configuration > Account Settings.
- Find the Idle Timeout section on the User Settings tab.
- If you don't want inactive users to ever be automatically logged out of the NiCE CXone web portal, click Idle Timeout to Off.
- If you want to adjust the length of time before inactive users are automatically logged out, set the values you want in the Hours and Minutes fields. The minimum value you can configure is 5 minutes. If you want to set the timeout for more than 8 hours, you must turn the setting off.
- Click Save.
Configure the User Inactivity Lock for Your System
Required permissions: Admin > Account Settings > Edit, Security Policy > Configure
You can configure user accounts to lock after a certain number of days of inactivity. This option is turned off by default. Turning on this setting can prevent attackers from breaching your system. The following instructions describe how to manage the user inactivity lock setting for your system. You can override the system-level settings at the employee level.
The user inactivity lock applies to employees using any authentication type, including SSO.
When you set Lock Users to Off, accounts that were locked while it was On remain locked.
- Click the app selector and select Admin.
- Go to Tenant Configuration > Account Settings.
-
On the User Settings tab, click Lock Users to On to apply a user inactivity lock to all the users in your system. Turn it Off to disable the user inactivity lock.
-
If you set Lock Users to On, set Inactive Days Before User Can Be Locked to the number of days a user account must be inactive before it locks. The default is 90 days after you enable the inactivity lock, but you can specify any number of days from 7 to 90.
When you decrease the Inactive Days Before a User Can Be Locked threshold, the setting applies retroactively. For example, if you change it from 30 days to 7 days, all employee profiles that have been inactive for at least seven days are immediately locked.
If you increase the threshold, accounts that were locked at the lower threshold remain locked. For example, if you change the setting from 7 days to 10 days, an account that has been inactive for eight days and was already locked under the previous setting will remain locked.
- Click Save.
Add External Links to My Profile
Required permissions: Admin > Account Settings > Edit
You can add links to the Additional Applications tab of the My Profile page. They can be links to external websites or third-party applications. NiCE CXone users can click the links to launch the page or application from within the platform. For example, you could link to a CRM like Salesforce.
You can add up to 50 external links.
- Click the app selector and select Admin.
- Go to Tenant Configuration > Account Settings.
- Click the Additional Applications tab.
- Enter an intuitive Name or call to action for the application. This is the hyperlinked text that users see in the Additional Applications tab in My Profile, so choose a name that is familiar to users.
- For Link, enter the URL of the application that you want to open. This URL opens in a new browser tab when clicked. Be sure to include https:// or http:// at the beginning of the link.
- Click Add.
- Repeat these steps to add links to other applications.
- Click Save.
Configure the SSO State Timeout
Required permissions: Admin > Account > Settings Edit, Security Policy > Configure
You can customize the amount of time that users remain logged in to NiCE CXone before they need to re-authenticate. By default, NiCE CXone stores information about users' SSO login state for a week. During that time, users remain logged in and don't need to re-authenticate.
- Click the app selector and select Admin.
- Go to Tenant Configuration > Account Settings.
- On the User Settings tab, click SSO State to Off to use the default of one week. Turn it On to customize the SSO state timeout.
-
If you turned SSO Stateto On, set Set Hours For User State to the number of days an SSO user can be logged in to the NiCE CXone system without needing to re-authenticate. Possible values are 1-168 hours. If you don't specify a value for Set Hours For User State, the default value of 48 hours applies.
When you configure a new Set Hours For User State, the new value takes effect after the previous policy expires. For example, if you change the setting from 14 to 7, a user who authenticated via SSO 10 hours ago will remain logged in for four more hours. After that time passes and the user re-authenticates, they will remain logged in for seven hours before needing to authenticate again.
- Click Save.
Customize Domain Name
Required permissions: Admin > Account Settings > Edit
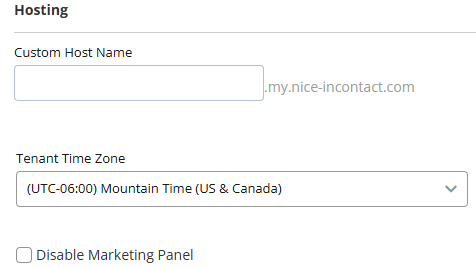
NiCE provides your organization an URL during setup for accessing NiCE CXone. You can customize that URL with a host name that is more meaningful to your users. The URL will use the hostname to create a custom URL such as "tomsawyer.myclassicsdomain.com".
- Click the app selector and select Admin.
- Go to Tenant Configuration > Account Settings.
- On the Host Settings tab, enter a value in Custom Host Name.
- Click Save.
Set a Default Time Zone
Required permissions: Admin > Account Settings > Edit
You can configure a default time zone for your NiCE CXone system. When you create a new employee profile, it defaults to the time zone set in Account Settings.
You can also set a time zone in your business unit settings, which impacts ACD components such as ACD reports or hours of operation.
- Click the app selector and select Admin.
- Go to Tenant Configuration > Account Settings.
- On the Host Settings tab, select a Tenant Time Zone.
- Click Save.
Generate SCIM Bearer Token
Required permissions: Admin > Account Settings > Edit
SCIM bearer tokens are used when setting up an integration with an external identity provider (IdP) using SCIM. Save the token somewhere safe. You won't be able to come back and access the same token again. If you lose it, you will need to create a new token.
- Click the app selector and select Admin.
- Go to Tenant Configuration > Account Settings.
- Click the SCIM tab.
- In the SCIM Token section, select all the users you want to be able to use the bearer token from the Users drop-down. Enter the Days to expire old tokens value you want.
- Click Generate.
- Copy the token and save it somewhere safe. You will not be able to access this token again.
- Click Save.
Enable or Disable Optional SCIM Provisioned Fields
Required permissions: Admin > Account Settings > Edit
SCIM is a tool that allows you to securely sync user data between multiple applications. With SCIM, you can sync user data between NiCE CXone and third-party applications, like Okta.
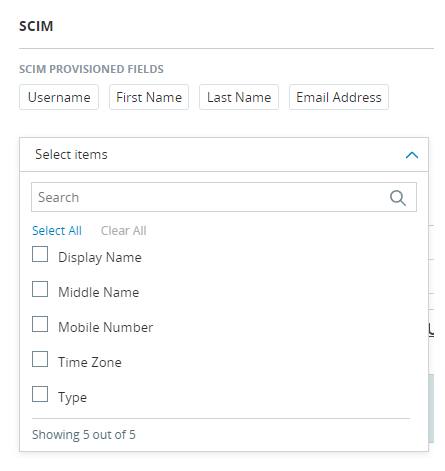
The Username, First Name, Last Name, and Email Address fields are enabled automatically after you integrate with a third-party application. They are required and cannot be disabled. You can enable these optional fields:
- Display Name
- Middle Name
- Mobile Number
- Time Zone
- Type
- Login Authenticator
- Primary Role
- Team
- Click the app selector and select Admin.
- Go to Tenant Configuration > Account Settings.
- On the SCIM tab, click the SCIM Provisioned Fields drop-down and select the fields you want to enable. They appear above the drop-down.
- To disable fields, clear them in the drop-down or click the X next to the field name.
- Click Save.
Configure a Login Banner
Required permissions: Admin > Account Settings > Edit
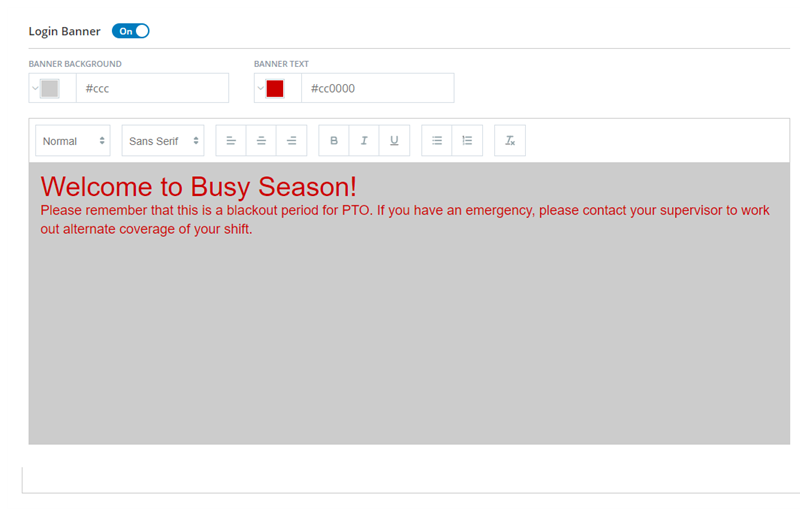
You can configure a custom banner to appear in the upper left corner of your NiCE CXone login page. This banner can contain any text-based message that you want all users to see. You cannot currently display different banners to different users.
The banner appears immediately after you save it. You can turn the banner off when it's not needed.
- Click the app selector and select Admin.
- Go to Tenant Configuration > Account Settings.
- Click the Login Settings tab.
- To make the login banner visible, set Login Banner to On. To disable the banner, set it to On.
- Enter a banner message in the large text area.
- Use the formatting toolbar options at the top of the text area to modify the font and style, add lists, and make other formatting changes.
- Click Banner Background to change the color of the banner background.
- Click Banner Text to change the color of the banner message.
- Click Save.
Disable the Marketing Panel
Required permissions: Admin > Account Settings > Edit
Your NiCE CXone login page is split in half. One side is the login form where users enter their credentials. The other side is the marketing panel where NiCE displays promotional materials. You can enable or disable this panel from the Account Settings page. It is enabled by default.
- Click the app selector and select Admin.
- Go to Tenant Configuration > Account Settings.
- Click the Host Settings tab.
- To remove the marketing panel, select Disable Marketing Panel.
- To re-enable the marketing panel, clear Disable Marketing Panel.
- Click Save.
Create a List of Allowed Email Domains
Required permissions: Admin > Account Settings > Edit
You can create a list of allowed email domain names. This restricts the email domains that NiCE CXone accepts for employee profile email accounts.
If you attempt to add an email domain that isn't on the list, you'll get an error message. Existing employees with email domains that aren't on the list won't lose access to NiCE CXone. However, if you need to change their email address in the future, you'll need to use one with an allowed domain.
All email domains are allowed until you enter one on the list. You can have up to 300 allowed email domains.
- Click the app selector and select Admin.
- Go to Tenant Configuration > Account Settings.
- Click the User Settings tab.
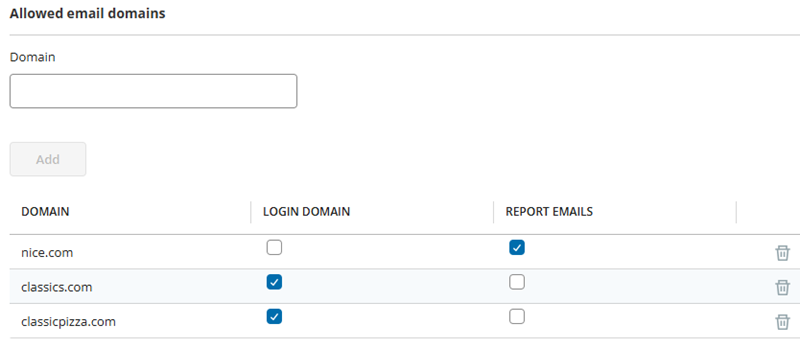
- In the Domain field, enter the email domain that you want to allow. For example, classics.com.
- Click Add. The domain appears in the list below this button. The Login Domain checkbox is selected by default for each domain you add.
- Repeat for each email domain you want to allow.
- To delete a domain, click the trashcan
 .
. - To remove the domain from this list but leave it in the Report Email list, clear Login Domain. Entries must have at least one of these options selected.
- Click Save.
Create an Allowlist of Email Domains to Receive Scheduled Reports
Required permissions: Admin > Account Settings > Edit
You can create an allowlist of email domains that can receive scheduled reports. This gives you control over who receives these reports and helps you protect your platform data and limit the number of unnecessary reports that are sent to certain user accounts.
Any domains you add to this allowlist can also be added to the login domain allowlist.
- Click the app selector and select Admin.
- Go to Tenant Configuration > Account Settings.
- Click the User Settings tab.
- In the Domain field, enter the email domain that you want to allow. For example, classics.com.
- Click Add. Allowed domains appear in the list below this button.
- Repeat for each email domain you want to allow for scheduled reports.
- Click the checkbox in the Report Emails column for each domain you added.
- To delete a domain, click the trashcan .
- To remove a domain from this allowlist but leave it in the Login Domain list, clear Report Emails for the domain. Entries in this list must have at least one of these options selected.
- Click Save.