You can download a CSV file containing a table of your existing employees and their settings. Modify this file to quickly change settings for your existing employees and to add new employees. Alternatively, you can create employees one at a time. You can also add multiple employees at once on the Bulk Upload Records page.
If you want to modify your employees' contact handling settings you must do so from ACD Users.
Processing bulk record creation or change requests can impact the performance of your system. To reduce the impact, it is recommended that you:
-
Make your bulk upload updates outside of your normal business hours.
-
Reduce the amount of data to process by marking the rows that need processing in the Row Changed column in the CSV file. When you upload the file, select Changed Rows Only for Rows to Include.
-
Limit your uploads to 1000 or fewer records per request. If this means uploading in batches, wait for one batch to finish processing before uploading the next.
-
Only click the submission button once, even if it takes time to respond.
- Click the app selector
 and select Admin.
 - Click Employees.
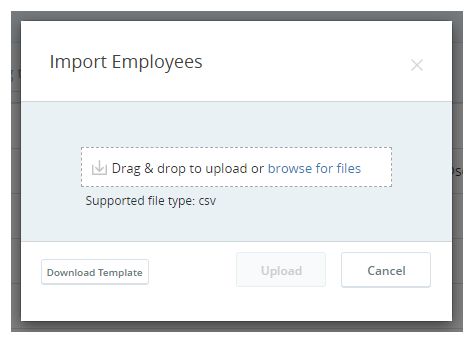
- Click Import Employees.
-
Click Download Template.
-
Open the CSV file in a spreadsheet editor like Microsoft Excel or a text editor like Notepad.
-
Modify the settings of existing employees as needed. Create new rows and enter details to create new employee profiles. Each new employee needs at least a Username, Email Address, First Name, Last Name, Role Name, and Team Name.
 Learn more about fields in this step
Field
Details
Username The username to assign to the employee. The username must be in the form of an email address, but it doesn't have to be a real email address. It can be different from the Email Address field.
You can edit employee usernames by changing the value in this field. If the User ID field is incorrect, the employee's username won't update. The same limitations for editing usernames in the employee profile apply to editing them with bulk upload.
This field is required.
First Name The user's first name. Special characters are not accepted in this field, including, but not limited to: ! / < > ? % ".
This field is required.
Last Name The user's surname. Special characters are not accepted in this field, including, but not limited to: ! / < > ? % ".
This field is required.
Email Address A valid email address associated with the employee. NiCE CXone sends emails, like activation invitations and password resets, here. You can use the same email address for multiple employee profiles. If you have a list of allowed email domains, then the employee's email must have an allowed domain for the employee to be created.
This field is required.
Mobile Number The employee's mobile or cell phone number. This field is for your records only. NiCE CXone doesn't use this information.
Time Zone The time zone allowed for dialing. By default, an employee's time zone is the same as the applicable tenant
High-level organizational grouping used to manage technical support, billing, and global settings for your NiCE CXone system. time zone and is automatically populated. You can edit the time zone if needed. The time zone must be in Internet Assigned Numbers Authority (IANA) format. For example, America/New York. If you don't select one, the user is assigned to time zone configured for your system.
Hire Date The date you hired an employee. This field is for your records only. NiCE CXone doesn't use this information. Rank
This field shows only if your system includes WFM. It determines the priority when creating a schedule.
Invite For new employees, enter True to automatically send an activation email to the employee when the file upload completes. Enter False to manually invite the employee. If you enter True and the user is enabled with SSO, they are immediately activated. No verification email is necessary.
ACD Login ID Enter the employee's ACD login ID here. This is a unique ID that lets an employee connect to a contact center.
Important If your tenant is configured with a third-party ACD, ensure that the ACD Login ID is assigned here. This is necessary to map the agent state, monitor real-time adherence, and generate reports.
Role Name The employee's role. This determines what the employee can do in NiCE CXone based on the role's assigned permissions.
This field is required.
Team Name Name of the team that you want the employee to be a part of. This field is required. OS Login OS Login represents the user's login details to their desktop operating system in the format Domain\UserName, for example, NICE\MyUser. The Recording Management (CXone) application requires OS Login information for screen recording to work on advanced configurations, such as, Engagement Hub (Multi-ACD/Open), multi-session environments, and more.
The OS Login value for each employee profile must be unique. The OS Login value cannot be used for multiple employee profiles, even if some of the duplicate employee profiles are inactive. If multiple employee profiles have the same OS Login value, ScreenAgent will not run for any agent using that OS Login value.
MFA Secret An MFA secret pairs the employee account in NiCE CXone with a hardware or virtual MFA device that employees use to generate a one-time password (OTP). NiCE CXone allows you to generate an MFA secret either manually or automatically. For more information, see MFA Secrets. MFA Time Period Enter a value between 15 and 300 seconds. It must be compatible with the virtual or hardware MFA device your employees use. For example, Google Authenticator only allows a value of 30 seconds. External Identity If you want to authenticate the employee using an external identity provider (IdP), enter their ID in the IdP. This is only required if the user is configured to use an external identity provider (IdP). The value you enter here depends on the IdP you use. Can Be Coached Or Evaluated Set to TRUE or FALSE.
Allows the employee to be evaluated. You will be billed for QM for this employee. This attribute appears only if your system includes NiCE CXone Quality Management (CXone). This option is selected by default for new employee accounts. If you add QM to a system that has existing users, you must manually enable this setting for those users.
Can Be Scheduled Set to TRUE or FALSE.
Allows the employee to be scheduled. You will be billed for WFM for this employee. This attribute is visible only if your system includes WFM. This option is selected by default for new employees. If you add WFM to a system that has existing users, you must manually enable this setting for those users.
Important Users who don't have this attribute selected won't appear in employee lists when creating weekly rules or shift templates. Removing this attribute from a user deletes that user from any weekly rules or shift templates to which the user is assigned.
Can Be Recorded Set to TRUE or FALSE.
Allows the employee's voice to be recorded. You will be billed for voice recording for this employee. This attribute is visible only if your system includes Recording Management (CXone) or Recording Management (CXone) Advanced.
This option is selected by default for new employees. If you add Recording Management (CXone) or Recording Management (CXone) Advanced to a system that has existing users, you must manually enable this setting for those users.
Can Be Analyzed Set to TRUE or FALSE.
Allows the employee's recorded interactions to be analyzed by Interaction Analytics (CXone). You will be billed for Interaction Analytics (CXone) for this employee. This attribute appears only if your system includes Interaction Analytics (CXone). This option is not enabled by default for new employees.
Status Whether the employee is currently active, inactive, or unregistered. Virtual Agent Enabled Set to TRUE or FALSE.
When this attribute is selected, the employee profile is marked as a non-human profile. This attribute does not enable a virtual agent in Virtual Agent Hub. It appears only if your system includes Digital Experience (DX). This option is not enabled by default for new employees.
Virtual Agent Type Set to Digital Bot, Digital Survey, or Off. If Virtual Agent Enabled is True, this field identifies the type of virtual agent for this employee profile.
Can View BI Reports Set to TRUE or FALSE.
Allows employees to open BI reports. Requires that the employee has individual BI Report permissions to access any BI reports. BI reports have no usage fee for up to 10% of either your concurrent or configured users, depending on your pricing model. Once the 10% threshold is passed, you will be billed for each additional employee with this checkbox selected. This attribute is not enabled by default for new or existing employees.
Can be Recorded Screen Set to TRUE or FALSE.
Allows the employee's screen to be recorded. You will be billed for screen recording for this employee. This attribute appears only if your system includes Recording Management (CXone) Advanced.
This option is selected by default for new employees. If you add Recording Management (CXone) Advanced to a system that has existing users, you must manually enable this setting for those users. This attribute is necessary for enabling screen recording, screen monitoring, or both.
Middle Name An optional middle name. Special characters are not accepted in this field, including, but not limited to: ! / < > ? % ". Display Name This field auto-populates from the First Name, Middle Name, and Last Name fields, but you can edit the display name as needed. Users from other teams can view the display name. They cannot view other information about the user unless they have the View Employee permission.
Type Use Type to organize employees outside of their assigned Role or Team. Type allows you to organize employees for reporting purposes. This field makes reporting easier because types are not tied to permissions or unavailability codes.
Views Enter the name of up to 10 views Users can see and navigate to the feature page from the menu and see the contents of the page. This is a foundation permission that may be included with higher-level permissions. to assign them to your employee. Separate each view with a comma.Login Authenticator Name The login authenticator you want to assign to the user. Each user must be assigned to one login authenticator. User ID This field is filled automatically when you download existing records. The User ID must be included to edit employee usernames with bulk upload. Deactivate This field allows you to deactivate user profiles. Enter True to deactivate the user. The default value is False. Agent Integrations TRUE or FALSE. Allows employees to see CRM Third-party systems that manage such things as contacts, sales information, support details, and case histories. records in the customer card in Agent Workspace (Agent) Suite applications. The customer card displays CRM records related to the contact the employee is handling. This option is not enabled by default for new employees.Digital Engagement Set to TRUE or FALSE.
Allows the employee to work on digital contacts. You will be billed for Digital Experience (DX) for this employee. This option is not enabled by default for new employees. This attribute appears only if your system includes Digital Experience (DX).
Customer Card Set to TRUE or FALSE. Allows employees to access the customer card in Agent Workspace (Agent). This option is not enabled by default for new employees. Can Edit BI Reports Set to TRUE or FALSE.
Allows employees to edit prebuilt BI reports. Requires that the employee has permissions to edit reports in Reporting. This attribute is not enabled by default for new or existing employees.
Has Smart Reach User Access Set to TRUE or FALSE.
Allows the employee to handle outbound Outbound Engagement (SmartReach) interactions for omnichannel campaigns. This attribute appears only if your system includes Outbound Engagement (SmartReach). This option is not enabled by default for new employees.
Has Smart Reach Agent Access Set to TRUE or FALSE. The default is FALSE. This enables the employee to access Outbound Engagement (SmartReach) as an agent, if enabled for your tenant. Performance Management Insights Set to TRUE or FALSE. The default is FALSE. This enables the employee to access Performance Management Insights, if enabled for your tenant.
It enables basic features like dashboards, integrations, and metrics. The default value is not selected for new users. If you add Performance Management Insights to a system with existing users, you must manually enable it for those users. Without this attribute, users won't access advanced tools and analytics. Removing it revokes access to related features and data.
Performance Management Act Set to TRUE or FALSE. The default is FALSE. This enables the employee to access Performance Management Act, if enabled for your tenant.
It provides advanced features like dashboards, gamification, and coaching tools. The default value is not selected for new users. If you add Performance Management Act to a system with existing users, you must manually enable it for those users. Without this attribute, users won't access gamification and coaching tools. Removing it revokes access to related features.
Data Collection Enabled Set to TRUE or FALSE. The default is FALSE. If you have NiCE CXoneActions enabled, this allows the system to collect data. BCP Type This field is applies when you have Multi-Region Business Continuity Plan (Business Continuity Plan) enabled.
Allows you to control the type of access the employee has to the Multi-Region BCP tenant. It also controls whether the employee account syncs to the Multi-Region BCP tenant. You can enter one of the following values:
-
No Access: The user account does not have access to the Multi-Region BCP tenant. By default, all employees have no access.
-
Single Access: The user account can only access whichever tenant is active. So, they can only log in to the Multi-Region BCP tenant when you've switched to the Multi-Region BCP tenant and it's active.
-
Multiple Access: The user account can choose which tenant to log in to. This type of access should be given to administrators, who you want to be able to log in to the Multi-Region BCP tenant at any time. These users will have an updated login page. When logging in, a selector will let them choose between the primary and Multi-Region BCP tenant. This selector will also show which tenant is currently active. This will help them easily know whether the Multi-Region BCP tenant is active or not.
Supported Time Zones
The following time zones are supported for dialing.
Time Zone Name
IANA Value
Midway Island, Samoa Pacific/Samoa Hawaii US/Hawaii Alaska America/Anchorage Pacific Time (US & Canada) America/Los_Angeles Tijuana, Baja California America/Tijuana Arizona US/Arizona Chihuahua, La Paz, Mazatlan America/Chihuahua Mountain Time (US & Canada) America/Denver Central Time (US & Canada) America/Chicago Guadalajara, Mexico City, Monterrey America/Mexico_City Saskatchewan Canada/Saskatchewan Bogota, Lima, Quito, Rio Branco America/Bogota Eastern Time (US & Canada) America/New_York Indiana (East) America/Indiana/Indianapolis Atlantic Time (Canada) America/Moncton Caracas, La Paz America/Caracas Manaus America/Manaus Santiago America/Santiago Newfoundland America/St_Johns Brasilia America/Fortaleza Buenos Aires, Georgetown America/Argentina/Buenos_Aires Montevideo America/Montevideo Azores Atlantic/Azores Casablanca, Monrovia, Reykjavik Africa/Casablanca Greenwich Mean Time Etc/GMT Greenwich Mean Time: Dublin, Edinburgh, Lisbon, London Europe/London Amsterdam, Berlin, Bern, Rome, Stockholm, Vienna Europe/Amsterdam Belgrade, Bratislava, Budapest, Ljubljana, Prague Europe/Belgrade Brussels, Copenhagen, Madrid, Paris Europe/Brussels Sarajevo, Skopje, Warsaw, Zagreb Europe/Sarajevo Amman Asia/Amman Athens, Bucharest, Istanbul Europe/Athens Beirut Asia/Beirut Cairo Africa/Cairo Harare, Pretoria Africa/Harare Helsinki, Kyiv, Riga, Sofia, Tallinn, Vilnius Europe/Helsinki Jerusalem Asia/Jerusalem Minsk Europe/Minsk Windhoek Africa/Windhoek Kuwait, Riyadh, Baghdad Asia/Kuwait Moscow, St. Petersburg, Volgograd Europe/Moscow Nairobi Africa/Nairobi Tbilisi Asia/Tbilisi Tehran Asia/Tehran Abu Dhabi, Muscat Asia/Dubai Baku Asia/Baku Yerevan Asia/Yerevan Kabul Asia/Kabul Yekaterinburg Asia/Yekaterinburg Islamabad, Karachi, Tashkent Asia/Karachi Chennai, Kolkata, Mumbai, New Delhi Asia/Kolkata Kathmandu Asia/Kathmandu Almaty, Novosibirsk Asia/Almaty Astana, Dhaka Asia/Dhaka Yangon (Rangoon) Asia/Rangoon Bangkok, Hanoi, Jakarta Asia/Bangkok Krasnoyarsk Asia/Krasnoyarsk Beijing, Chongqing, Hong Kong, Urumqi Asia/Hong_Kong Kuala Lumpur, Singapore Asia/Kuala_Lumpur Irkutsk, Ulaan Bataar Asia/Irkutsk Perth Australia/Perth Taipei Asia/Taipei Osaka, Sapporo, Tokyo Asia/Tokyo Seoul Asia/Seoul Yakutsk Asia/Yakutsk Adelaide Australia/Adelaide Darwin Australia/Darwin Brisbane Australia/Brisbane Canberra, Melbourne, Sydney Australia/Sydney Hobart Australia/Hobart Guam, Port Moresby Pacific/Guam Vladivostok Asia/Vladivostok Magadan, Solomon Is., New Caledonia Asia/Magadan Auckland, Wellington Pacific/Auckland Fiji, Kamchatka, Marshall Is. Pacific/Fiji -
-
Save the file.
-
Return to the Import Employees page in NiCE CXone.
-
In the Import Employees window, drag and drop the CSV file you saved in the indicated area.
-
Click Upload. NiCE CXone redirects you to the Bulk Upload Portal where you can see the file upload progress on the Activity tab.
You can navigate away from this page if you want. You will receive notification in Notification Center (the bell icon in the title bar) when the upload completes. You can click the notification to go to the Bulk Upload Portal and see details.
-
If the upload failed due to errors in the file records, click Review Errors. Fields with erroneous values are marked in red and have instructions to help you correct the values. Open the CSV file, correct the errors, save the file, and upload the file again.