

Flows allow you to create a visual representation of a conversation between your bot![]() A software application that handles customer interactions in place of a live human agent. and a contact
A software application that handles customer interactions in place of a live human agent. and a contact![]() The person interacting with an agent, IVR, or bot in your contact center.. You can build a flow by adding contact messages and bot responses. Bot responses in flows are made up of one or more bot actions, just as they are in stories
The person interacting with an agent, IVR, or bot in your contact center.. You can build a flow by adding contact messages and bot responses. Bot responses in flows are made up of one or more bot actions, just as they are in stories![]() Used to train a bot for interaction handling based on intent and context. or rules
Used to train a bot for interaction handling based on intent and context. or rules![]() Used to define a bot response to messages that don't change with context..
Used to define a bot response to messages that don't change with context..
Changes to your flow are saved automatically.
Create a Flow
- In NiCE CXone, click the app selector
 and select Bot Builder.
 - Click the bot you want to work with.
- Click Dialogues
 in the left icon menu.
 - Click the
- Locate the folder your new
 , enter a name, and press Enter.
 - Click Create flow.
-
On the flow canvas, click the plus sign
 and select Intent.
You can also begin your flow with any of the bot actions
 What the bot can do on its turn in the conversation, such as send a message or fill a slot. available in the menu. If this flow will only ever be triggered by another flow, such as with a button or quick reply, you can use a bot action to start the flow. If the bot needs to choose this flow based on the context of the conversation, it should start with the Intent action.
 - In the Customer may say field, enter a message a contact might send in the scenario you're working on, then press Enter. Bot Builder analyzes the message and displays its intent The meaning or purpose behind what a contact says/types; what the contact wants to communicate or accomplish. prediction with its confidence level for that prediction.
- If the predicted intent is correct, click the checkmark
 . If it's not, click the predicted intent to expand the list, then select the correct intent and click the checkmark . You can also click the trash can
  in the field to delete the message and try again.
 -
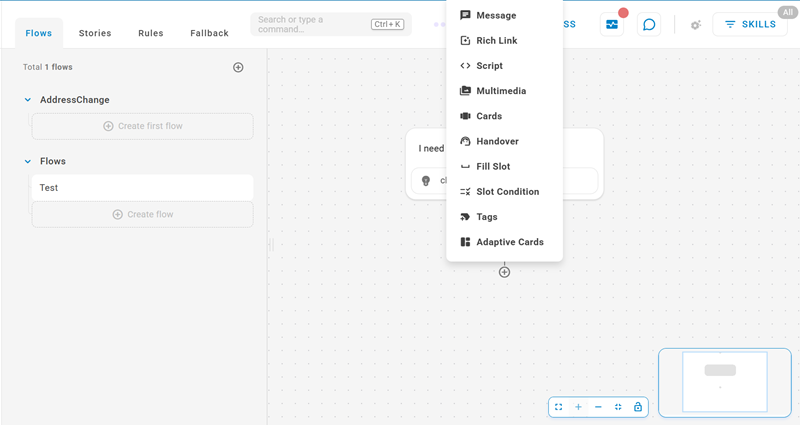
Click the plus sign
and choose an action as the bot's response. All available options except Intent are bot actions. -
Configure the selected bot action following the directions on the Add Bot Responses for Flows page.
- Add other bot actions to the bot's responses, if necessary.
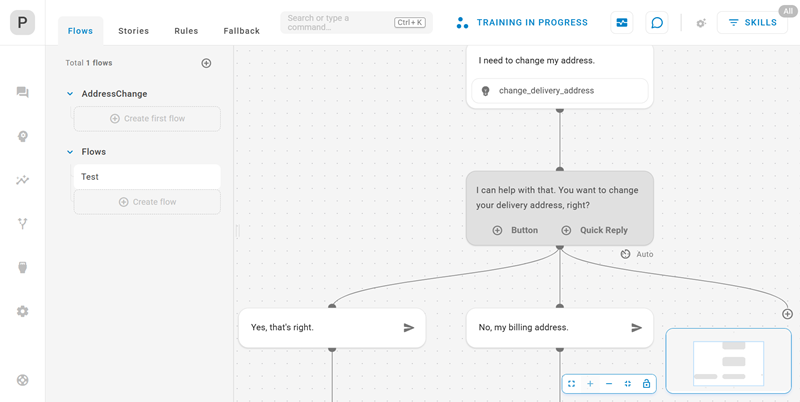
- If the bot's response includes added quick replies or buttons that trigger intents, complete the flow for those branches. Add bot actions and other contact messages (Intent actions) until each branch ends.
- Continue the flow by adding other intents and bot responses to every branch you create. Only add intents that fit within the context of the flow.
- When you're finished making changes, click Train and Stage to update your bot model Version of a bot that has been trained and staged to test this change.
Generate a New Flow by Using AI
If you are creating a new flow, you can use AI to generate the flow. Simply type in a description of what you would like the flow to do, and let the Bot Builder Copilot build the flow for you.
Note the following:
-
The Flow Designer must be empty to use the Bot Builder Copilot. If you have already designed or started designing a flow, the Bot Builder Copilot is not available.
-
Be as specific as possible when writing the prompt for the flow to generate.
-
The Bot Builder Copilot builds the flow, creating the intents and other nodes of the flow. The nodes are often defined as scripts. You will need to fine tune the intents and scripts to meet your specific needs. When you edit a script, the script editor provides a copilot where you can use AI to ask questions about the generated script or request changes to the script.
The script editor copilot is part of a Controlled Release program. Contact your Account Representative if you're interested in knowing more.
- In NiCE CXone, click the app selector and select Bot Builder.
- Click the bot you want to work with.
- Click Dialogues in the left icon menu.
- Click the
- Locate the folder your new , enter a name, and press Enter.
- Click Create flow.
-
Click the Open Copilot
 icon. The Bot Builder Copilot appears.
 -
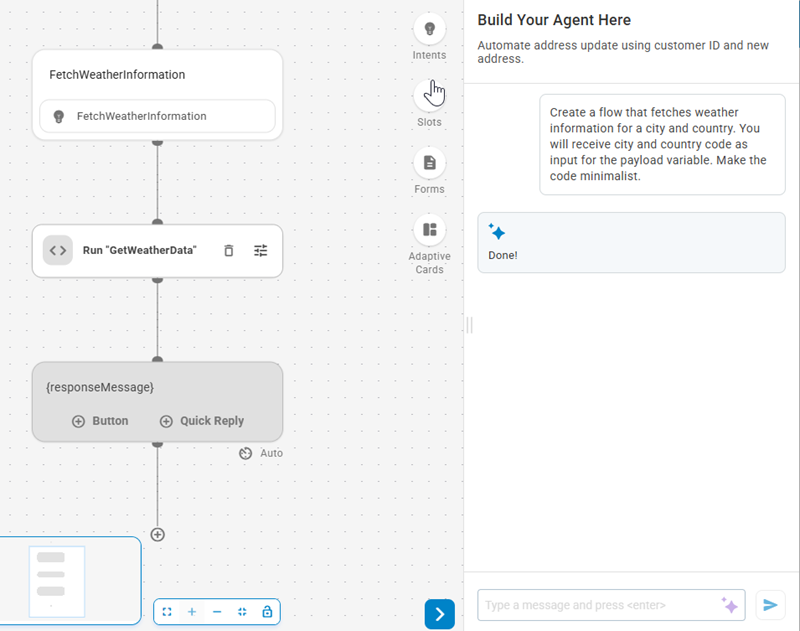
In the text box at the bottom of the Bot Builder Copilot, use natural language to ask the copilot to generate a flow and then press Enter. For example:
Create a flow that fetches weather information for a city and country. You will receive city and country code as input for the payload variable. Make the code minimalist.
The AI-generated flow appears on the flow canvas.
You cannot fine-tune the flow by asking a follow up question in the Bot Builder Copilot at this time.
-
Evaluate the generated flow and look for places that require manual fixes. For example, check any generated scripts and fine tune as needed.
-
Click
 to view the code generated for a script.
 -
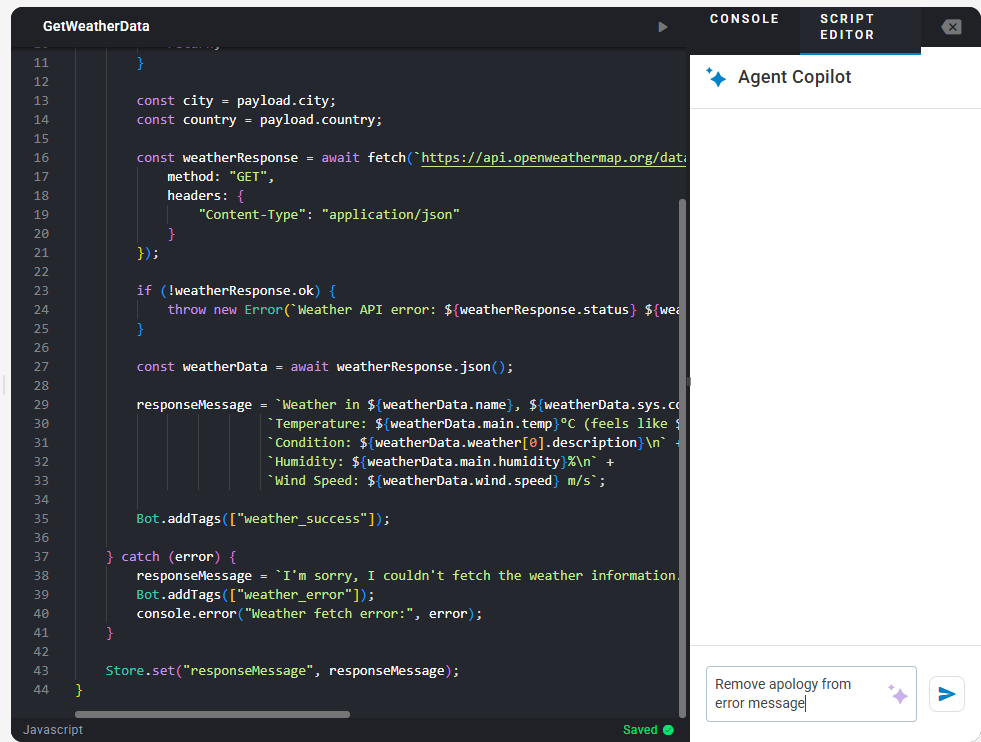
To use AI to edit the script, click Script Editor. The Copilot panel appears.
Use the Copilot panel to learn more about the generated script or request changes to the script. For example, you can ask to adjust the wording of a message.
The script is adjusted as you requested.
When editing scripts, you can continue asking the copilot to fine tune the script. You are not limited on the number of adjustments that can be made.
-
-
Use AI to automatically generate examples for intents.
-
Click on a generated intent in the flow. A window appears where you can fine tune the intent.
-
Click the
icon to generate a list of suggested examples for the intent. -
Click Add All to use all examples, or hand select the generated examples to use.
-
- Continue fine-tuning the flow as needed by editing the components.
- When you're finished making changes, click Train and Stage to update your bot model Version of a bot that has been trained and staged to test this change.

Flow Designer Controls
The flow designer canvas offers a number of controls to help you. You can use these at any time when creating contact and bot messages.
- When you hover over blank parts of the canvas, the cursor appears as a hand
 . You can use the hand to grab the canvas and move it around to quickly see a different part of the flow. The flow mini-map in the lower right corner shows you where the flow bubbles you're viewing are in relation to the whole canvas. This can be very helpful when you're working on long or complex flow designs.
 -
When you hover over a message bubble, two icons appear to the left of the bubble. Click the six vertical dots
 to move that bubble on the canvas. The bubble maintains its connections to the rest of the flow. Click the trash can
  to delete that bubble.
If you delete a bubble that starts a branch, you will delete the entire branch. A confirmation dialog helps you avoid doing this by accident.
- Under each message bubble is a small clock
 . Click this icon to set a number of seconds for which your bot should appear to be typing. This can help make the bot seem more personal to the contact. If you use smart typing, the word Auto appears next to the clock.
 - Click the plus
 or minus
  on the toolbar at the bottom of the page to zoom in or out.
 - Click the four arrows pointing at each other
 on the toolbar at the bottom of the page to center the canvas on your flow.
 - Click the lock
 to on the toolbar at the bottom of the page to prevent changes from being made to the flow.
 - Use your mouse wheel to zoom in and out on the flow canvas view.