

You can define how your bot![]() A software application that handles customer interactions in place of a live human agent. responds to contact utterances
A software application that handles customer interactions in place of a live human agent. responds to contact utterances![]() What a contact says or types.. Flows
What a contact says or types.. Flows![]() A graphical representation of a conversation used to train a Bot Builder bot. allow you to create a visual representation of the conversation between the contact and your bot, including how the bot should respond to each intent
A graphical representation of a conversation used to train a Bot Builder bot. allow you to create a visual representation of the conversation between the contact and your bot, including how the bot should respond to each intent![]() The meaning or purpose behind what a contact says/types; what the contact wants to communicate or accomplish.. During an interaction, when the bot identifies a particular intent, it responds with the response that was configured for that intent. Responses consist of one or more bot actions.
The meaning or purpose behind what a contact says/types; what the contact wants to communicate or accomplish.. During an interaction, when the bot identifies a particular intent, it responds with the response that was configured for that intent. Responses consist of one or more bot actions.
You can also configure bot responses in stories![]() Used to train a bot for interaction handling based on intent and context. and rules
Used to train a bot for interaction handling based on intent and context. and rules![]() Used to define a bot response to messages that don't change with context.. You do not need to create stories and rules in addition to flows. You can do one or the other.
Used to define a bot response to messages that don't change with context.. You do not need to create stories and rules in addition to flows. You can do one or the other.
The steps on this page describe how to add bot responses to a flow. If you're working with stories, rules, or fallback![]() A plain text alternative sent when the destination doesn't support rich media. you can learn how to add bot responses.
A plain text alternative sent when the destination doesn't support rich media. you can learn how to add bot responses.
| Concept | Definition | Example | What the Bot Does |
|---|---|---|---|

Utterance |
Anything a contact |
"I lost my password." "What is my balance?" "Are you a bot?" |
The bot uses Natural Language Understanding (NLU) to analyze each contact utterance to determine its meaning, or intent. |

Intent |
What the contact wants to communicate or accomplish. Every message the contact sends has an intent. |
"I lost my password" has the intent of "reset password". "Hello" has the intent of "greeting". |
The bot analyzes a contact's message using NLU |

Entity |
A defined piece of information in a contact's message. | Person or product name, phone number, account number, location, and so on. | The bot uses NLU to identify entities in a contact's message. Entities help the bot understand what the contact's message means. |

Slot |
An entity extracted from a contact's message and saved for use in bot responses. Similar to a variable. | Creating a slot for contact name lets the bot use that name in responses during an interaction, making it more personal. | When configured to do so, the bot extracts an entity from a contact message and saves it in a slot. You can have your bot use this information later in the conversation. |

Rule |
Defines bot responses to messages that don't change meaning with context. |
|
Rules are one of two ways you can configure how your bot responds to an intent. Rules are useful for certain kinds of intents, but not all intents. |

Story |
Trains a bot to handle an interaction based on message intent and conversational context. | In an interaction about a forgotten password, the bot would respond to "How do I do that?" in one way. If the interaction were about creating a new account, the response would be quite different even though in both cases the contact is using the same words with the same intent—to get more information. | Stories are the second of two ways you can configure how your bot responds to an intent. Stories teach the bot how to use the context of the conversation to respond appropriately. |

Bot Action |
Anything a bot says or does while handling an interaction. |
In an interaction about a forgotten password, the bot responds by sending the link to the password reset FAQ on the website. When a contact expresses frustration, such as "I don't understand! It's not working!!!" the bot responds with "I'm sorry. Would you like me to transfer you to a human agent?" When the contact says yes, the bot initiates the transfer. |
Bot actions are the options you have when defining how you want your bot to respond to each intent. They give you the flexibility to configure each response to achieve the outcome that meets the contact's needs. |
Add a Bot Response
When adding a bot response, you can use any of the available bot actions![]() What the bot can do on its turn in the conversation, such as send a message or fill a slot. that are supported for flows. Intent is an option in the list of bot actions you can add to a flow. However, it is not a bot action. Instead, it represents a contact message and introduces a new intent
What the bot can do on its turn in the conversation, such as send a message or fill a slot. that are supported for flows. Intent is an option in the list of bot actions you can add to a flow. However, it is not a bot action. Instead, it represents a contact message and introduces a new intent![]() The meaning or purpose behind what a contact says/types; what the contact wants to communicate or accomplish. to the flow
The meaning or purpose behind what a contact says/types; what the contact wants to communicate or accomplish. to the flow![]() A graphical representation of a conversation used to train a Bot Builder bot..
A graphical representation of a conversation used to train a Bot Builder bot..
You must create a flow before adding a bot response to it. If you're working with stories![]() Used to train a bot for interaction handling based on intent and context., rules
Used to train a bot for interaction handling based on intent and context., rules![]() Used to define a bot response to messages that don't change with context., or fallback
Used to define a bot response to messages that don't change with context., or fallback![]() A plain text alternative sent when the destination doesn't support rich media. you can learn how to add bot responses.
A plain text alternative sent when the destination doesn't support rich media. you can learn how to add bot responses.
- In NiCE CXone, click the app selector
 and select Bot Builder.
 - Click the bot you want to work with.
- Click Dialogues
 in the left icon menu.
 - On the
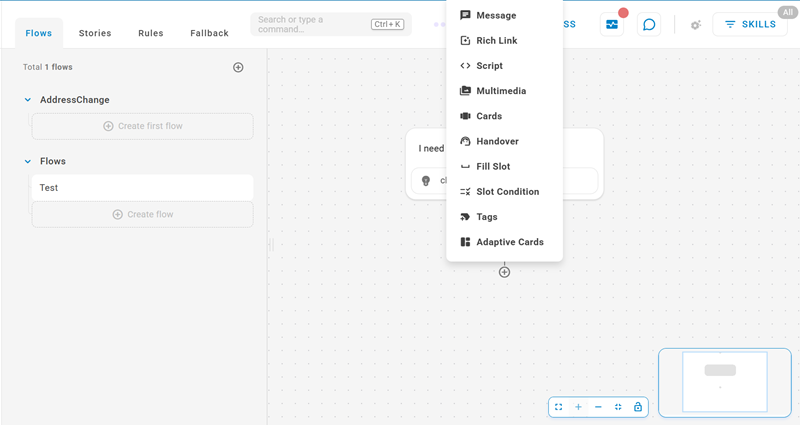
- On the flow canvas, locate the place where you want to add a bot response.
- Click the plus sign
 and select the bot action you want.
 -
Configure the bot action you selected:
- If you add a Message action, you can include buttons or quick replies. Configure them if you add any, and complete the new branch that each button or quick reply creates in the flow.
- Continue adding bot actions as needed to complete the bot response. For example, in addition to a Message action, you might want to fill a slot and add a tag all in the same turn in the conversation.
-
To delete a bot action from the flow, click the trash can
 .
. -
When you're finished making changes, click Train and Stage to update your bot model
 Version of a bot that has been trained and staged to test this change.
Add a Message Bot Action
The Message bot action allows you to define what the bot says in response to the contact![]() The person interacting with an agent, IVR, or bot in your contact center.. A message can include buttons or quick replies.
The person interacting with an agent, IVR, or bot in your contact center.. A message can include buttons or quick replies.
These steps describe how to add a message to a flow![]() A graphical representation of a conversation used to train a Bot Builder bot.. If you're working with stories
A graphical representation of a conversation used to train a Bot Builder bot.. If you're working with stories![]() Used to train a bot for interaction handling based on intent and context., rules
Used to train a bot for interaction handling based on intent and context., rules![]() Used to define a bot response to messages that don't change with context., or fallback
Used to define a bot response to messages that don't change with context., or fallback![]() A plain text alternative sent when the destination doesn't support rich media. , you can learn how to add this option.
A plain text alternative sent when the destination doesn't support rich media. , you can learn how to add this option.
- When adding a bot response to a flow, click Message in the bot actions menu.
- Enter the message text.
- Add buttons or quick replies to the message, if you want to. You can add more than one of each, but you cannot add both to one message. Each button or quick reply creates a new branch in the flow.
-
Click the clock
 to modify the amount of time the typing indicator displays before this message is sent. If smart typing is enabled for this bot, you can click Auto to override the default.
 -
 and drag the bubble to a new location.
 - When you're finished making changes, click Train and Stage to update your bot model Version of a bot that has been trained and staged to test this change.
Multimedia, Cards, List Picker, Rich Link, Buttons, Quick Replies
Some of the options on the bot actions![]() What the bot can do on its turn in the conversation, such as send a message or fill a slot. menu allow you to create messages that have rich content. Rich content enhances the messages the bot sends to the contact. They make it a more satisfying, versatile contact
What the bot can do on its turn in the conversation, such as send a message or fill a slot. menu allow you to create messages that have rich content. Rich content enhances the messages the bot sends to the contact. They make it a more satisfying, versatile contact![]() The person interacting with an agent, IVR, or bot in your contact center. experience compared to plain text. You can learn more about rich messaging in Bot Builder, or you can learn how to add the following rich content to flows
The person interacting with an agent, IVR, or bot in your contact center. experience compared to plain text. You can learn more about rich messaging in Bot Builder, or you can learn how to add the following rich content to flows![]() A graphical representation of a conversation used to train a Bot Builder bot. :
A graphical representation of a conversation used to train a Bot Builder bot. :
- Multimedia: The Multimedia bot action lets you have the bot send images, GIFs, videos, and so on to the contact.
- Cards: Cards combine images, structured text, and buttons into one message.
- Rich Link: Rich links are links that include a clickable image.
- Buttons: Buttons are an add-on to Message bot action and can trigger an intent or open a URL.
- Quick Replies: Quick replies are a list of possible replies the contact can choose from. They're often used to help clarify or narrow down the intent.
If you're working with stories![]() Used to train a bot for interaction handling based on intent and context., rules
Used to train a bot for interaction handling based on intent and context., rules![]() Used to define a bot response to messages that don't change with context., or fallback
Used to define a bot response to messages that don't change with context., or fallback![]() A plain text alternative sent when the destination doesn't support rich media. you can learn how to add these options.
A plain text alternative sent when the destination doesn't support rich media. you can learn how to add these options.
Add an Adaptive Cards Bot Action
Adaptive Cards are a platform-independent method of creating a variety of rich message content. They're currently only supported on digital![]() Any channel, contact, or skill associated with Digital Experience (DX). chat and Microsoft Teams channels
Any channel, contact, or skill associated with Digital Experience (DX). chat and Microsoft Teams channels![]() Various voice and digital communication mediums that facilitate customer interactions in a contact center.. If a response that includes an adaptive card might be sent via another channel
Various voice and digital communication mediums that facilitate customer interactions in a contact center.. If a response that includes an adaptive card might be sent via another channel![]() Various voice and digital communication mediums that facilitate customer interactions in a contact center., add rich message fallback
Various voice and digital communication mediums that facilitate customer interactions in a contact center., add rich message fallback![]() A plain text alternative sent when the destination doesn't support rich media. to the response.
A plain text alternative sent when the destination doesn't support rich media. to the response.
These steps describe how to add a custom bot action to a flow![]() A graphical representation of a conversation used to train a Bot Builder bot.. If you're working with stories
A graphical representation of a conversation used to train a Bot Builder bot.. If you're working with stories![]() Used to train a bot for interaction handling based on intent and context., rules
Used to train a bot for interaction handling based on intent and context., rules![]() Used to define a bot response to messages that don't change with context., or fallback
Used to define a bot response to messages that don't change with context., or fallback![]() A plain text alternative sent when the destination doesn't support rich media. you can learn how to add this option.
A plain text alternative sent when the destination doesn't support rich media. you can learn how to add this option.
- When adding a bot response to a flow, click Adaptive Cards in the bot actions menu.
- Select the Adaptive Card you want to use from the drop-down.
- To view or modify the selected Adaptive Card, click preferences
 at the top right corner of the card.
 -
Click rectangles with an arrow
 to override the default rich message fallback for this bot action only.
 -
Click the clock
to modify the amount of time the typing indicator displays before this message is sent. If smart typing is enabled for this bot, you can click Auto to override the default. -
and drag the bubble to a new location.
- When you're finished making changes, click Train and Stage to update your bot model Version of a bot that has been trained and staged to test this change.
Add a Fill Slot Bot Action
The Fill Slot bot action allows you to choose a slot![]() Entity extracted from contact's message and saved for use in bot responses. Similar to a variable. and specify a value to fill it with. You can use this action to fill a slot during the bot's turn in the conversation.
Entity extracted from contact's message and saved for use in bot responses. Similar to a variable. and specify a value to fill it with. You can use this action to fill a slot during the bot's turn in the conversation.
These steps describe how to fill a slot in a flow![]() A graphical representation of a conversation used to train a Bot Builder bot.. If you're working with stories
A graphical representation of a conversation used to train a Bot Builder bot.. If you're working with stories![]() Used to train a bot for interaction handling based on intent and context., rules
Used to train a bot for interaction handling based on intent and context., rules![]() Used to define a bot response to messages that don't change with context., or fallback
Used to define a bot response to messages that don't change with context., or fallback![]() A plain text alternative sent when the destination doesn't support rich media. you can learn how to add this option.
A plain text alternative sent when the destination doesn't support rich media. you can learn how to add this option.
This bot action instructs the bot on what it needs to do. The contact does not see a message in the chat window when you include this action a bot response.
- When adding a bot response to a flow, Fill Slot in the bot actions menu.
- Select a slot from the drop-down of available slots. If the slot you want doesn't exist yet, you can create it from the Slots
 option in the right pane on the Dialogues > Stories page.
 - Enter a Value, or leave the field blank to allow the value to be reset. Slot variables are accepted.
- Click the flow canvas to continue.
-
and drag the bubble to a new location.
- When you're finished making changes, click Train and Stage to update your bot model Version of a bot that has been trained and staged to test this change.
Add a Slot Condition Bot Action
You can use the
These steps describe how to add a Slot Condition bot action to a flow![]() A graphical representation of a conversation used to train a Bot Builder bot. only. If you're working with stories
A graphical representation of a conversation used to train a Bot Builder bot. only. If you're working with stories![]() Used to train a bot for interaction handling based on intent and context., rules
Used to train a bot for interaction handling based on intent and context., rules![]() Used to define a bot response to messages that don't change with context., or fallback
Used to define a bot response to messages that don't change with context., or fallback![]() A plain text alternative sent when the destination doesn't support rich media., you can learn how to add this option.
A plain text alternative sent when the destination doesn't support rich media., you can learn how to add this option.
This bot action instructs the bot on what it needs to do. The contact does not see a message in the chat window when you include this action a bot response.
- When adding a bot response to a flow, click Slot Condition in the bot actions menu.
- Select a slot from the drop-down of available slots in your entities and intents. If the slot you want doesn't exist yet, you can create it from the Slots option in the right pane on the Dialogues > Stories page.
- Enter a Value, or leave the field blank to allow the value to be reset. Slot variables are accepted.
-
Click the flow canvas to continue.
-
and drag the bubble to a new location.
-
When you're finished making changes, click Train and Stage to update your bot model
Version of a bot that has been trained and staged to test this change.
Add a Handover Bot Action
This option allows you to have the preceding customer message trigger the handover![]() The transfer of a contact from a virtual agent to a live agent. rule. This is an important action to use in fallback and out-of-scope paths, but you can use it any time you want your bot to hand a conversation off to a live agent. You can learn more about handover on the Bot Actions help page.
The transfer of a contact from a virtual agent to a live agent. rule. This is an important action to use in fallback and out-of-scope paths, but you can use it any time you want your bot to hand a conversation off to a live agent. You can learn more about handover on the Bot Actions help page.
These steps describe how to add a custom bot action to a flow![]() A graphical representation of a conversation used to train a Bot Builder bot.. If you're working with stories
A graphical representation of a conversation used to train a Bot Builder bot.. If you're working with stories![]() Used to train a bot for interaction handling based on intent and context., rules
Used to train a bot for interaction handling based on intent and context., rules![]() Used to define a bot response to messages that don't change with context., or fallback
Used to define a bot response to messages that don't change with context., or fallback![]() A plain text alternative sent when the destination doesn't support rich media. you can learn how to add this option.
A plain text alternative sent when the destination doesn't support rich media. you can learn how to add this option.
This bot action instructs the bot on what it needs to do. The contact does not see a message in the chat window when you include this action a bot response.
- When adding a bot response to a flow, click Handover in the bot actions menu.
- For Into, select an agent queue from the drop-down of available queues.
- Enter a note for the agent if you want to provide more context.
- Click the flow canvas to continue.
-
and drag the bubble to a new location.
- When you're finished making changes, click Train and Stage to update your bot model Version of a bot that has been trained and staged to test this change.
Add a Tag Bot Action
The Tags bot action lets you add Bot Builder tags to an interaction. You can use tags when reviewing bot data to identify patterns in conversations.
These steps describe how to add a custom bot action to a flow![]() A graphical representation of a conversation used to train a Bot Builder bot.. If you're working with stories
A graphical representation of a conversation used to train a Bot Builder bot.. If you're working with stories![]() Used to train a bot for interaction handling based on intent and context., rules
Used to train a bot for interaction handling based on intent and context., rules![]() Used to define a bot response to messages that don't change with context., or fallback
Used to define a bot response to messages that don't change with context., or fallback![]() A plain text alternative sent when the destination doesn't support rich media. you can learn how to add this option.
A plain text alternative sent when the destination doesn't support rich media. you can learn how to add this option.
This bot action instructs the bot on what it needs to do. The contact does not see a message in the chat window when you include this action a bot response.
- When adding a bot response to a flow, click Tags in the bot actions menu.
- Click Add Tag. If the tag you want doesn't exist yet, you can create it by clicking settings
 > Tags.
 - Click the name of a tag to add it. You can add multiple tags but must do so one at a time. Even if you add more than one tag, only one new branch opens in the flow.
- Click the flow canvas to continue.
-
and drag the bubble to a new location.
- When you're finished making changes, click Train and Stage to update your bot model Version of a bot that has been trained and staged to test this change.
Add a Script Bot Action
The Scripts bot action allows you to choose a custom bot actions that you created as a script integration in Bot Builder. Depending on what the custom actions are designed to do, a message may or may not be sent to the contact.
These steps describe how to add a custom bot action to a flow![]() A graphical representation of a conversation used to train a Bot Builder bot.. If you're working with stories
A graphical representation of a conversation used to train a Bot Builder bot.. If you're working with stories![]() Used to train a bot for interaction handling based on intent and context., rules
Used to train a bot for interaction handling based on intent and context., rules![]() Used to define a bot response to messages that don't change with context., or fallback
Used to define a bot response to messages that don't change with context., or fallback![]() A plain text alternative sent when the destination doesn't support rich media. you can learn how to add this option.
A plain text alternative sent when the destination doesn't support rich media. you can learn how to add this option.
- When adding a bot response to a flow, click Script in the bot actions menu.
- Click Select Script and select from the list of available scripts. If the script you want doesn't exist yet, you can create it on the Integrations
 > Scripts tab.
 - Click the checkmark
 to confirm the script you selected or click the trash can to start over.
 - Click preferences in the action bubble to open the Scripts page to view or modify the selected script.
-
and drag the bubble to a new location.
- When you're finished making changes, click Train and Stage to update your bot model Version of a bot that has been trained and staged to test this change.