

ScreenAgent ![]() NiCE ScreenAgent is a service that runs on agent desktops that require screen recording. is available if you have these licenses:
NiCE ScreenAgent is a service that runs on agent desktops that require screen recording. is available if you have these licenses:
You need to add and configure screen recording and real-time screen monitoring IWAs (Isolated Web Applications) in your Google Admin Console. ScreenAgent then automatically records activity on your agents' Chromebox or Chromebook during an interaction according to the recording policies. Supervisors and evaluators can also monitor an agent’s activity during an interaction.
Prerequisites
Before setting up ScreenAgent:
-
Check the Connectivity Wizard.
-
Make sure the user setting up ScreenAgent for ChromeOS has Chrome Admin privileges for the Chrome Admin Console.
-
Make sure the user setting up ScreenAgent for ChromeOS (for example, the admin) has these NiCE CXone permissions:
-
Access Key: Create, this is to manage access keys for your organization.
-
-
In NiCE CXone, generate an access key for ScreenAgent.
The access key receives all the permissions of the NiCE CXone user who generates it. If this user is an administrator, then anyone with the access key would have administrator privileges. So, for security reasons, first create a NiCE CXone user and role for ScreenAgent, and then generate the key with the ScreenAgent user.
-
Create a role for the ScreenAgent service:
- Click the app selector
 and select Admin.
 -
Go to Security > Roles and Permissions.
-
Click New Role.
-
Give a name for the role, such as ScreenAgent access key.
-
Remove all permissions for the role, except Access Key and My Access Key.
-
Click Save & Activate.
- Click the app selector
-
Create an employee for the ScreenAgent service:
- Click the app selector and select Admin.
-
Click Employees.
-
Click New Employee.
-
Give a name for the employee, such as ScreenAgent.
-
From the Primary Role drop-down list, select the ScreenAgent access key role you just created.
-
On the General tab, clear all the attributes.
-
Click Create. You can generate access keys only after you create the account.
- Click the app selector
-
Open the ScreenAgent employee again and go to the Security tab. Click Add access key to generate an access key.
-
Copy both the Access Key ID and Secret Access Key and save them somewhere safe. If you don't copy the Secret Access Key or if you lose it, you'll need to create a new one. Use this access key ID and secret access key when installing ScreenAgent.
-
Activate the ScreenAgent employee account by clicking the Activate Account button in the activation email.
-
-
In NiCE CXone, go to Admin > Employees and make sure that the following is defined for each agent in the General tab:
-
OS login for ChromeOS is defined from the agent's email. For example, the OS login for the email, john@company.com, should be entered as company.com\john.
The OS Login value for each employee profile must be unique. The OS Login value cannot be used for multiple employee profiles, even if some of the duplicate employee profiles are inactive. If multiple employee profiles have the same OS Login value, ScreenAgent will not run for any agent using that OS Login value.
-
The agent has the attribute Can be Recorded (Screen). This attribute is necessary for enabling screen recording, screen monitoring, or both.
-
Set up ScreenAgent for ChromeOS
Before you begin to set up ScreenAgent for ChromeOS make sure all prerequisites are in place.
Set up ScreenAgent in the Chrome Admin Console in the order given.
Configuration changes will be applied on agents' computers when they next log in. To apply configuration changes made while agents are logged in, the agents must log out and log in again.
Add the screen recording and screen monitoring IWAs:
If PWAs were already added and configured for the account, they must be removed before adding and configuring the IWAs.
-
In the Chrome Admin Console, go to Devices > Chrome.
-
Select Apps & extensions.
-
Select the Users & browsers tab.
-
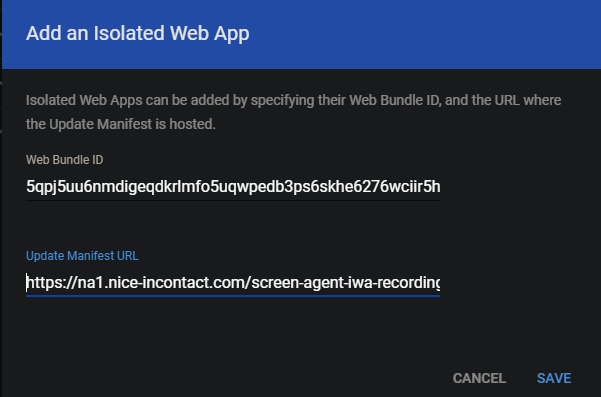
To add the screen recording IWA, hover over the plus + icon and select Add an Isolated Web App.
-
Set the following:
-
Web Bundle ID: 5qpj5uu6nmdigeqdkrlmfo5uqwpedb3ps6skhe6276wciir5h6yaaaic
-
Update Manifest URL: <CXone host domain>/screen-agent-iwa-recording/update.json (The host domain is different for each region, for example: https://na1.nice-incontact.com/screen-agent-iwa-recording/update.json)
-
-
Click Save.
-
To add the monitoring IWA, hover over the plus + icon and select Add an Isolated Web App.
-
Set the following:
-
Web Bundle ID: alxuw6tyvg7ri6eekczt3magynxwwqeoyndxjmiwuz33dlz6jnjr2aacai
-
Update Manifest URL: <CXone host domain>/screen-agent-iwa-rtm/update.json (The host domain is different for each region, for example: https://na1.nice-incontact.com/screen-agent-iwa-rtm/update.json)
-
-
Click Save.
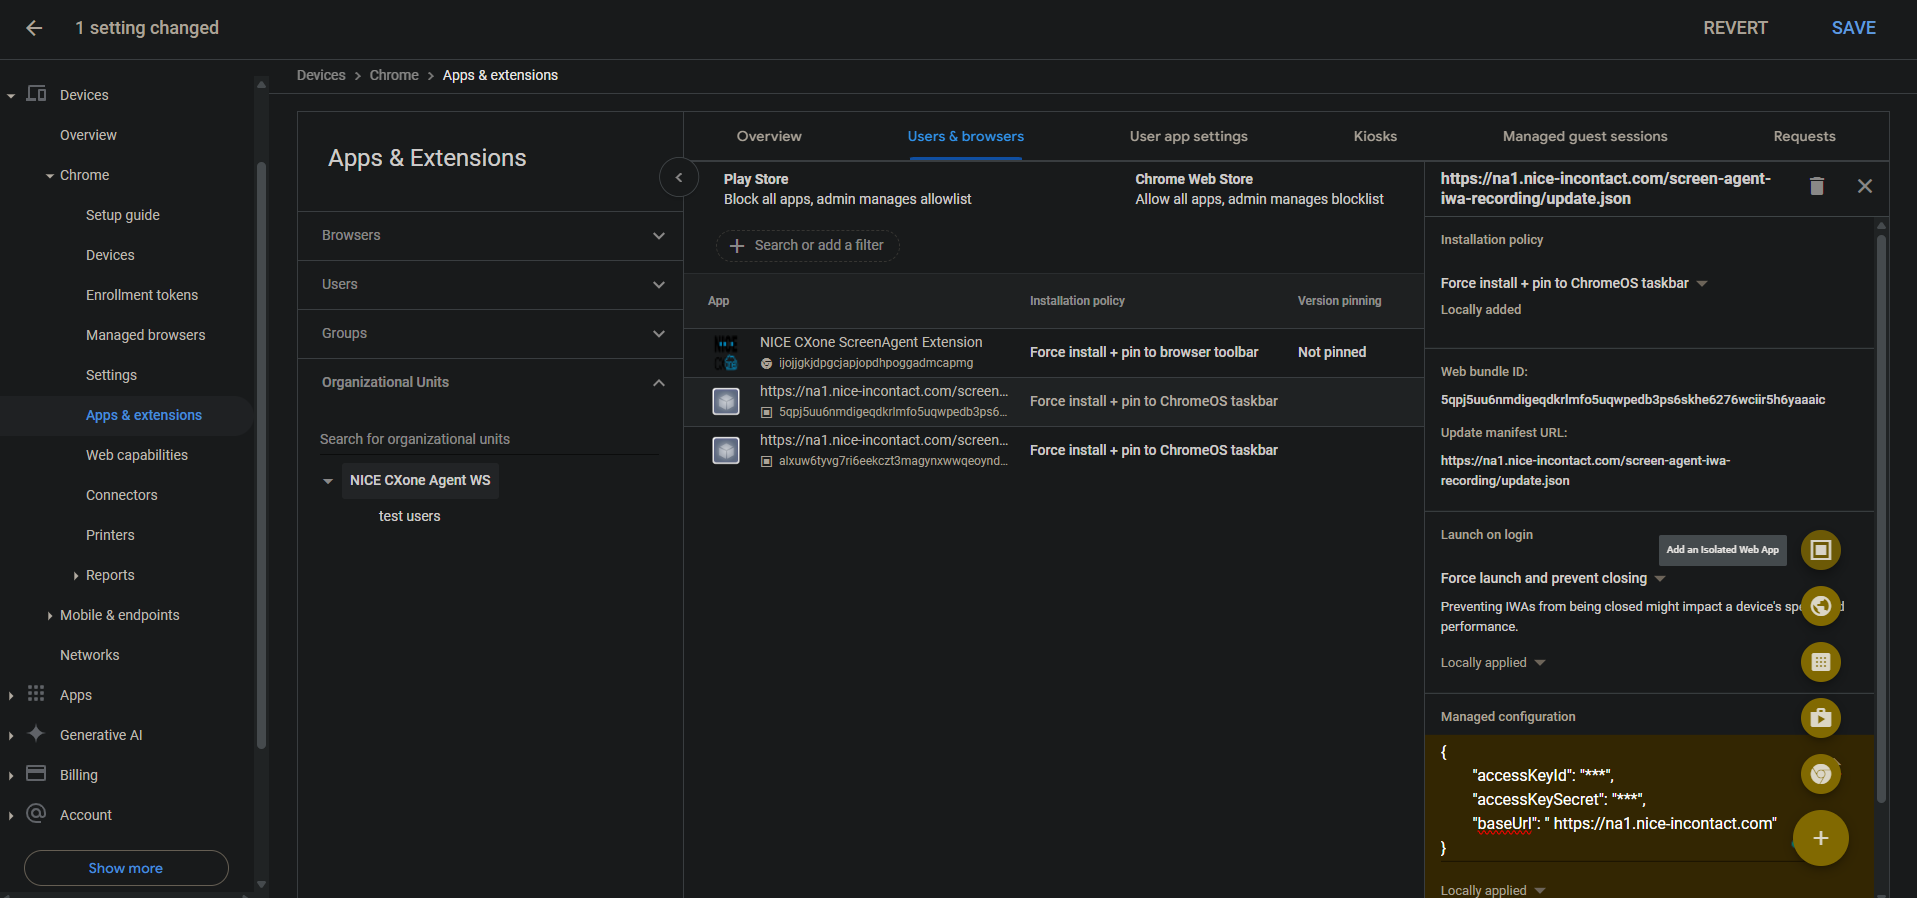
Configure the screen recording and screen monitoring IWAs:
-
In the Users & browsers tab, click the recording app name and configure the following:
-
Installation policy: Force install + pin to ChromeOS taskbar
-
Launch on login: Force launch and prevent closing
-
Managed configuration: Add NiCE CXone access keys and host domain in the following JSON format:
Pay attention to spaces and so on. If the JSON format is not correct, the configuration will not be applied.
Use a JSON formatter to format the JSON object, then copy and paste it into Managed configuration.
-
-
Click Save.
-
Click the monitoring app name and configure the same settings as for the recording app.
-
Click Save.
The ScreenAgent screen recording and monitoring application windows open automatically when the user logs in.
Recording and monitoring close only when the user logs out.
Add and configure the Chrome ScreenAgent extension for the account:
This Chrome extension brings the user's OS login to their Chromebox or Chromebook.
-
In the Users & browsers tab, hover over the + icon and select Add from Chrome Web Store.
-
Search for NICE CXone ScreenAgent Extension and select it.
-
Click the extension name and set the following:
Installation policy: Force install + pin to browser toolbar
-
Click Save.
Enable Developer Tools for troubleshooting:
-
Go to Devices > Chrome.
-
Select Settings.
-
Select the User & browser settings tab.
-
Search for Developer tools.
-
In the list of results, click Developer tools settings and select Always allow use of built-in developer tools.
-
Click Save.
Disable End Process in the Task Manager:
-
Go to Devices > Chrome.
-
Select Settings.
-
Select the User & browser settings tab.
-
Search for Task Manager.
-
In the list of results, click Task Manager settings and select Block users from ending processes with the Chrome task manager.
-
Click Save.
Enable screen recording and real-time screen monitoring for the account:
-
Go to Devices > Chrome.
-
Select Web capabilities.
-
To enable screen recording, in the Origin-specific permissions section, select Add origin.
-
Set the following:
-
Origin/site pattern:
-
Screen recording: Allowed
-
Window management: Allowed
-
-
Click Save.
-
To enable real-time screen monitoring, in the Origin-specific permissions section, select Add origin.
-
Set the following:
-
Origin/site pattern: isolated-app://alxuw6tyvg7ri6eekczt3magynxwwqeoyndxjmiwuz33dlz6jnjr2aacai
-
Screen recording: Allowed
-
Window management: Allowed
-
-
Click Save.
Troubleshoot ScreenAgent for ChromeOS
To access the ScreenAgent log file for troubleshooting:
-
On the ChromeOS desktop, click the NiCE CXone ScreenAgent icon
 .
.The ScreenAgent application window opens.
-
Press Ctrl-Shift-C.
The DevTools window opens.
-
Select the Console tab. From the right mouse button menu, select Save As.
-
Save the log file and send to the NiCE CXone support team, if required.
ScreenAgent for ChromeOS FAQs
Yes, ScreenAgent for ChromeOS supports masking for a single interaction and parallel interactions.
Yes, you can record and monitor up to three screens on ChromeOS.
Yes, ScreenAgent for ChromeOS supports parallel recording for digital and voice interactions.