

Integration Hub connections allow you to set up integrations to third-party web services to use in NiCE CXone.
Create a Connection Template
A connection template defines the basic information about an integration. Templates are used to create connections, where you can configure specific requests and other information.
Connection templates cannot be modified after creation. If you need to change any details, including the headers, you must create a new template.
- In NiCE CXone, click the app selector
 and select Automation & AI > Integration Hub.
 - Click Add Template.
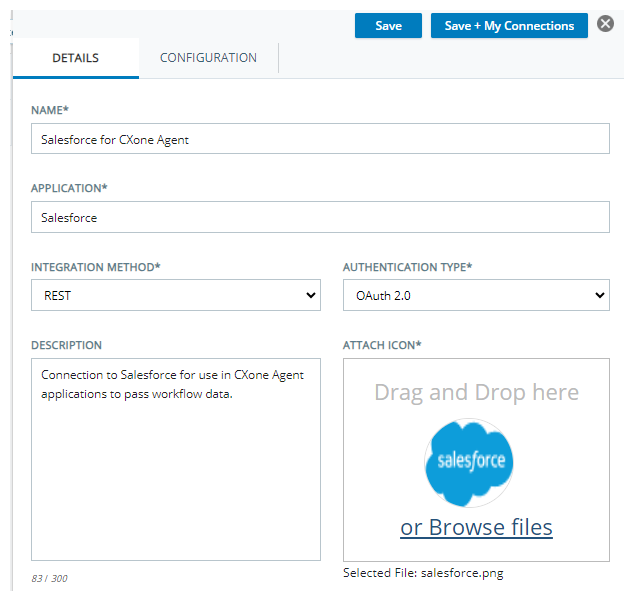
- On the Details tab, enter a Name for the template.
- Enter the name of the Application you're connecting to. This could be an application, platform, or web service.
- Select REST as the Integration Method. Currently, REST is the only supported method.
-
Select an option for Authentication Type. After making a selection, the Configuration tab displays.
 Learn more about fields in this step
Option Details OAuth 2.0 An open standard framework that lets apps access resources on behalf of a user without sharing credentials. No Auth Select this option if you do not want the template to include authentication. - Enter a Description of the template. Other users can see it when they select this template from the connection library.
- Attach an icon by dragging and dropping an image or by clicking Browse files. This icon is displayed for this template in the connection library for all connections created from this template.
- On the Configuration tab, select the methods (verbs) that you want to be available for use with this template. Not all web services support all REST verbs.
- If you selected an authentication type, define any custom authentication headers for this template:
- Click Add Custom Header.
- Enter the header name in the field that appears.
- Click Add Custom Header to add more custom headers.
- Select Required? for any headers that must be used in connections created from this template.
- Click the X to delete a header.
- Double-check all settings. You cannot edit a template after you save it.
- Do one of the following:
- Click Save to add the template to the connection library.
- Click Save + My Connections to add the template to the connection library and create a connection from it. After the connection is created, you can configure it by adding authentication details, variables, or requests. Your request can include any or all of these configurations.
Add a Connection to the My Connections List
This section applies if you clicked Save when creating the connection template, not Save + My Connections. A connection can only be used in a Studio script if it's in the My Connections list.
-
In NiCE CXone, click the app selector
and select Automation & AI > Integration Hub. -
Create a new connection in one of the following ways:
-
Select an existing connection from the Connection Library then click + My Connection.
-
Copy a template by selecting an existing one in the My Connections list then click
 Copy.
Copy. -
In the My Connection Name field on the pop-up window, enter a unique name for the new connection.
-
Click Save.
Configure Authentication Details
You can configure authentication details on the Authentication tab in your connection. This tab is visible only when authentication is enabled in the template used for this connection.
-
In NiCE CXone, click the app selector
and select Automation & AI > Integration Hub. -
Click the connection you want to work with from My Connections on the left side of the page.
-
Click the Authentication tab.
-
Enter the URL used for the authentication request. The URL cannot be dynamic, but you can reference secrets in it.
-
Select the REST Method (verb) used in the authentication request. The available verbs are defined by the template used for this connection.
-
Under Headers, enter the appropriate value in each field. Fields with an asterisk ( * ) are required. These fields are defined in the template used for this connection.
-
To add a custom header to this connection:
-
Click Add Custom Header.
-
Enter a Header Name and Header Value.
-
- To add a query parameter to the authentication request:
- Click Add Query Parameter.
- For each query parameter you add, enter a Query Parameter Name and Query Parameter Value.
-
Select a Media Type and enter the Body content. The media type affects the format of the body content. It should match the type required by the authorization server you're using.
Learn more about fields in this step
Option Details AWS Sigv4 Used for authentication with AWS. This updates the Content-Type header of type x-amz-json-1.1, which is a specific JSON structure that AWS expects. ApplicationJson
The body content must be in JSON.
ApplicationJsonPatch The body content must be in JSON Patch format. FormURLEncoded The body content must be in key-value pairs. This media type sends requests using common URL notations.
Click +Add Form Parameter, then enter the Form Parameter Name and Form Parameter Value.
TextHtml The body content must be in HTML. TextPlain The body content must be in plain text. TextXml The body content must be in XML. -
Click Save.
Configure an mTLS Self-Signed Certificate
You can use the Configuration tab of a connection to configure the timeout setting and configure an mTLS self-signed certificate.
-
In NiCE CXone, click the app selector
and select Automation & AI > Integration Hub. -
Click the connection you want to work with from My Connections on the left side of the page.
-
Click the Configuration tab.
-
Adjust the Timeout (MS) setting as needed. The timeout applies to all request configured in the connection, including authentication. If you're using an mTLS self-signed certificate, fill in the following fields:
- Client Certificate
- Client Private Key
- Key Passphrase
These fields only appear if you use OAuth 2.0 as your authentication type. You should enter the Client Certificate and Client Private Key together. If your Client Private Key is encrypted, you must enter a Key Passphrase. mTLS certificates only work if your authentication URL is in HTTPS. Validation of these fields occur after the connection is saved. You can reference these fields in the Secrets tab.
-
Click Save.
Add Variables to a Connection
Integration Hub variables allow you to share certain information in a connection. You can determine whether this information is encrypted or not. An encrypted variable, or a secret, provides an added layer of security when using sensitive information, such as passwords in Studio scripts.
When you create a variable, you can convert it to a secret at any time. Once a variable becomes a secret and the connector has been saved, you cannot turn the secret back into a variable.
Secrets are not reversible. When you click away from the Secret Value field, the content is encrypted and replaced with masking asterisks ( * ). There is no way to retrieve the value you entered into the field after it's masked.
-
In NiCE CXone, click the app selector
and select Automation & AI > Integration Hub. -
Click the connection you want to work with from My Connections on the left side of the page.
-
On the Variables tab, click + Add Variable.
-
Enter a Variable Name that identifies what the variable contains. Names can contain spaces or special characters.
-
Enter the Variable Value. This is the value of the variable and the information that will be encrypted if you make the variable a secret. Verify that the information is correct before you enable it as a secret.
-
To encrypt the variable, enable the Secret toggle. Remember, if you enable this toggle, you cannot revert it.
-
To remove a variable from the connection, click the X on the right side of it.
-
Click Save.
Use Variables in a Connection
You can use variables in manual or Studio script requests. You can use them in headers, query parameters, and body content.
Use a Variable in Authentication Details or a Manual Request
-
In NiCE CXone, click the app selector
and select Automation & AI > Integration Hub. -
Click the connection you want to work with from My Connections on the left side of the page.
-
Click the tab where you want to use a variable. Variables can be used on the Authentication and Requests tabs.
-
Enter the variable in the place where you want the variable value to be, following these guidelines:
- Enclose the name in double brackets. For example, [[ variableName ]].
- Use the name exactly as entered in the Variable Name field on the Variables tab.
- Variables can only be used with the connection where they were created.
Use a Variable in a Studio Request
To use variables in a Studio script, the script must have a CONNECTAuth or CONNECTREQUEST action. The action must link the script to the connection containing the variable.
-
In Studio, open the script you want to use the variable in.
-
Double-click the Snippet action you want to add the variable to.
-
In the
- Enclose the name in double brackets. For example, [[ variableName ]].
- Use the name exactly as entered in the Variable Name field on the Variables tab.
- Enclose the brackets and variable name in double quotes ( " ). For example, "[[ variableName ]]". If the variable is part of a string, such as a URL, the entire string must be enclosed in double quotes, not just the variable. For example, "[[ variableName ]]/location/anotherlocation/".
- Variables can only be used with the connection where they were created. The connection must be specified in the script with a CONNECTAuth or CONNECTREQUEST action.
Examples:
-
ASSIGN requestPayload.body = "[[client_id]]"
-
ASSIGN requestPayload.URL = "[[INSTANCEURI]]/INCONTACTAPI/SERBICES/V42.0/AGENTS"
Create a Manual Request
Requests are how you obtain the information you need from the web service your integration connects to. You can use manual requests in Studio scripts or execute them from Integration Hub.
If your request requires path parameters or variable substitution in the URL, headers, or parameters, you must create a Studio request. Manual requests don't support these options.
-
In NiCE CXone, click the app selector
and select Automation & AI > Integration Hub. -
Click the connection you want to work with from My Connections on the left side of the page.
-
On the Requests tab, click Add Request.
-
Enter a Request Name.
-
Select Manual as the Trigger.
-
Enter the URL for this request.
-
Click the Method (verb) for this request.
-
Under Headers, add any headers that are required for your request:
-
Click Add Header.
-
Enter a Header Name and Header Value.
-
- Under Query Parameters, add any query parameters that are required for your request:
- Click Add Query Parameter.
- Enter a Query Parameter Name and a Query Parameter Value.
-
Select a Media Type and enter the Body content. The media type affects the format of the body content. It should match the type required by the web service you're connecting to.
Learn more about fields in this step
Option Details ApplicationJson
The body content must be in JSON with application/json as the content header.
ApplicationJsonPatch The body content must be in JSON Patch format with application/json-patch+json as the content header. FormURLEncoded The body content must be in key/value pairs with application/x-www-form-urlencoded as the content header. This media type sends requests using common URL notations.
Click +Add Form Parameter, then enter the Form Parameter Name and Form Parameter Value.
TextHtml The body content must be in HTML with text/html as the content header. TextPlain The body content must be in plain text with text/plain as the content header. TextXml The body content must be in XML with text/xml as the content header. - If you want to change this request's active status, click Active at the top of the page. The text changes to Inactive.
- Click Confirm.
- On the Requests tab, click Test for the request you just added. Integration Hub attempts the request. A window appears and displays the results of the test.
- Click Edit and make changes to the request or click Save.
Create a Studio Request
A Studio request is helpful when you have API requests that cannot be created in Integration Hub but you want to be able to use Integration Hub for authentication and secrets.
-
In NiCE CXone, click the app selector
and select Automation & AI > Integration Hub. -
Click the connection you want to work with from My Connections on the left side of the page.
-
On the Requests tab, click Add Request.
-
Enter a Request Name.
-
Select Studio as the Trigger.
-
Select and copy the example request payload from the Add Request page if you want to use the example to build the JSON in your script.
-
Click Confirm.
Studio requests cannot be tested from Integration Hub. You must test them in Studio by running the script with a trace.
-
Click
 Save.
Save. - Launch Studio and log in.
- Open an existing script or create a new one.
- Add a
-
Build a dynamic object in the
Use the example payload you copied from Integration Hub in an earlier step as a guide when you create your object. The example payload is:
{
 "URL": "[[INSTANCEURI]]/INCONTACTAPI/SERVICES/V42.0/AGENTS",
 "HTTPMETHOD": "POST",
 "HEADERS": {
	"CONTENT-TYPE": "APPLICATION/JSON",
	"AUTHORIZATION": "BEARER[[BEARERTOKEN]]"
	},
 "QUERYPARAMETERS": {
	"ANI": "[[ANI]]",
	"ACCOUNTID": "8675309"
	},
 "BODY": {
	"ANI": "[[ANI]]",
	"ACCOUNTID": "9035768",
	"ACCOUNTNAME": "Mister Underhill Bagginses"
	}
}
A dynamic object created using the example payload as a guide is:
DYNAMIC requestPayload
ASSIGN requestPayload.URL = "[[INSTANCEURI]]/INCONTACTAPI/SERVICES/V42.0/AGENTS"
ASSIGN requestPayload.HTTPMETHOD = "POST"
ASSIGN requestPayload.HEADERS.CONTENTHYPHENPLACEHOLDERTYPE = "APPLICATION/JSON"
ASSIGN requestPayload.HEADERS.AUTHORIZATION = "BEARER[[BEARERTOKEN]]"
ASSIGN requestPayload.QUERYPARAMETERS.ANI = "[[ANI]]"
ASSIGN requestPayload.QUERYPARAMETERS.ACCOUNTID = "8675309"
ASSIGN requestPayload.BODY.ANI = "[[ANI]]"
ASSIGN requestPayload.BODY.ACCOUNTID = "9035768"
ASSIGN requestPayload.BODY.ACCOUNTNAME = "Mister Underhill Bagginses"
ASSIGN requestPayloadJSON = "{requestPayload.asjson()}"
ASSIGN requestPayloadJSON = "{requestPayloadJSON.replace("HYPHENPLACEHOLDER", "-")}"
The last line of the preceding example uses the replace() function to insert the hyphen ( - ) character into the CONTENT-TYPE key name. In Studio, variable names cannot include special characters such as hyphens, so this approach is used as a workaround.
- Configure the script to use the request.
Change a Request's State
Each Integration Hub connection can have up to 50 requests. There is no restriction on how many requests can be active at a time. Requests are active by default.
-
In NiCE CXone, click the app selector
and select Automation & AI > Integration Hub. -
Click the connection you want to work with from My Connections on the left side of the page.
-
On the Requests tab, click the request you want to work with.
- Click Inactive or Active at the top of the page to change the state.