

This page is for agents and other users of Attendant. If you're an administrator, see Attendant for Administrators.
Attendant lets you manage your Out of Office status for the phone system. If your organization uses voicemail with Attendant, you can also manage your voicemail.
If you've been granted web access to Attendant, you can use the Attendant web application to manage your Out of Office status or your voicemail, if your organization uses these features. ![]() and select CXone Attendant under Omnichannel Routing.
and select CXone Attendant under Omnichannel Routing.
Attendant refreshes automatically at regular intervals. Do not click Refresh in your browser as this can cause an error.
Record Your Voicemail Greeting and Name
Your voicemail greeting and name are what callers hear before being prompted to leave a message. You have the ability to record three separate greetings: default greetings for Out of Office, After Hours, and Unavailable scenarios. You have two options to record your greetings and name. When you want to record your greeting and name, you can have the system call you at a phone number you specify to make your recording. Alternatively, you can record greeting prompts directly within the app by launching an in-app recorder ![]() . You can record Unavailable, Out of Office, and After Hours greetings directly within the browser and then play back the message. Your administrator may have configured these differently based on the needs of your company.
. You can record Unavailable, Out of Office, and After Hours greetings directly within the browser and then play back the message. Your administrator may have configured these differently based on the needs of your company.
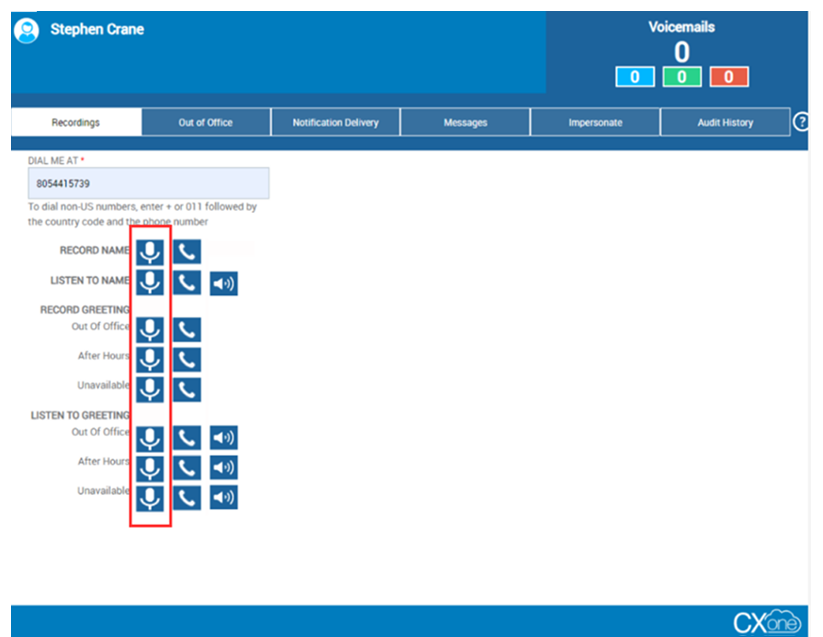
Record using the Dial Me At option
-
In NiCE CXone, click the app selector
 and select CXone Attendant.
 - On the Recording tab, enter the phone number you want the system to use to call you in the Dial Me At field, then click the microphone icon next to Record Name or Record Greeting.
 Learn more record greetings in this step.
Field
Details
Out of Office The OOO message is triggered when a call is delivered to an agent and that agent has the OOO option set.
After Hours The After Hours message triggers when the call is delivered to the agent and the agent doesn’t answer after business hours.
Unavailable The Unavailable message triggers when the called is delivered to the agent and the agent doesn’t respond during business hours. - Answer the call from the system, listen to the voice prompt, then record your name and press the # key on your phone.
- To listen to your recorded name or greeting, either:
- Click the speaker icon next to Listen to Name or Listen to Greeting to play the current recording as a WAV file on your computer.
- Click the phone icon next to Listen to Name or Listen to Greeting to have the system call you at the number you specified in the Dial Me At field; listen to the voice prompt and follow its instructions.
- Repeat this process for each voicemail greeting you want to record.
Record using the in-app recorder
-
In NiCE CXone, click the app selector
and select CXone Attendant. -
On the Recording tab, click the microphone icon to launch the recorder.
-
Allow access to your microphone.
-
Click Record and start recording your audio.
-
Click Stop to playback the recording.
-
Click the Play icon to replay the recording.
-
Click Save.
-
Recordings will not be saved until the user clicks the save icon; closing the dialog box will cancel the recording.
-
Only one version of the recording will be saved. If you re-record the prompt, the latest version will be saved to the file server.
-
Manage Your Out of Office Options
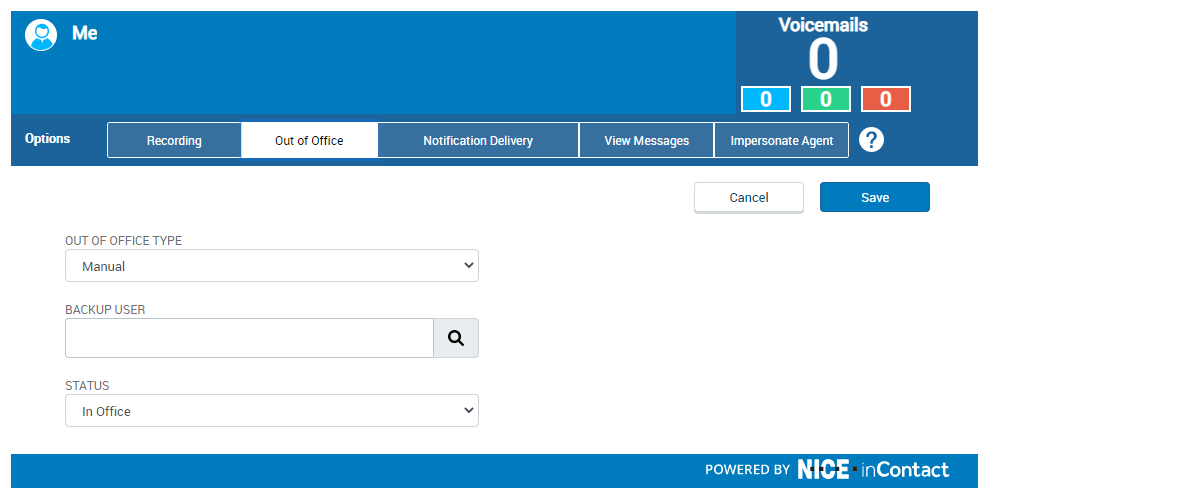
When you set your status to Out of Office, you can specify a person as your backup. Any phone calls that come in for you while you are away will be forwarded to your backup user.
-
In NiCE CXone, click the app selector
and select CXone Attendant. - Click the Out of Office tab.
-
Select an Out of Office Type and if necessary, specify the dates you will be away from the office.
Learn more about fields in this step.
Field
Details
Out of Office Type Select Date Range to specify the beginning and ending date of your time away from the office; your status is automatically changed to In Office at the end of the specified time. The time options for Date Range do not change to match your time zone.
Select Manual if you don't know when you will be returning; you must manually change your status back to In Office when you return.
From Your first day away from the office. Enter the date in the format YYYY-MM-DD or select from the drop-down calendar.
To Your last day away from the office. Enter the date in the format YYYY-MM-DD or select from the drop-down calendar. - To specify a backup user that Attendant will forward all of your calls to during your absence, enter the user's name in Backup User.
- Click Save.
Change Voicemail PIN and Notification Method
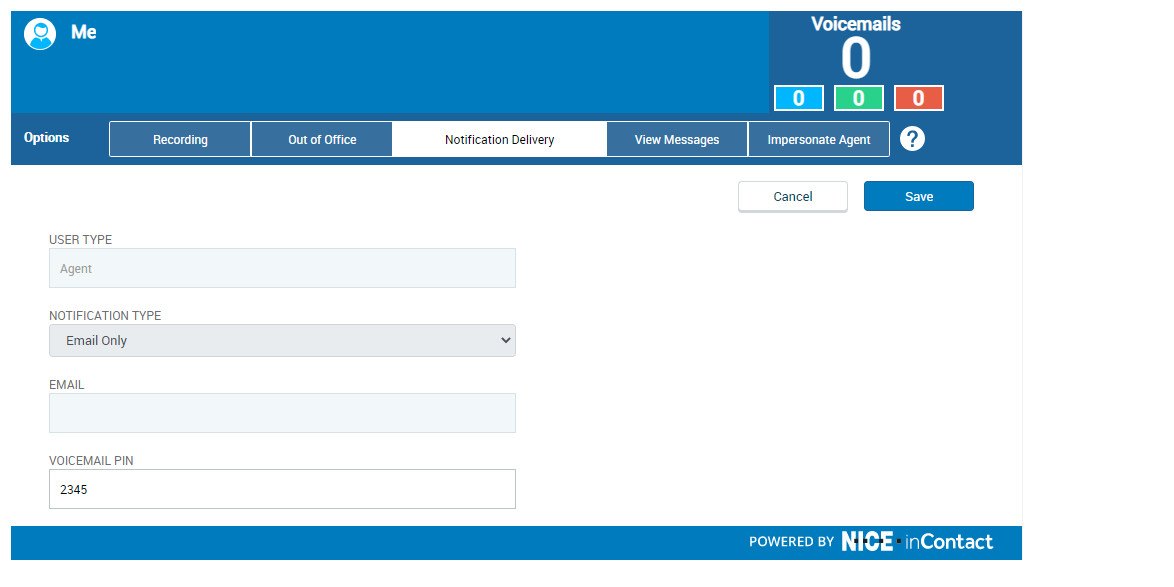
You can change your voicemail pin and set the notification method for how Attendant sends a notification. Notifications are sent when a call has been missed or a voicemail message has been received. Missed call notifications will only appear if configured by your administrator.
-
In NiCE CXone, click the app selector
and select CXone Attendant. -
Click the Notification Delivery tab, then select the way you want to receive notification of new voicemails or missed calls from the Notification Type drop-down.
Learn more about notification types.
Field
Details
Email Only Attendant sends you an email every time you have a new voicemail or missed call. Email with File Attachment For every voicemail you receive, Attendant sends you an email that has the voicemail attached as an audio file. For missed calls, you will receive an email with no attachment. Web Only You must check the Attendant application to see if you have new voicemail messages. For missed calls, you will receive an email notification. Via MyAgent Attendant sends you a message in your agent application when you have a new voicemail or a missed call. This option only applies to agents; if you are not an agent, don't select this notification type. - If you want to, enter a new number in the Voicemail PIN field. PINs can be a maximum of 6 characters (numbers only).
- Click Save.
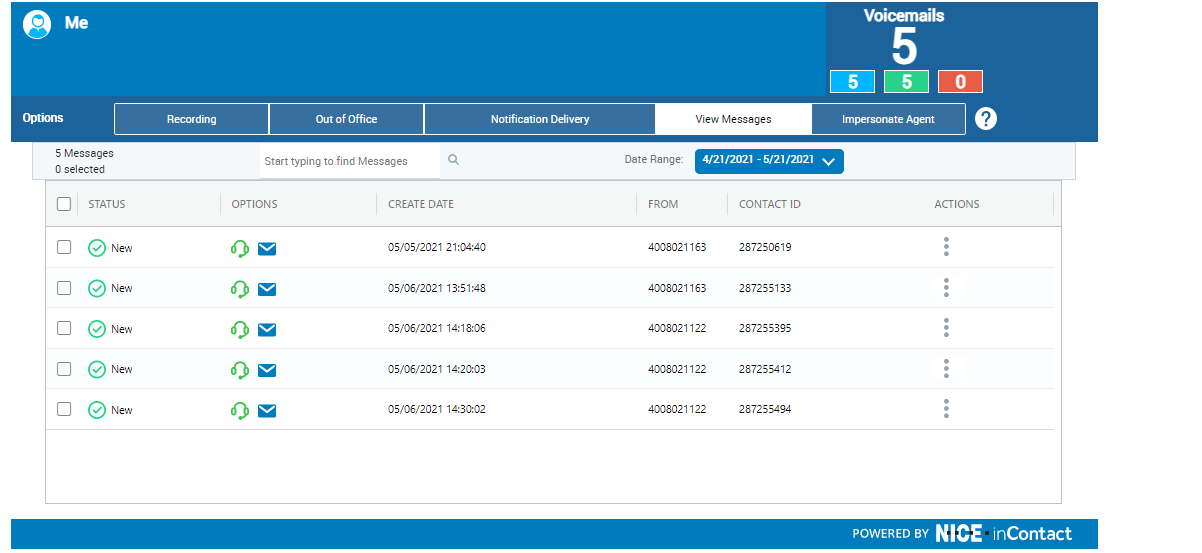
View, Listen To, or Download New Messages
Your Attendant administrator can configure the system to automatically delete voicemail messages when they reach a certain age. The maximum age is 120 days, or three months. To avoid losing important messages, download them to your computer.
You may be able to listen to your messages by phone. Your administrator will provide you the phone number to call. To log in, you need to configure a PIN.
-
In NiCE CXone, click the app selector
and select CXone Attendant. - Check the message notification center in the upper right corner of the page.Learn more about the message notification center icons.
Icon
Details
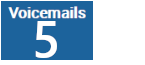
The total number of voicemail messages you have. 
The total number of voicemail messages you have. 
The number of new or unheard messages you have. 
The number of messages you have listened to. -
If you want to see your messages, click the Messages tab. You can also sort and filter your messages by Status, Created Date, From, and Contact ID.
-
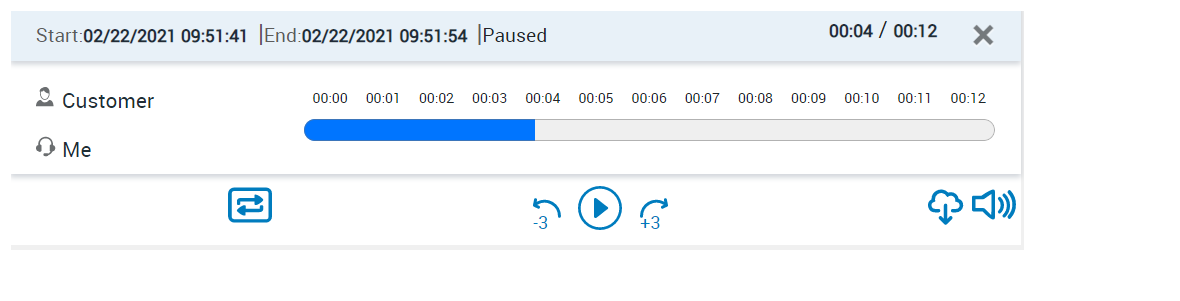
If you want to listen to your messages, click the headset icon under Options for the message you want to listen to. This launches the player.
Learn more about the icons in the player.
Icon
Details

Replay your message in a loop. 
Download your message. Icon only available if enabled by your administrator.
-
If you want to download your messages, and it has been enabled by your administrator, select the download icon in the player.
Forward Voicemail Messages
If enabled by your administrator, you can forward one or more voicemail messages to other Attendant users. Forwarded messages appear as new messages on the View Messages tab in Attendant for the recipients you selected.
-
In NiCE CXone, click the app selector
and select CXone Attendant. - Click the View Messages tab, then locate the message you want to forward. You can select multiple messages to forward.
-
Click the Actions icon next to the message you want to forward and click Forward Message. If you are forwarding multiple messages, click the Actions icon of any of the selected messages.
- In Select the Users to Forward the Message, enter the first few letters of the name of the user you want to send the message to and click the correct name when the system finds a match.
- Add additional recipients, if you want to.
- If you want to, select Delete message(s) after forwarding.
- Click Forward.
Delete Voicemail Messages
You can delete voicemail messages from your inbox. Your Attendant administrator can configure the system to automatically delete voicemail messages when they reach a certain age. The maximum age is 120 days, or three months. To avoid losing important messages, download them to your computer.
-
In NiCE CXone, click the app selector
and select CXone Attendant. - Click the View Messages tab, then locate the message you want to forward. You can select multiple messages to forward.
-
Click the Actions icon next to the message you want to forward and click Delete Message. Confirm your intention to delete the message if prompted.
Send Voicemail Message to Your Email
If enabled by your administrator, you can send a copy of a voicemail message to your email address. Attendant sends the message as an attachment to the email address listed in your profile.
- Launch the Attendant application.
- Click the View Messages tab, then locate the message you want to send.
- Click the envelope icon under Options for the message you want to send. The system displays a notification when the message has been sent.
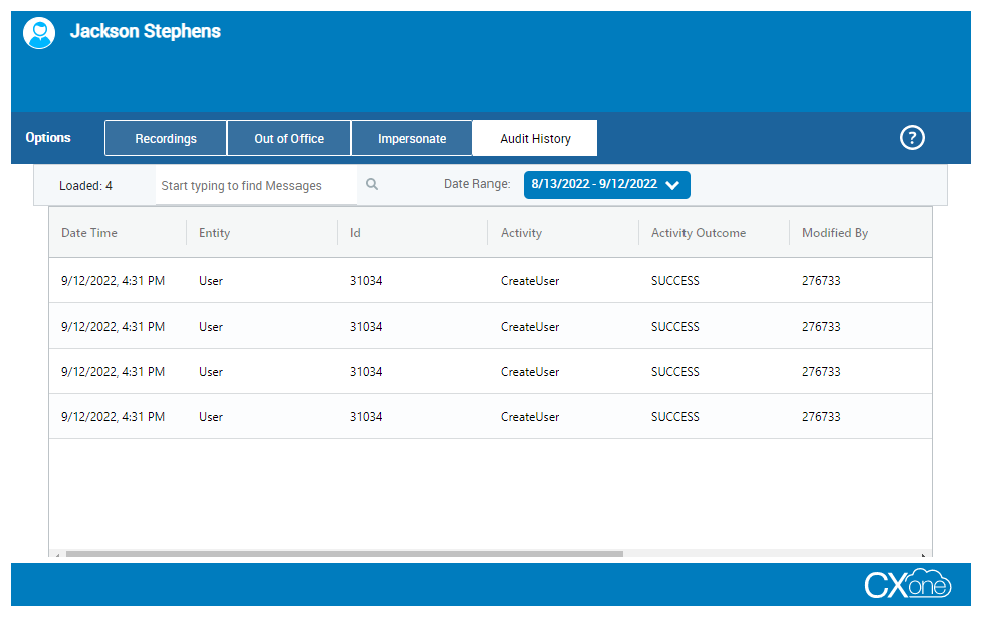
View Audit Logs
You can use the Audit History tab to view activity that occurs in the Attendant application window. You can also:
-
See audit logs related to the current user context of Attendant application window.
-
Search data via an open-text search field.
-
Filter changes by date using a start date and end date.
-
See the records of the deleted voicemail and the date they were deleted.
- From the platform, click the grid icon in the upper right corner of the screen.
- Launch the Attendant application.
- Click the Audit History tab, then find the activity you want to view.