You can use the NiCE CXone Agent Workspace (Browser Extension) (Agent Integrated) browser extension in Google Chrome or Microsoft Edge. In both browsers, you can download it from the Chrome Web Store.
Add Agent Workspace (Browser Extension) (Agent Integrated) to Google Chrome
If you use Agent Workspace (Browser Extension) (Agent Integrated) in Google Chrome, you must log in to Agent Workspace (Browser Extension) (Agent Integrated) every time you open a new tab and navigate to a new domain. This is because of a Chrome security policy.
- Navigate to the
 .
. - Click Add to Chrome in the top right.
- Chrome will install Agent Workspace (Browser Extension) (Agent Integrated). It will appear under Extensions
 as
as -
Click Extensions
in the top right of Chrome. Then select Manage extensions. Locate -
On click: On each website, a notification will appear asking to allow Agent Workspace (Browser Extension) (Agent Integrated).
-
On specific sites: Enables you to make a list of websites that allow Agent Workspace (Browser Extension) (Agent Integrated). This option prompts you to add at least one URL.
-
On all sites: Agent Workspace (Browser Extension) (Agent Integrated) appears on all websites.
-
-
To pin Agent Workspace (Browser Extension) (Agent Integrated) to the Chrome menu in the top right corner, click Extensions
, then click Pin  next to
 -
Go to Extensions
. Then, next to  > Options.
-
Verify that the CXone Agent URL is one of the following:
-
If you are not on FedRAMP: https://cxagent.nicecxone.com/
-
If you are on FedRAMP: https://cxagent.nicecxone-gov.com/
-
-
To dial phone numbers by clicking them in your browser, turn on Enable Click to Dial.
-
Click Provide Microphone Access. If this option is disabled, you've already provided microphone access.
-
To allow Agent Workspace (Browser Extension) (Agent Integrated) to display information about your ChromeOS device, turn on Enable Telemetric Data.
-
Click Update.
-
Add Agent Workspace (Browser Extension) (Agent Integrated) to Microsoft Edge
Microsoft Edge allows you to download extensions from the Chrome Web Store. Agent Workspace (Browser Extension) (Agent Integrated) is only available in the Chrome Web Store, not in Edge Add-ons.
- Navigate to the .
- Click Get in the top right.
- Click Add extension in the window that appears.
- Microsoft Edge will install Agent Workspace (Browser Extension) (Agent Integrated). It will appear under Extensions
 as
as -
Click Extensions
in the top right of Edge. Then select Manage extensions. Locate -
On click: On each website, a notification will appear asking to allow Agent Workspace (Browser Extension) (Agent Integrated).
-
On specific sites: Enables you to make a list of websites that allow Agent Workspace (Browser Extension) (Agent Integrated). This option prompts you to add at least one URL.
-
On all sites: Agent Workspace (Browser Extension) (Agent Integrated) appears on all websites.
-
-
To display Agent Workspace (Browser Extension) (Agent Integrated) in the Edge menu in the top right, go to Extensions
. Then, next to  > Show in toolbar.
 -
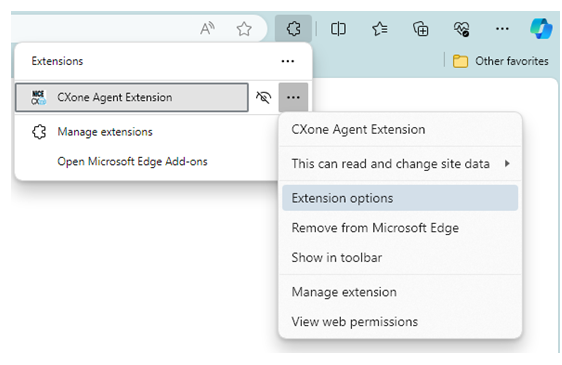
Go to Extensions
. Then, next to > Extension options.-
Verify that the CXone Agent URL is one of the following:
-
If you are not on FedRAMP: https://cxagent.nicecxone.com/
-
If you are on FedRAMP: https://cxagent.nicecxone-gov.com/
-
-
To dial phone numbers by clicking them in your browser, Enable Click to Dial.
-
Click Provide Microphone Access. If this option is disabled, you've already provided microphone access.
-
To allow Agent Workspace (Browser Extension) (Agent Integrated) to collect and display information about your ChromeOS device, Enable Telemetric Data.
-
Click Update.
-