

This is the first step of integrating Microsoft Dynamics with Agent Workspace (Browser Extension) (Agent Integrated).
This page explains how to set up a CRM configuration for Microsoft Dynamics. This is done in NiCE CXone. The configuration connects Microsoft Dynamics to NiCE CXone Agent Workspace (Browser Extension) (Agent Integrated). It allows the two to share data through data memorialization and dynamic data mapping.
When a CRM authentication token expires, it takes 9–15 seconds to generate a new one. This means that data memorialization and dynamic data mapping may take 9–15 seconds to execute, especially during the first interaction of the day.
Complete each of these tasks in the order given.
Create a New CRM Configuration in NiCE CXone
Required permissions: Configurations Create
Provide NiCE CXone with the information it needs to connect to Microsoft Dynamics.
If the Microsoft Dynamics user account that created the CRM configuration is deleted or disabled, the CRM configuration will also be deleted. Prevent this by creating a user account in Microsoft Dynamics specifically for NiCE CXone configuration. This is the system user. It is recommended to give the system user administrator privileges. If you do not want to give the system user administrator privileges, you must give it:
-
Read access to all Microsoft Dynamics entity records and entity fields.
-
Read/Write access to all Microsoft Dynamics entity records that will be accessed or updated in the workflows you've configured, including Search workflows, Create workflows, and data memorialization.
The workflows you configure later in this process use the system user's roles and permissions. When records are created or updated, they use the system user's name and time zone.
- In NiCE CXone, click the app selector
 and select Agent Integrations
  > Configurations.
 - Click New CRM Configuration.
-
In the Select Region drop-down, select the region you want this CRM configuration to be connected to: AMERICAS, APAC, or EMEA.
You cannot change this region later. If you want to move a CRM configuration from one region to another, you must create a new CRM configuration. This includes re-authenticating, recreating data memorialization and dynamic data mappings, and reconfiguring the WORKFLOW EXECUTE and AGENT WORKFLOW CONFIGURATION actions in your Studio script.
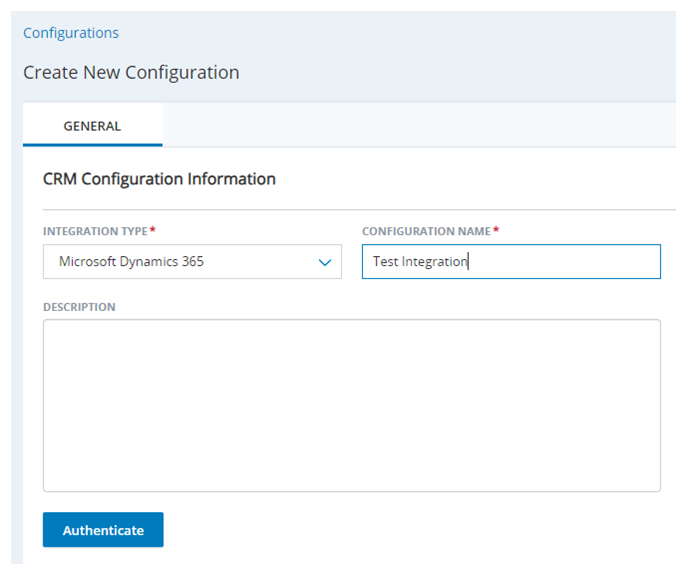
- Select Microsoft Dynamics 365 or Microsoft Dynamics 365 - OAuth 2 with Client Credentials from the Integration Type drop-down. The option you select determines the authentication fields.
- Enter a Configuration Name. You can write a Description.
- Click Authenticate.
-
In the Authentication pop-up window, select one of the authenticated accounts listed, if you have them.
Each Microsoft Dynamics account should be used to authenticate one CRM configuration. Do not reuse accounts.
If you have accounts listed, but want to create a new one, scroll to the end of the drop-down and click Add a new account. If you don't have any accounts listed, click New authentication. Configure the fields that appear:
- To change the name of the authentication, edit Your authentication name.
Enter your Microsoft Dynamics 365 URL. To find it, open your instance of Microsoft Dynamics and copy and paste the URL from the address bar in your browser. You only need the URL up until .com. For example: https://ven12345.dynamics.microsoft.com.
If you selected Microsoft Dynamics 365 as your Integration Type, skip to step G.
- Enter your support Scope. Learn about defining your support scope
 in the Microsoft Dynamics documentation.
 - Enter your Client ID. Learn about setting up your client ID in the Microsoft Dynamics documentation.
- Enter your Tenant ID. Learn about finding your tenant ID in the Microsoft Dynamics documentation.
- Enter your Client Secret. Learn about setting up your client secret in the Microsoft Dynamics documentation.
- Click Create.
- If you haven't already, log in to Microsoft Dynamics with the system user account you created specifically for NiCE CXone configuration. If you're already logged in to Microsoft Dynamics, make sure you're logged in with the system user account.
- If a window from Microsoft Dynamics appears asking to allow NiCE to connect to your Microsoft Dynamics account, click Allow.
- Click Next.
-
If the external_screenpop_domain_md field appears, enter your Microsoft Dynamics 365 URL. To find it, open your instance of Microsoft Dynamics and copy and paste the URL from the address bar in your browser. You only need the URL up until .com. For example: https://ven12345.dynamics.microsoft.com.
- Click Finish. A message telling you the authentication is active appears in the bottom right corner.
- Click Save in the top right corner of Agent Integrations.
Create Data Memorialization Mappings
Required permissions: Configurations Edit; Data Memorialization Create
Data memorialization mappings allow for data from Agent Workspace (Browser Extension) (Agent Integrated) to be popped into Microsoft Dynamics records. In these mappings, you select the NiCE CXone data field to map to each Microsoft Dynamics record field. For example, if you map the Customer Name NiCE CXone data field to the Name Microsoft Dynamics record field, Name displays the value from Customer Name. Only text is mapped; attachments, images, and notes cannot be mapped.
For voice interactions, data memorialization happens when the call ends and the agent completes ACW![]() State that allows an agent to complete work requirements after finishing an interaction. time, if configured. For digital
State that allows an agent to complete work requirements after finishing an interaction. time, if configured. For digital![]() Any channel, contact, or skill associated with Digital Experience (DX). interactions, it happens when the agent transfers the interaction or when they Unassign & Dismiss it from themselves. If the contact
Any channel, contact, or skill associated with Digital Experience (DX). interactions, it happens when the agent transfers the interaction or when they Unassign & Dismiss it from themselves. If the contact![]() The person interacting with an agent, IVR, or bot in your contact center. ends the interaction first, data memorialization does not occur for statuses, dispositions, notes, and tags. However, all other configured data memorialization will be mapped to the CRM record.
The person interacting with an agent, IVR, or bot in your contact center. ends the interaction first, data memorialization does not occur for statuses, dispositions, notes, and tags. However, all other configured data memorialization will be mapped to the CRM record.
- If you haven't already, open a CRM configuration for Microsoft Dynamics. In NiCE CXone, click the app selector and select Agent Integrations > Configurations. Select a CRM configuration from the list.
- Click the Data Memorialization tab.
- Click New Data Mapping.
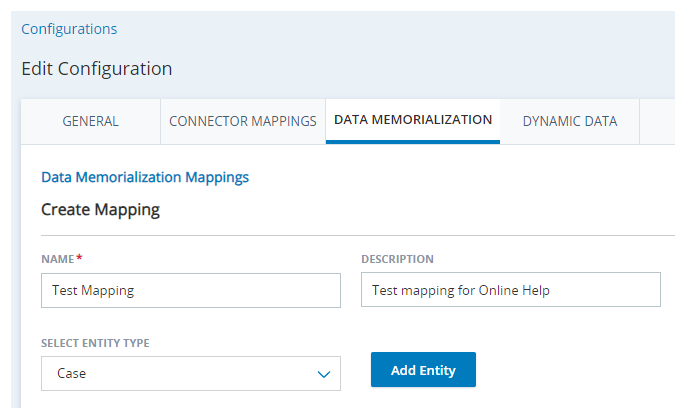
- Enter a Name for the mapping. You can optionally enter a Description.
-
In the Select Entity Type drop-down, select the Microsoft Dynamics record type you want to create field mappings for.
- Click Add Entity.
-
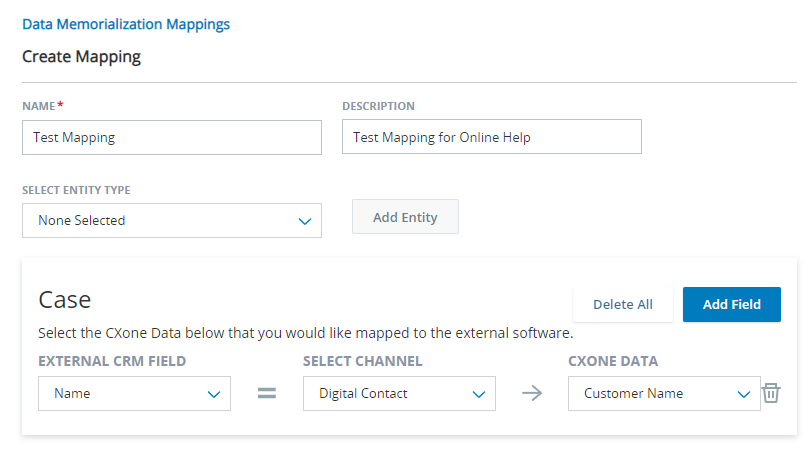
In the External CRM Field drop-down that appears, select the Microsoft Dynamics record field you want to receive data from Agent Workspace (Browser Extension) (Agent Integrated).
If you want to map the full transcript of an interaction, select a record field with proper formatting and a large enough character limit. If the field doesn't meet these requirements, only part or none of the transcript is displayed, depending on the CRM.
-
In the Select Channel drop-down, select the type of NiCE CXone data you want to map to the Microsoft Dynamics record field you selected.
We recommend creating two separate mappings for voice and digital channels on each new channel you create. This is to prevent unnecessary data mappings for records in an interaction. Studio actions can then be added to either voice or digital mappings.
 Learn about fields in this step
Field Value
Details
Digital Contact Enables you to select a Digital Experience (DX) data field to map. Script Variable Enables you to input a script variable for a data field. Select this option if you want to map a data field other than the preset Digital Experience (DX) and ACD data fields. The script variable should be in lowercase to match the ASSIGN action in the Studio script for the skill.
Script variables are not supported for digital
Any channel, contact, or skill associated with Digital Experience (DX). interactions.If you select this option to use for voice interactions, you must enable screen pops
A pop-up window with information about the contact that appears on an agent's screen after an event such as connecting to a contact. for the skill Used to automate delivery of interactions based on agent skills, abilities, and knowledge. and the ASSIGN action in the Studio script:-
Go to ACD > Contact Settings > ACD Skills and select the voice skill. In the Details tab, click Edit. Then select the checkbox for Use Screen Pops.
-
Open the Studio script for the voice skill. In the ASSIGN action's input properties, set the ScreenPop property to True.
Voice Call Contact Enables you to select an ACD data field to map. -
-
In the NiCE CXone Data drop-down, select the NiCE CXone data field you want to map to the Microsoft Dynamics record field you selected.
If you selected Script Variable in the Select Channel drop-down, enter the script variable in the
Learn more about NiCE CXone data fields
Mapping to any other NiCE CXone data field requires using a script variable.
Digital Contact (Digital Experience (DX)) Data Fields
Agent ID
The user's NiCE CXone employee ID.
Agent Name The agent's name in NiCE CXone. Call Duration (sec) The total interaction time in seconds. This is available for voice and digital interactions. Channel Name The name of a digital channel. Channel Type The type of digital channel, such as chat, email, or Facebook Messenger. Contact ID The contact's unique ID number from NiCE CXone. Customer Name The contact's name from the customer card. Direction The interaction's direction: inbound, outbound, or internal. Disposition Name The disposition Result assigned by the agent or system at the end of a voice (disposition) or digital (status) interaction. the agent selected in the Outcomes window.Disposition Notes The notes the agent added in the Outcomes window. End Time The date and time the interaction was closed. Event Type The type of interaction: voice, digital, voicemail, or work item. Final State If the interaction has ended: true or false. From The contact's name from the customer card. Interaction ID The interaction's unique ID number from NiCE CXone. Media Type The type of media: voice, digital, voicemail, or work item. Skill ID The skill's unique ID number from NiCE CXone. Skill Name The skill's name in NiCE CXone. Start Time The date and time the interaction began. Status The status Result assigned by the agent or system at the end of a voice (disposition) or digital (status) interaction. the agent selected in the Outcomes window.To The agent who handled the interaction. Transcription Text The transcript of the digital interaction. Transcript URL The URL where the digital transcription is located. Voice call Contact (ACD) Data Fields
Agent ID
The user's NiCE CXone employee ID.
Agent Name The agent's name in NiCE CXone. ANI The contact's phone number. Contact ID The contact's unique ID number from NiCE CXone. Contact Type The type of interaction: voice or digital. Direction The interaction's direction: inbound, outbound, or internal. Disposition Name The disposition Result assigned by the agent or system at the end of a voice (disposition) or digital (status) interaction. the agent selected in the Outcomes window.Disposition Notes The notes the agent added in the Outcomes window. DNIS The agent's phone number. End Time The date and time the interaction was closed. Final State If the interaction has ended: true or false. Interaction ID The interaction's unique ID number from NiCE CXone. Master Contact ID The master or parent ID number for the contact. Media Type The type of media: voice, digital, voicemail, or work item. Recording URL The URL where the recording is located. Skill ID The skill's unique ID number from NiCE CXone. Skill Name The skill's name in NiCE CXone. Start Time The date and time the interaction began. Status The status Result assigned by the agent or system at the end of a voice (disposition) or digital (status) interaction. the agent selected in the Outcomes window.To The agent who handled the interaction. Tags The tags applied to the interaction. - To add more data fields, click Add Field.
- To configure mappings for another Microsoft Dynamics record type, select a different record type from the Select Entity Type drop-down and click Add Entity.
-
Click Save at the top of the page. The active data mapping appears in the Data Memorialization tab.
In the next task in this process, select that data mapping in the AGENT WORKFLOW CONFIGURATION action in your Studio script. It appears when you select Data Memorialization in the Actions drop-down in the action's wizard.
Create Dynamic Data Mapping Mappings
Required permissions: Configurations Edit; Dynamic Data Create
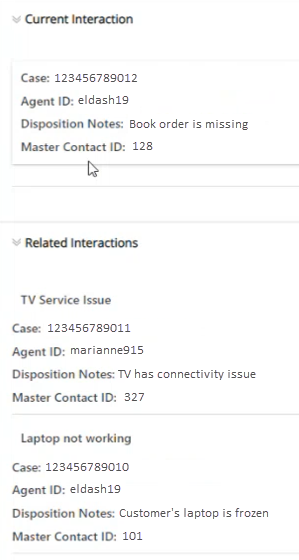
Dynamic data mappings allow you to choose which Microsoft Dynamics record fields appear in Agent Workspace (Browser Extension) (Agent Integrated). You can set up dynamic data mappings for standard Microsoft Dynamics record types retrieved by Search workflows. You can also set them up for custom records created by Custom Create workflows. For each record type, you can add up to ten string fields. You can add up to three fields with a data type other than string.
- If you haven't already, open a CRM configuration for Microsoft Dynamics. In NiCE CXone, click the app selector and select Agent Integrations > Configurations. Select a CRM configuration from the list.
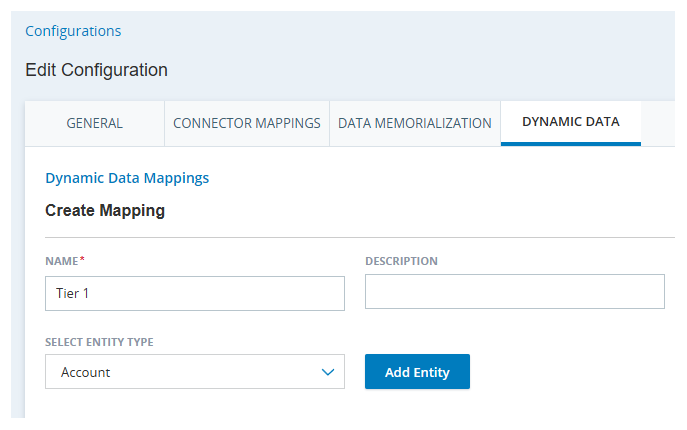
- Click the Dynamic Data tab.
- Click New Data Mapping.
- Enter a Name for the mapping. You can optionally enter a Description.
-
In the Select Entity Type drop-down, select the Microsoft Dynamics record type with the fields you want to display in Agent Workspace (Browser Extension) (Agent Integrated).
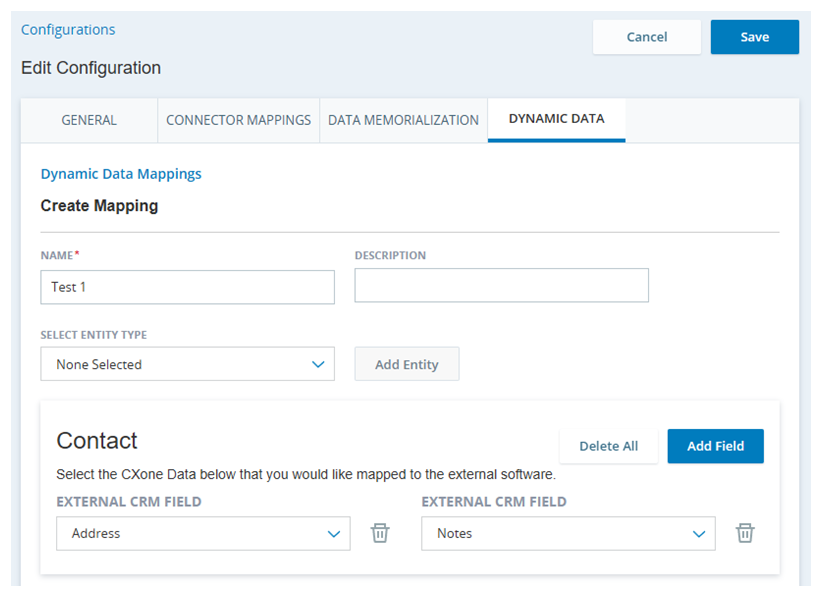
- Click Add Entity.
-
In the External CRM Field drop-down that appears, select the Microsoft Dynamics record field you want to display to agents.
- To add more Microsoft Dynamics record fields, click Add Field. You can add up to five fields per record type.
-
Click Save at the top of the page. The active dynamic data mapping appears in the Dynamic Data tab.
In the next task in this process, select that dynamic data mapping in the AGENT WORKFLOW CONFIGURATION action in your Studio script. It appears when you select Search in the Actions drop-down in the action's wizard.
The next step of integrating Microsoft Dynamics with Agent Workspace (Browser Extension) (Agent Integrated) is to modify your Studio script.