

Access and refresh tokens are encrypted to provide increased security. They do not appear directly in users' browser storage. This includes both local and session storage.
Create Access Keys for Services
You can give users access to a specific service using access keys. You do this by creating a new role with only the service's permissions enabled and assigning it to an employee profile with no features enabled. You then generate the access key on the employee profile and share it with users you want to access the service.
Caroline Bingley, the administrator of the Netherfield, Inc. contact center, wants to generate an access key for ScreenAgent so that only users with the access key can use ScreenAgent.
-
Add a new role with custom permissions required for the service.
- Click the app selector
 and select Admin.
 - Go to Security > Roles and Permissions.
-
Click New Role.
- Give the role a descriptive name. For the use case described previously, you might call it ScreenAgent Access Key.
-
Select only the permissions required for the service. Selecting other permissions will grant users extra administrative privileges in addition to those required to use the service.
-
Click Save & Activate.
- Click the app selector
-
Create a new employee profile for your service:
-
Click the app selector
and select Admin. -
Click Employees.
- Click New Employee.
-
Give the employee profile an email address you own so that you can activate the employee account later.
-
Give the employee profile a descriptive first and last name. For the use case described previously, you might call it ScreenAgent AccessKey.
-
In the Primary Role drop-down, assign the employee to the role you just created.
-
In the Attribute drop-down, clear all the checkboxes so you aren't charged for the account.
-
Click the Security tab. Select a Login Authenticator.
-
Click Create.
-
-
In the Employees table, click the new employee profile you created to open it.
-
Click the Security tab.
-
Under Access Keys, click Add access key.
-
Copy the Access Key ID and paste it somewhere you can save it.
-
Click (SHOW SECRET KEY).
-
Copy the Secret Access Key and paste it where you want to save it. If you ever lose the secret key, you'll need to create and share a new one.
-
Click Save.
-
In the Employees table, click Invite next to the new employee profile you created.
-
When you receive the account activation email, follow the instructions in the email to activate the account.
-
Share the access key only with users you want to use the service.
Use of Access Keys through Global Authentication/Token Endpoint
You can authenticate your users with access keys through the NiCE CXone global authentication/token endpoint. To do so, you have to register for this method in the DEVone Developer Community  . NiCE CXone supports a single API endpoint to retrieve access tokens. You can discover the endpoint for access keys with OpenID Connect discovery.
Delete Access Keys with Access Key Manager
The Access Key Manager page allows you to view all the access keys in your system. It displays:
-
The Access Key ID.
-
When the key was created and last used.
-
The owner of the key.
-
Whether the key is active or inactive.
You can activate, deactivate, or delete access keys from this page.
-
Click the app selector
and select Admin. -
Go to Security Settings > Access Key Manager.
- Locate the access key you want to delete.
- Click Delete
 .
. -
If you want to delete all of the access keys in your system, click Delete all access keys, then click Delete.
This action is irreversible and may result in loss of access to your system.
Session and Token Traceability
To make security easier to track and check, NiCE CXone Global Authentication (GA) services now include standardized identifiers in all issued tokens. Special ID tags have been added to all login tokens to help security teams identify every token and follow a user's entire session from the moment they log in until they finish their work. This makes it much easier to see exactly what happened during a session and keep the system safe.
New JWT Claims
All JSON Web Tokens (JWTs) issued by NiCE CXone now include the following claims, formatted as GUIDs:
 JWT Claims and Descriptions
| Claim | Name | description |
|---|---|---|
| jti | JWT ID | A globally unique identifier for the specific token instance. Every new grant (Access, ID, or Refresh token) receives a unique jti. |
| sid | Session ID | A unique identifier for the authentication session. This ID is generated during the initial credential-based login and remains constant throughout the session's lifecycle. |
How Session Tracking Works
The Session ID (sid) acts like a permanent anchor that connects all tokens used during a single login. This helps security teams track a user's activity even as their tokens change.
-
First Login: When a user logs in, the system creates a new Session ID (sid) and a unique Token ID (jti).
-
Refreshing a Token: When a token is refreshed, the system creates a new Token ID, but keeps the same Session ID.
-
Switching Applications (Token Exchange): If a user moves between different apps, the new token gets a new Token ID, but still uses the original Session ID.
Because the Session ID never changes, security teams can link all actions back to the very first time the user logged in, even if they have been working for a long time or moving between different tools.
Better Control for Access Keys
This update also makes Access Keys more secure. The system now checks if an Access Key is still active every time a token is used or updated:
-
Instant Checks: If an Access Key is disabled in NiCE CXone, any tokens created from that key stop working immediately and cannot be refreshed.
-
Immediate Stop: Once a key is turned off, the entire session is cut off. No more tokens can be requested using that key.
How Security Teams Can Use This
-
Easier Audits: Use the Session ID (sid) in your logs to see every action a user took during their entire session, even if they used different tokens.
-
Spotting Risks: Watch for duplicate Token IDs (jti) to quickly find and stop security threats, like someone trying to reuse an old token.
-
Tracking Automated Tasks: Easily link automated machine actions (using Access Keys) to specific processes to better manage and control them.
Automate Access Key Lifecycle and Security
The Access Key Lifecycle feature helps you to keep API keys secure automatically. By setting timers for inactivity and tracking how old a key is, you can:
-
Keep your security up to date.
-
Stop hackers from using old, forgotten keys.
-
Make sure old keys are replaced regularly.
These settings apply to your entire account. If a key isn't used for a certain amount of time, the system locks it. A locked key cannot be used to log in until you unlock it. This keeps your system safe by making sure only active keys can be used.
Permissions
To configure and manage Access Key Lifecycle settings, you must have the following permissions enabled in your security profile:
-
Admin > Security Settings > Roles and Permissions:
-
Security Policy (View, Configure)
-
Access Key Manager: (View, Edit)
-
Lifecycle Rules
You can define lifecycle rules for the users based on the following criteria:
Access Key Lifecycle Rule Settings
| rule | available range |
|---|---|
| Inactive since first use | 1–7 days or Never |
| Inactive since last use | 7–90 days or Never |
| Maximum age | 180–370 days or Never |
| Warning period | 7 days |
Access Key States
An access key can exist in one of the following states:
Access Key State Definitions
| state | description |
|---|---|
| Active | The access key can be used for authentication. |
| Inactive | The access key is disabled and cannot be used for authentication. |
| Locked | The access key has been locked by lifecycle rules or administrative action. |
| Deleted | The access key has been removed and can no longer be used. |
Access Key Actions
The Access Key Manager provides several actions that you can perform.
Access Key Actions Definitions
| action | description |
|---|---|
| Activate | Enables an inactive access key. |
| Deactivate | Disables an active access key. |
| Lock | Prevents the access key from being used. |
| Unlock | Restores a locked access key to an active state. |
| Ignore Rules | Exempts the access key from tenant-wide lifecycle rules. |
| Apply Rules | Removes the exemption and reapplies tenant lifecycle rules. |
| Delete | Permanently deletes the access key. |
The Warning column in Access Key Manager displays lifecycle-related notifications and warnings for individual access keys.
Configuring Lifecycle Settings
You can define the lifecycle rules that apply to all access keys within the tenant.
-
Click the app selector
and select Admin. -
Go to Tenant Configuration > Access Key Manager.
-
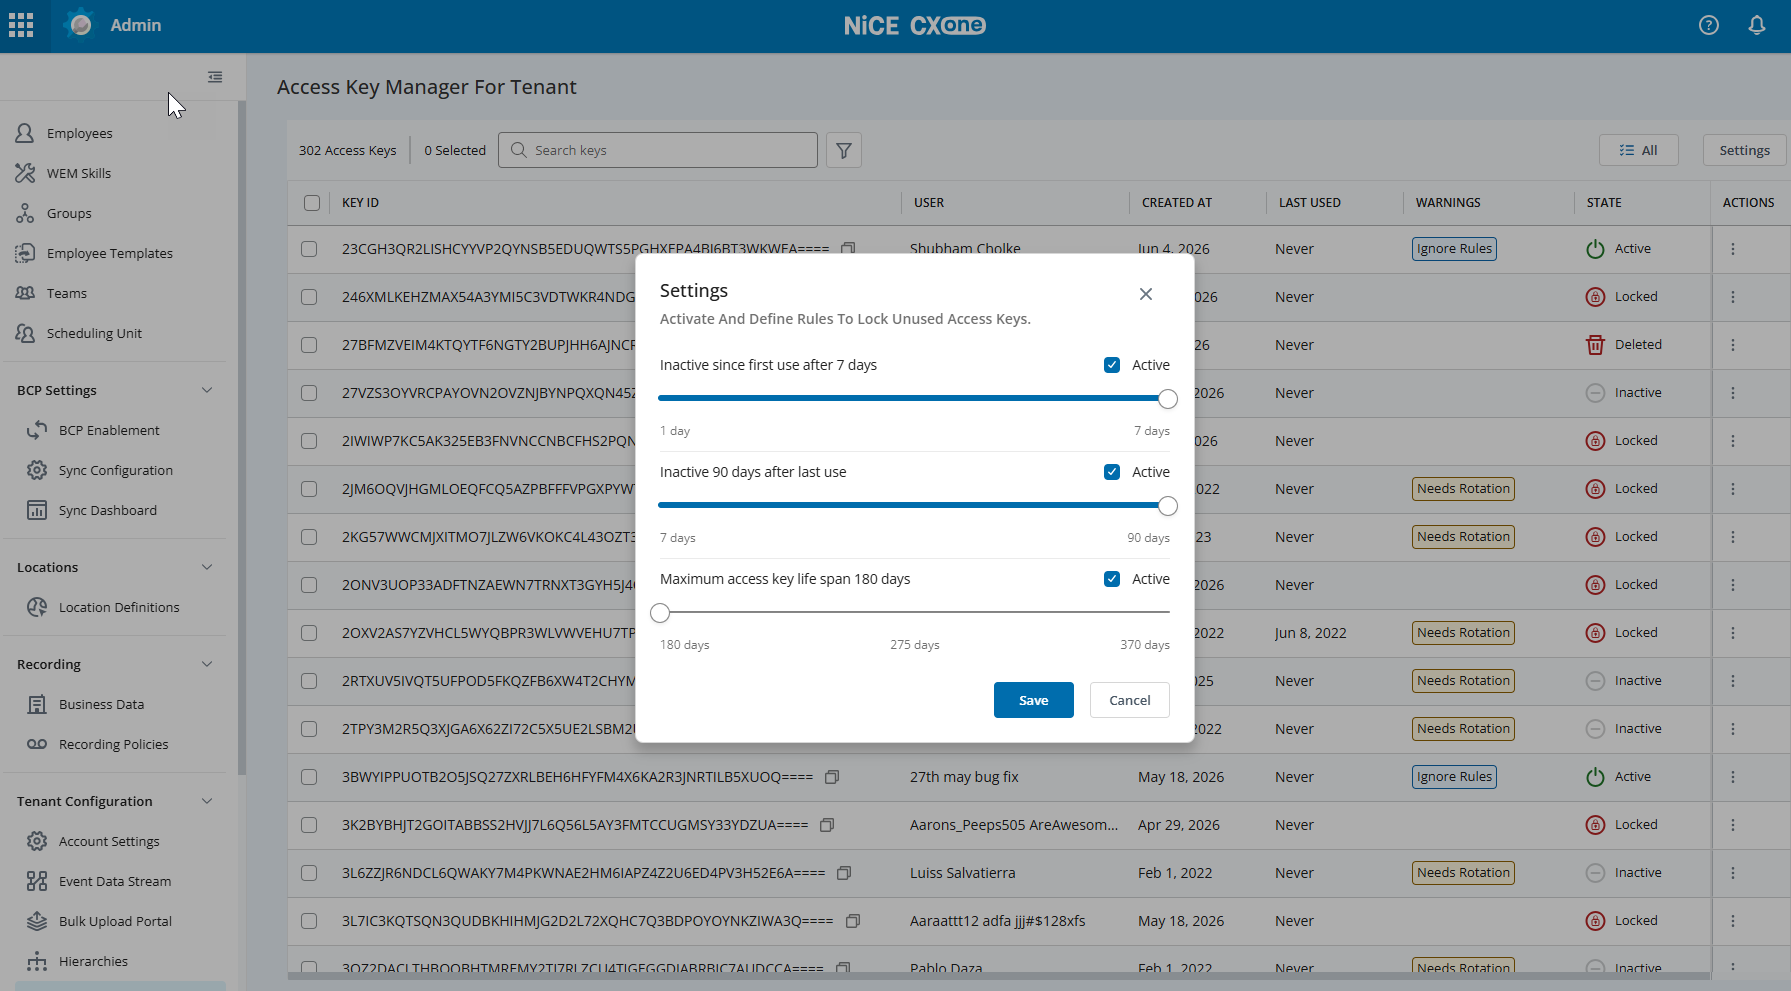
Click the Settings button in the top-right corner of the page.
- In the Settings pop-up, configure the following rules by toggling the Active checkbox and adjusting the sliders:
Inactive since first use: Set a threshold (1–7 days) to lock keys that have been created but never used.
Inactive after last use: Set a threshold (7–90 days) to lock keys that were previously active but have not been used for the specified duration.
Maximum access key life span: Set a duration (180–370 days) to flag keys that have reached their maximum recommended age.
-
Click Save.
Managing Locked Keys
When a lifecycle rule is triggered, the state of the access key changes to Locked. You can monitor and manage these keys directly from the Access Key Manager.
Identifying Locked Keys
-
State Column: Keys locked by automation will display a red Locked status icon.
-
Warnings Column: Keys nearing their maximum life span or those that have triggered a rule will display a Needs Rotation or similar warning label.
-
Filtering: Use the All filter dropdown to select Locked and view only those keys affected by lifecycle automation.
Unlocking or Exempting Keys
If a key was locked automatically but is still required, you can take the following actions from the Actions menu:
-
Unlock: Restores the key to an Active state.
-
Ignore Rules: Exempts a specific access key from the tenant-level lifecycle automation. This is useful for critical service accounts that may have infrequent but essential usage.
-
Apply Rules: Re-enables lifecycle automation for a key that was previously set to Ignore Rules.
Managing You Own Access Keys
Under My Zone > My Profile > Access Keys, you can view your own access keys.
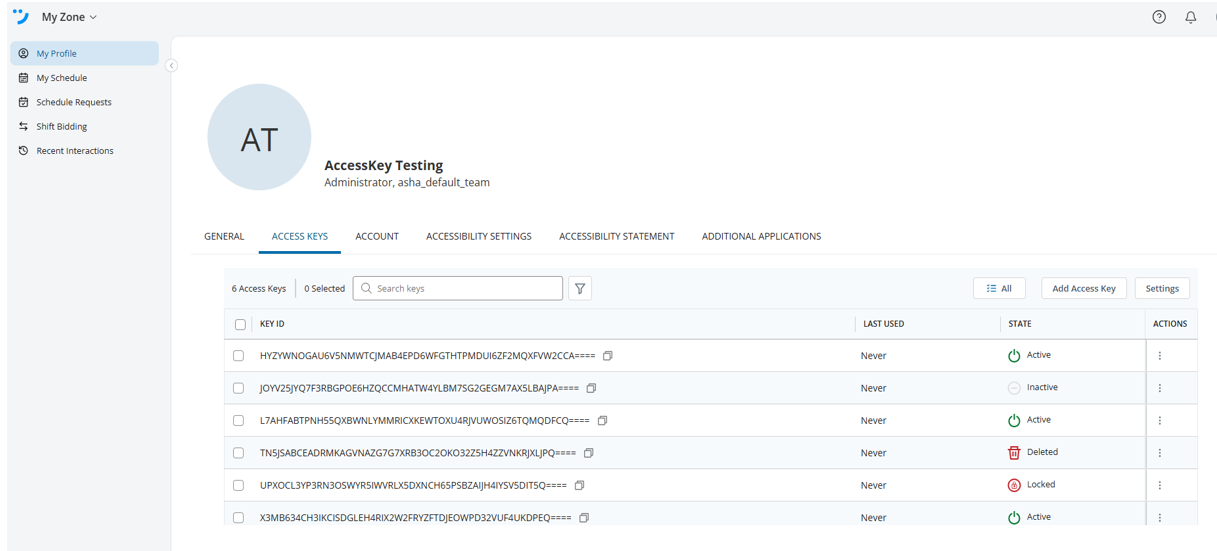
You can configure lifecycle settings and manage access keys directly from the Access Key Manager page if you have the required permissions.