

To connect Salesforce to a knowledge base, you must either provide your Salesforce credentials to NiCE Professional Services or enter them in Knowledge Hub yourself. This page describes how to create and configure a connected app in Salesforce, then enter the Salesforce connection details in Knowledge Hub and authenticate the connection there. After you authenticate, Knowledge Hub generates the required tokens automatically in the background.
Complete each of these tasks in the order given.
Create and Configure a Connected App in Salesforce
Create a Connected App
In Spring 2026, Salesforce will no longer allow you to create connected apps. You will be able to continue using existing connected apps, but you will need to contact Salesforce Support to create new ones. See the Salesforce announcement ![]() for more information.
for more information.
-
Log in to Salesforce with an account that has admin privileges.
-
Click Setup
 in the top right.
 -
Use the Quick Find box to search for App Manager and select it in the results.
-
Click New Connected App.
-
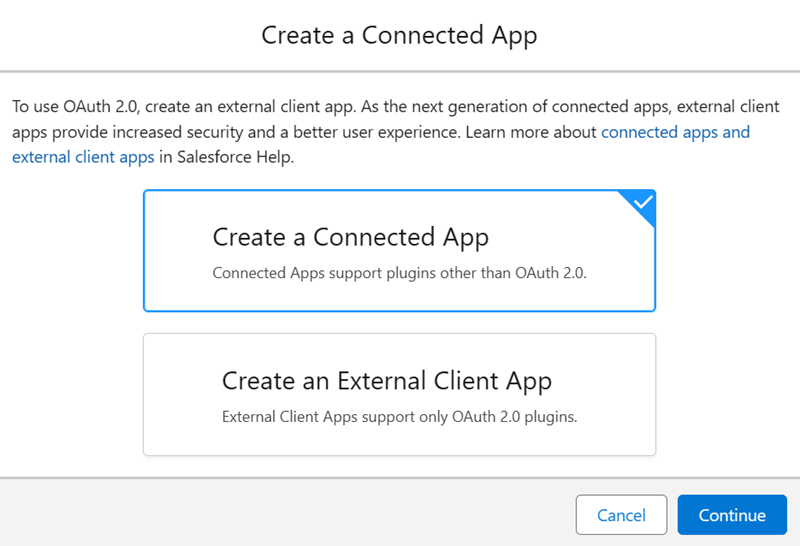
In the pop-up that appears, select Create a Connected App and click Continue.
-
If a message appears saying that the page cannot be displayed because your browser blocks cross-domain cookies, click view this page in Salesforce Classic.
-
Enter a Connected App Name. The API name is generated automatically; it's the Connected App Name without spaces.
-
In Contact Email, enter a valid email address you have access to.
-
Under API (Enable OAuth Settings), select Enable OAuth Settings and configure the fields that appear.
-
Make sure the following settings are selected:
-
Require Secret for Web Server Flow
-
Require Secret for Refresh Token Flow
-
Enable Client Credentials Flow
-
Enable Authorization Code and Credentials Flow
-
Enable Token Exchange Flow
-
Require Secret for Token Exchange Flow
-
Enable Refresh Token Rotation
-
-
Click Save.
 :
:Copy and Store Consumer Key and Consumer Secret
After you create and configure the connected app in Salesforce, the system generates the credentials required for integration with Knowledge Hub. In Salesforce, these are labeled as the Consumer Key and Consumer Secret. In Knowledge Hub, you should enter these values as the Client ID and Client Secret, respectively.
-
In Salesforce, use the Quick Find box to search for App Manager, then click App Manager.
-
In the Lightning Experience App Manager, find the connected application you created. Click Actions
 > View in the row for that connected application.
 -
Under API (Enable OAuth Settings), click Manage Consumer Details.
-
If prompted, authenticate by entering the code sent to your email.
-
Copy the Consumer Key and Consumer Secret and store them in a secure location. You use these values later as the Client ID and Client Secret in Knowledge Hub.
Configure Connected App Settings
Next, configure some of the settings of the connected application you created.
-
From Manage Consumer Details in Salesforce, click Back to Manage Connected Apps.
-
Click Manage at the top.
-
Click Edit Policies.
-
Under OAuth Policies, configure the following fields:
-
In the Permitted Users drop-down, select Admin approved users are pre-authorized.
-
In Refresh Token Policy, select Expire refresh token if not used for, then enter 2 and select Hour(s).
-
Select Enable Token Exchange Flow.
-
-
Under User Provisioning Settings, select Enable User Provisioning.
-
Click Save.
Assign Admin Profile to the Connected App
Then, assign the System Administrator profile to the connected application.
-
Back in the connected application, scroll down to the Profiles section and click Manage Profiles.
-
Select the box next to System Administrator.
-
Click Save.
Configure OAuth Settings
Next, configure your OAuth settings in Salesforce.
-
In Salesforce, click Setup
in the top right. -
Use the Quick Find box to search for OAuth, and then click OAuth and OpenID Connect Settings.
-
Enable the following settings:
-
Allow OAuth Username-Password Flows
-
Allow OAuth User-Agent Flows
-
Allow Authorization Code and Credentials Flows
-
Get the Object Name
Finally, get the object name from Salesforce. This is the last credential you need to provide to Knowledge Hub.
-
Log in to Salesforce.
-
Click Setup in the top right.
-
Use the Quick Find box to search for Object Manager, and then click Object Manager.
-
Find the object with the API name Knowledge_kav.
Configure and Authenticate Salesforce in Knowledge Hub
-
In NiCE CXone, click the app selector
 and select General > AI Studio > Knowledge Hub.
 -
Click Edit Source
 in the row for the knowledge source you want to provide credentials for.
 -
On the Source Configuration page, enter the details for the following fields,
-
Knowledge source
-
Client ID
-
Client secret
-
Instance URL
-
Object name
-
-
After you enter all required Salesforce fields, the Authenticate button is enabled. Select Authenticate to sign in to Salesforce and complete verification.
-
In the Salesforce sign-in window, enter the username and password for the account associated with the client ID and client secret.
-
Complete the identity verification step. Salesforce sends a verification code to the registered email address or phone number.
-
After authentication completes successfully, Knowledge Hub generates the required tokens automatically in the background.
-
When authentication is complete, the configuration fields become read-only. If source creation or sync fails, you can edit the configuration again.
-
Select Next.
Select metadata for Ingestion
After authentication, select the Salesforce fields that Knowledge Hub should ingest. You can choose both metadata fields and article body fields. Some fields are required by default and cannot be removed. The available fields may vary based on your Salesforce configuration.
-
In Article Meta Data Fields, select the fields to ingest as metadata.
-
In Article Body Field/s, select the field or fields that contain the article body.
Do not select the same field in both the metadata field list and the article body field list. Keep the default required fields selected. These fields cannot be removed.
-
Click Save.
Re-authenticate the Salesforce Source
If Salesforce authentication is revoked, expires, or stops working, update the connection details if needed, and then authenticate again from the same configuration page. After you authenticate successfully, continue with metadata selection.