

Update Permissions for Interaction Analytics (CXone) Widget
- Click the app selector
 and select Admin.
 Go to Security > Roles and Permissions.
- Click the role you want to modify.
- Click Permissions > Analytics.
- Under
- Click Save.
Frustration Widget
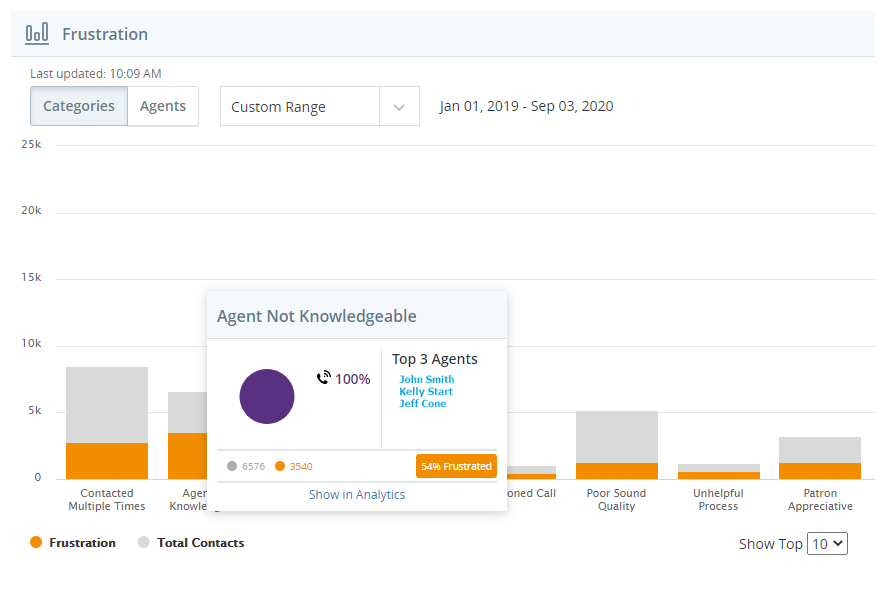
The Frustration Widget displays a chart showing the top ten frustrated contacts by category or agent. From Categories view, you can see the top ten categories with the highest number of frustration. From Agent view, you can see the top ten agents with the most frustrated interactions. You can click on any bar to view a pie chart of the percentage of frustration per channel, the top three agents that match the categories for top frustrated interactions (categories view), the top three categories that match the agents for frustrated interactions (agents view), overall and frustrated counts, and frustration percentage for that bar.
Modify the frustration widget
You can modify the Frustrated Contacts Widget settings to change the title of the widget, select a different dataset to view frustrated interactions for, change the default view, or apply a time period filter. When you select the three stacked dots in the top right corner of the widget you can access settings, reset the size of the widget, or delete it from your dashboard.
Change the Title of the Frustration Widget
- Click the three stacked dots in the top right corner of the widget.
- Click Settings.
- Enter the new widget name in the Display Name field.
- Click Apply.
Specify the Default View for the Frustration Widget
You can toggle between the Agents and Categories views in the Frustration Widget. However, you can specify which of the two views appears in the workspace by default.
- Click the three stacked dots in the top right corner of the widget.
- Click Settings.
- In the Default View field, select either Categories or Agents to specify which you would like to be the default view.
- Click Apply.
Select a Time Period
You can select the time period of frustrated interactions that you want to be displayed in the widget from the settings or from the top of the widget.
- Click the three stacked dots in the top right corner of the widget.
- Click Settings.
- In the Time Period field, select the time period you would like to view.
- Click Apply.