

ConnectLingua relies on custom scripting in Studio. To set up ConnectLingua, you must use your own scripting expertise or request assistance from your Account Representative. Work with your Account Representative to integrate ConnectLingua into your production scripts.
This page leads you through setting up a demo script. It helps you understand the key scripting requirements and lets you test the ConnectLingua functionality. This helps you understand how the script works and how you can integrate the same functionality into your own scripts.
Prerequisites
Before working through this page, work with your Account Representative to obtain the following:
-
The demo Studio script for ConnectLingua.
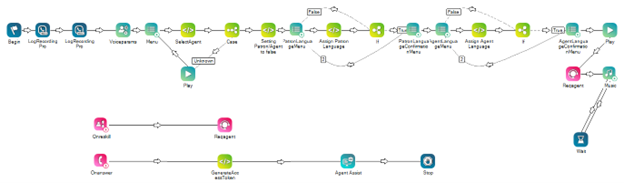
 Learn about the key actions in the demo script
-
Assign Patron Language: A SNIPPET action that assigns language codes for the contact
The person interacting with an agent, IVR, or bot in your contact center. to select in the IVR Interactive Voice Response. Automated phone menu contacts use via voice or key inputs to obtain information, route an inbound voice call, or both.. -
Assign Agent Language: A SNIPPET action that assigns the agent's language via language code.
-
GenerateAccessToken: A SNIPPET that gets the contact and agent's language values from the Assign Patron Language and Assign Agent Language SNIPPET actions, then sets them in the Agent Assist Hub action as script parameters. An authentication URL is also set in this action which is used to generate an auth token. The token is also used by Agent Assist Hub.
-
Onreskill: If the agent transfers the interaction
The full conversation with an agent through a channel. For example, an interaction can be a voice call, email, chat, or social media conversation. to a new skill Used to automate delivery of interactions based on agent skills, abilities, and knowledge., this ensures the ConnectLingua tab pops open for the new agent.
-
-
The authentication URL for ConnectLingua and the URL for your ConnectLingua instance. If you're setting up ConnectLingua to handle voice interactions
The full conversation with an agent through a channel. For example, an interaction can be a voice call, email, chat, or social media conversation., you must also obtain the audio relay endpoint URL. -
A comfort sequence audio file. This is the relaxing tune that plays to the contact while the agent is speaking into their microphone. This prevents silence on the call and ensures the contact that the agent audio will play soon. Your Account Representative can provide you with a default file or you can create your own.
-
The pretranslated audio quick replies. If you want to create your own quick replies for your production system, provide the text strings to your Account Representative to be translated.
Prepare the following in CXone Mpower:
-
A point of contact that will use the ConnectLingua demo script. This lets you make calls to test the demo script and explore the ConnectLingua interface.
You may also want to review the list of available ConnectLingua languages ![]() .
.
Configure the ConnectLingua Demo Script
Required Permissions: Studio Scripts Create/Edit, Studio Scripts IMP/EXP, File Browser Create
-
In Studio, import the ConnectLingua script provided by your Account Representative.
-
Save the script in a folder within your root folder. Do not save the script in a further sub-folder or sub-directory; this can cause undesired behavior.
-
In the GenerateAccessToken action, add the authentication URL you obtained from your Account Representative as the value for "url".
-
Save the script.
-
Add the audio files provided by your Account Representative:
-
Create a folder named ConnectLingua.
-
Add the comfort sequence WAV file to this folder.
-
Create two subfolders named DynamicAudio and QuickReplies. The DynamicAudio folder automatically stores the translated agent and contact
The person interacting with an agent, IVR, or bot in your contact center. audio segments. -
Add the quick reply files to the QuickReplies folder.
-
-
Double-click the Agent Assist action and configure its settings:
-
Click Add Agent Assist App.
-
Give the new app a descriptive name.
-
Select Custom Agent Assist Endpoints then click Next.
-
Complete the APP URL, Audio Relay Endpoint, APP TITLE, and PARTICIPANTS fields.
Learn more about fields in this step
Field Details APP URL The URL for your ConnectLingua instance. This is provided by your Account Representative. Audio Relay Endpoint
If you're setting up ConnectLingua to handle voice interactions, enter the audio relay endpoint URL you obtained from your Account Representative. This is the ConnectLingua endpoint where the audio is sent to be translated.
APP TITLE Enter an intuitive name like ICX_ConnectLingua. The value you enter here appears at the top of the window for the agent. PARTICIPANTS Select Patron Only. -
Click Create.
-
If you want to ensure you configured it correctly, double-click the Agent Assist action. The Custom Agent Assist Endpoints app displays under the General category along with a green checkmark. You can also right click the Agent Assist action to view its properties. The assistLaunchConfigName should show the name you gave the agent assist app. Also, scriptParams should have {scriptPayload.asJson()} as its value.
-
-
Save the script.
-
In CXone Mpower, navigate to the point of contact you set up as a prerequisite. In its settings, select the demo script that you just configured.
After configuring the script and assigning it to the point of contact, you can make test calls.