

This page provides the essential tasks required to set up a new bot in Bot Builder. This is the second step in the bot implementation process.
In addition to creating a new bot in Bot Builder, setting up your bot requires configuring NiCE CXone to route contacts to the bot. These configurations are:
-
NiCE CXone Employee Profile: NiCE CXone treats Bot Builder bots as user entities. They must have NiCE CXone employee profiles so NiCE CXone can route contacts to them. The employee profile must have two attributes enabled:
-
Digital Engagement.
-
Virtual Agent Enabled. This is automatically applied when you assign the employee profile as the bot body.
-
- Digital Omnichannel Routing (ACD) Skill: Create one or more digital Omnichannel Routing (ACD) skills
 Used to automate delivery of interactions based on agent skills, abilities, and knowledge. and assign them to the bot's employee profile.
 - Digital Routing Queue or Studio Script: Contacts can be routed through the system by digital routing queues or Studio scripts. When you create a digital Omnichannel Routing (ACD) skills, a corresponding routing queue is automatically created. You can configure the routing queue or you can use a script for routing.
- Digital Point of Contact (POC): A POC The entry point that an inbound contact uses to initiate an interaction, such as a phone number or email address. is the contact's entry point into the NiCE CXone system.
These configurations work together to route contacts to your bot, as shown in the following image:
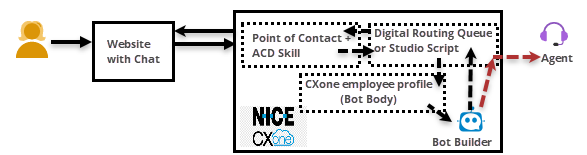
In the preceding image, you can see that the routing of contacts to your bot follows the same flow as the routing of contacts to human agents. NiCE CXone uses the relevant point of contact and its default Omnichannel Routing (ACD) skill or Studio script to route to the agent, whether it's a bot or a human.
Complete each of these tasks in the order given.
Create a NiCE CXone Employee Account for the Bot
Required permission: Admin > Employees
Creating an employee profile for the bot is the first step in creating a bot. Follow these best practices when creating your bot employee profile:
- Don't use a real person's name for your bot. If you use a human-sounding name, choose one that's unlikely to belong to a real person.
- Don't use the same employee profile for more than one Bot Builder bot. Each bot should have its own unique profile for routing and reporting purposes.
- Do use the same name for the bot and its employee profile. This keeps things simple when you're managing multiple bots.
- Do use an email address you have access to. This allows you to receive and respond to the invitation to NiCE CXone. You can use the same email address for multiple bot employee profiles.
- In NiCE CXone, click the app selector
 and select Admin.
 -
Click Employees.
- Click Create Employee.
-
Enter a First Name and a Last Name. This should be the same name you plan to give your bot. It should be a human-sounding name, but not the name of a real agent. For example, John Bot.
- Enter a working Email Address that you have access to. You must be able to respond to the invitation that NiCE CXone sends.
- Enter a Username in the format of an email address. For example, john.bot@classics.com.
-
On the General tab, use the Attributes drop-down to select Digital Engagement.
Your bot also needs the Virtual Agent Enabled attribute. However, do not add it now. Wait until you have assigned the employee profile to the bot in Bot Builder. If you add this attribute before assigning the profile, you won't be able to assign the profile to the bot.
- Leave all other settings at their default values and click Create & Invite.
- When the invitation email arrives at the email address you entered, click the link to accept and follow the on-screen prompts. You must activate the employee profile or it will not sync to Digital Experience (DX).

Set Up a Bot in Bot Builder
You can create a new bot from scratch, or you can duplicate or import an existing bot to Bot Builder. After you create or import the bot, you must assign the employee profile you created to the bot.
Create a New Bot
- Log in to NiCE CXone with your own account.
- Click the app selector and select Bot Builder.
-
Click Create Bot.
-
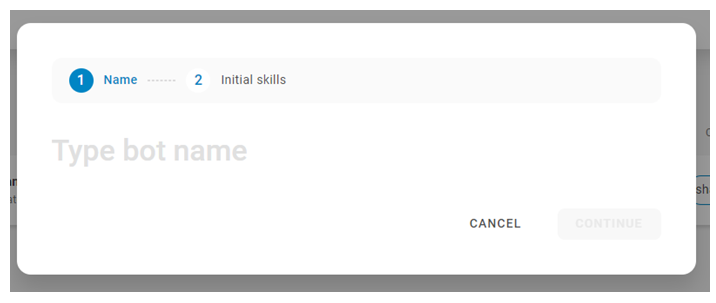
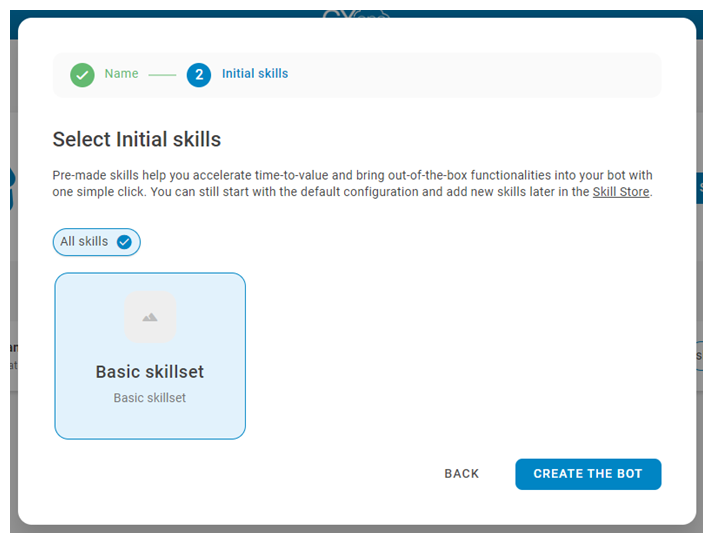
Enter a Name and click Continue.
-
- It may take several minutes for the setup to complete. You can wait or click Enter the bot to explore the Bot Builder interface while setup completes.
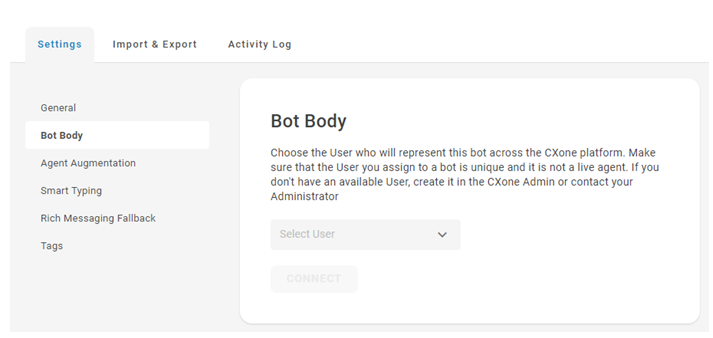
- Once the bot is created, go to Preferences
 > Settings > Bot Body.
 -
Duplicate a Bot
- Log in to NiCE CXone with your own account.
- Create a NiCE CXone employee profile for the new bot. If you're duplicating a bot only to have a backup, you don't need an employee profile.
- In NiCE CXone, click the app selector and select Bot Builder.
-
Click the bot you want to duplicate.
- Click Preferences in the left icon menu.
-
On the General tab, click Duplicate.
- Enter a name for the new bot and click Confirm.
- Click the Open link in the success message that appears at the top of the page. If you don't see this message, you can open the duplicated bot from the main Bot Builder page. Click the robot head
 in the top left corner of the page to return to the main page.
 - It may take several minutes for the setup to complete. You can wait or click Enter the Bot to explore the Bot Builder interface.
- If you created an employee profile for this bot, go to Preferences > Settings > Bot Body in Bot Builder.
-
Select a the bot's NiCE CXone employee profile, then click Connect.
Import a Bot
The file you import must have the YAML or YML extension. If you haven't exported a bot file yet, do so before completing these steps.
- Log in to NiCE CXone with your own account.
- Create a NiCE CXone employee profile for the imported bot.
- In NiCE CXone, click the app selector and select Bot Builder.
-
Click Import Bot.
-
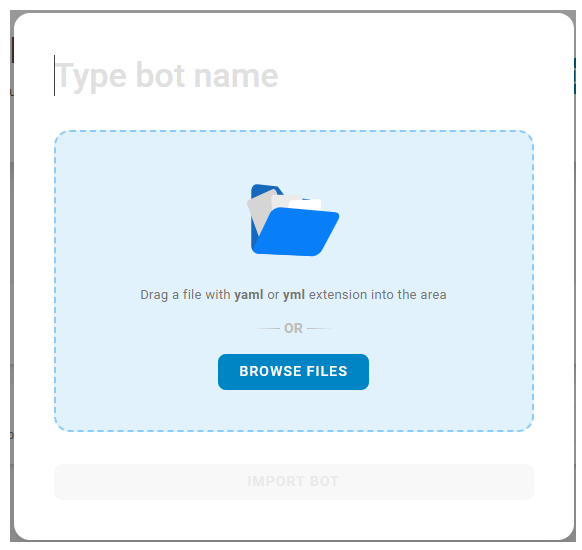
Enter a name for the bot, then drag-and-drop or click Browse Files to bring your YAML or YML bot file into NiCE CXone Bot Builder. Click Import Bot.
- It may take several minutes for the setup to complete. You can wait or click Enter the Bot to explore the Bot Builder interface.
- Once the bot is created, go to Preferences > Settings > Bot Body.
-
Select a user from the drop-down. You should pick the user you specifically created for the bot. Click Connect.
Assign Bot's Employee Profile to Omnichannel Routing (ACD) Skills
Required Permissions:
NiCE CXone considers Bot Builder bots![]() A software application that handles customer interactions in place of a live human agent. to be users. In order for your bot to receive contacts
A software application that handles customer interactions in place of a live human agent. to be users. In order for your bot to receive contacts![]() The person interacting with an agent, IVR, or bot in your contact center., it needs to be assigned Omnichannel Routing (ACD) skills
The person interacting with an agent, IVR, or bot in your contact center., it needs to be assigned Omnichannel Routing (ACD) skills![]() Used to automate delivery of interactions based on agent skills, abilities, and knowledge., just like a human agent would.
Used to automate delivery of interactions based on agent skills, abilities, and knowledge., just like a human agent would.
Follow the steps to add skills to a user or add users to a skill. Use the NiCE CXone employee profile you created for the bot. You should not assign more than one bot to a routing skill, but each bot can be assigned to multiple skills.
Assign Omnichannel Routing (ACD) Skills to a Point of Contact
Required Permissions:
If you haven't already, create a point of contact![]() The entry point that an inbound contact uses to initiate an interaction, such as a phone number or email address. (POC) for the digital channel you're using with your Bot Builder bot. For the default skill in the POC, configure it to use the Omnichannel Routing (ACD) skill you assigned to the bot's employee profile. Information about creating POCs is available on the help page for the specific digital channel you're using.
The entry point that an inbound contact uses to initiate an interaction, such as a phone number or email address. (POC) for the digital channel you're using with your Bot Builder bot. For the default skill in the POC, configure it to use the Omnichannel Routing (ACD) skill you assigned to the bot's employee profile. Information about creating POCs is available on the help page for the specific digital channel you're using.
Ensure that the Studio script assigned to the POC appropriately routes contacts. For example, if you want to use your Bot Builder bot as an overflow agent during peak hours, you must have script logic to define the conditions for when contacts are routed to the bot and when they're routed to human agents. The Reqagent actions that route to your bot should be configured with the appropriate digital Omnichannel Routing (ACD) skill.