

If you have a license for NiCE CXone Real-Time Third Party Telephony Recording (Multi-ACD) and the required permissions, you can configure connections between NiCE CXone and an external telephony system. You also edit and manage the device lists that are used to monitor communications devices in those telephony systems, when applicable. You can then record calls from the managed devices.
When deploying Real-Time Third Party Telephony Recording (Multi-ACD) side by side with NiCE CXone ACD, the ACD application must also be configured.
With Real-Time Third Party Telephony Recording (Multi-ACD), you can configure the following third party telephony systems, depending on your license.
An Avaya telephony system can include the following interface types:
-
CTI
 Computer Telephony Integration - any technology that allows interactions on both computers and phones to be integrated. interface: Avaya TSAPI (mandatory).
 -
Media interfaces:
-
DMCC—for recording internal and external calls (mono only)
-
SIPREC—for recording external calls
-
The interfaces can be configured in an Avaya telephony system in one of the following ways:
-
TSAPI with DMCC only
-
TSAPI with SIPREC only
-
TSAPI with both SIPREC and DMCC
This solution only supports the SSC![]() Single Step Conference DMCC method, while the MR
Single Step Conference DMCC method, while the MR![]() Multiple Registration and SO
Multiple Registration and SO![]() Service Observe methods are not supported.
Service Observe methods are not supported.
(Optional for failover and high availability) If you have 2 Avaya telephony systems, you can configure one TSAPI interface and one DMCC interface for each telephony system.
You can use an outbound dialer with the Avaya telephony system. In this case, create an additional telephony system for each dialer interface—Avaya POM or Alvaria (Aspect).
CXone Recording Management (CXone) is officially recognized as compliant with Avaya Communication Manager 10.1 and 10.2.
In an Avaya system, the following monitored device groups should be configured:
-
For the TSAPI interface, configure a monitored device group for physical phone extensions
-
For a DMCC interface, configure a monitored device group for Virtual Extensions (DMCC stations).
A Cisco telephony system supports two configurations:
-
IP Phone-based Recording (BiB) requires any of these SBCs: Cisco CUBE/vCUBE, AudioCodes SBC, Oracle (Acme Packet), or Ribbon (Sonus)
-
Network-based Recording (NBR) requires both Cisco CUBE/vCUBE and one of the additional SBCs: CUBE/vCUBE, AudioCodes SBC, Oracle (Acme Packet), or Ribbon (Sonus)
The Cisco telephony system can include the following interface types:
-
CTI interface: Cisco JTAPI (mandatory)
-
CTI interface: Cisco CTI Server (optional; multiple interfaces may be included)
-
CTI interface: Cisco UCCX CTI (optional; multiple interfaces may be included)
-
Cisco CUBE Media Interface: Defining this interface is not required
-
The UCCE/UCCX outbound dialer can be used with the Cisco system without any additional configuration, as it is supported out-of-the-box.
The interfaces can be configured in a Cisco telephony system in one of the following ways:
-
JTAPI
-
JTAPI and one or more Cisco CTI Servers
-
JTAPI and one or more Cisco UCCX CTI Servers
Real-Time Third Party Telephony Recording (Multi-ACD) is officially certified and recognized by Cisco as compliant with CUCM 14 and 15.
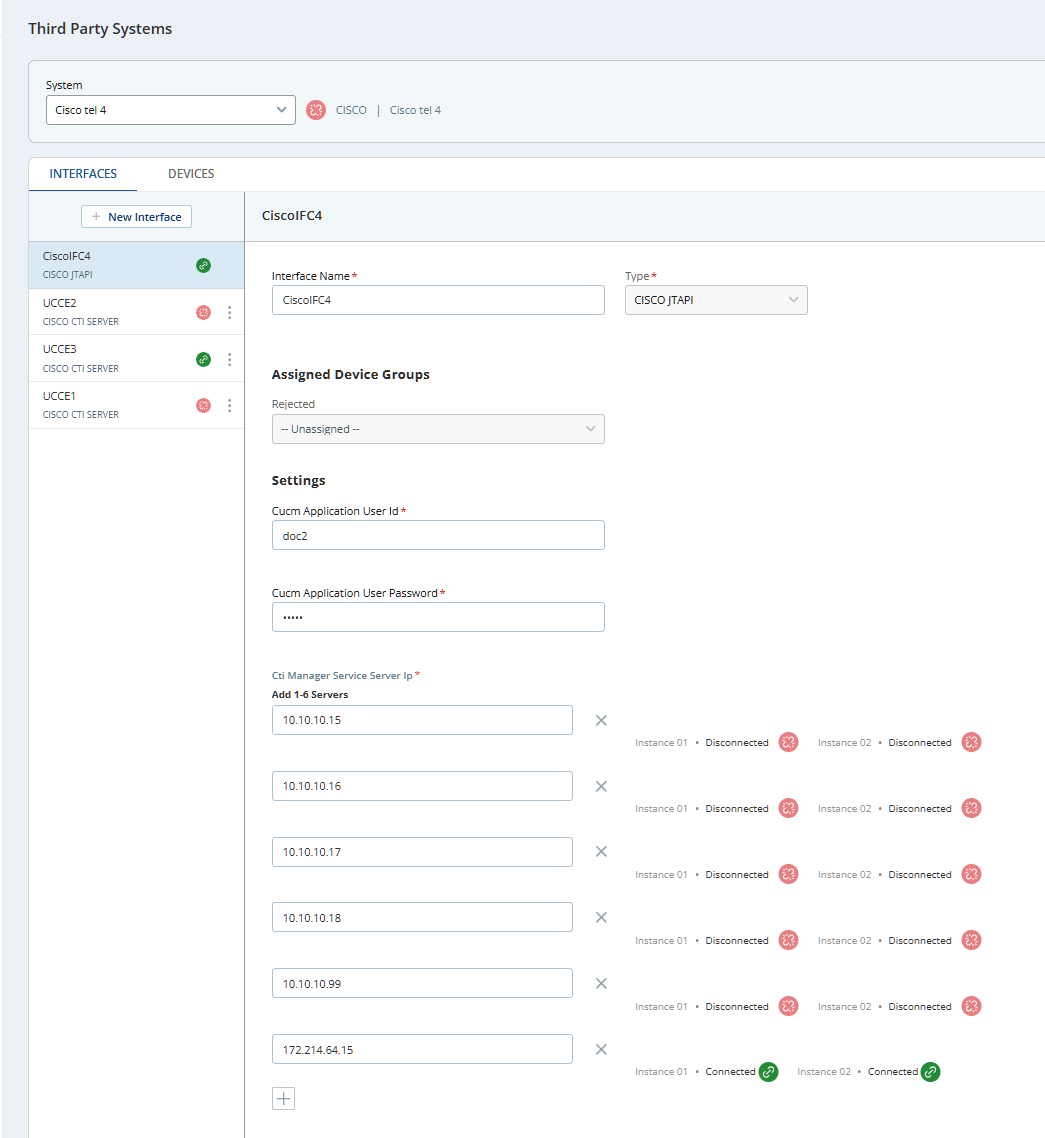
In a Cisco system, you can assign a Rejected device group to a JTAPI interface. There is no need to assign any device group to a Cisco CTI Server interface.
Cisco deployment prerequisites
Before you set up a Cisco telephony system in NiCE CXone, make sure your Cisco environment and NiCE CXone tenant are ready. Work with your Cisco or telephony team to make sure the following items are complete:
-
Cisco Unified Communications Manager (CUCM) version 14 or 15 is installed and configured.
-
Recording topology is in place:
-
IP Phone‑based Recording (BiB): An SBC such as Cisco CUBE/vCUBE, AudioCodes, Oracle (Acme Packet), or Ribbon (Sonus) is deployed and configured.
-
Network‑based Recording (NBR): Cisco CUBE/vCUBE and an additional SBC (CUBE/vCUBE, AudioCodes, Oracle, or Ribbon) are deployed and configured.
-
-
Contact center components, if used, are installed and configured:
-
Cisco UCCE or Cisco UCCX
-
Cisco Finesse agent desktop
-
-
The telephony team provides a completed configuration file used by NiCE. The file must include at least:
-
CUCM application user and password
-
CTI Manager server IP addresses
-
Cisco CTI Server A/B IP addresses and ports (for UCCE)
-
Cisco UCCX CTI server addresses, ports, and credentials (for UCCX)
-
-
Make sure that the endpoints and agent applications are ready:
-
Agents have Cisco Jabber, Webex softphones, or Cisco physical phones registered to CUCM with the extensions that will be recorded.
-
Agents can sign in to Cisco Finesse with their agent IDs. These IDs will also be used in NiCE CXone for agent‑ID–based recording.
-
A Genesys telephony system can include the following interface types:
-
CTI
Computer Telephony Integration - any technology that allows interactions on both computers and phones to be integrated. interface: Genesys SIP Server -
Media interface SIPREC
The Genesys telephony system includes the Genesys SIP Server and SIPREC interface types that can be configured together with AudioCodes SBC.
A Microsoft Teams telephony system can include the following interface type:
-
Microsoft Teams (NiCE Recording BOT)
The Microsoft Teams interface manages both CTI![]() Computer Telephony Integration - any technology that allows interactions on both computers and phones to be integrated. call events and call media.
Computer Telephony Integration - any technology that allows interactions on both computers and phones to be integrated. call events and call media.
Recording Format:
MONO or STEREO recording is supported, depending on the license.
Deployment Notice:
After creating the Microsoft Teams telephony system and interface, it is required to deploy the Microsoft Teams NiCE Recording BOT in the NiCE Azure account. This deployment is handled by the NiCE deployment team.
If an outbound dialer![]() A service that automatically calls a list of customers. is used with an Avaya telephony system, create a separate dialer telephony system with a single dialer interface. You can create the following systems:
A service that automatically calls a list of customers. is used with an Avaya telephony system, create a separate dialer telephony system with a single dialer interface. You can create the following systems:
-
Alvaria (Aspect)
-
Avaya POM
Manage Third Party Telephony Systems
The recommended workflow is to first configure the new telephony system with its device groups and interfaces. Then add devices manually or by bulk upload.
-
Use the New Telephony System wizard to add a Telephony System, define device groups, and configure interfaces. You can add up to 10 device groups and 10 interfaces during system creation, and add more after the system is created.
-
(Optional) Create Device Groups
If you are using Bulk Upload to add devices with a device group assignment, you need to add the device groups in the telephony system.
-
Add Interfaces to the telephony system.
You can also add and configure interfaces after devices have been added.
-
Add Communication Devices manually or using bulk upload. Devices are configured with their extension number.
-
Configure External Identifiers (Recording Accounts). You can add external identifiers to an employee account manually or using bulk upload. An external identifier associates an agent with a telephony system by extension number or agent ID.
-
Define the Business Data fields from the third party telephony system.
After configuring the third party telephony system, you can define recording policies. For a new tenant, the default recording policy records 100% of all voice calls.
Add a Telephony System
Create a separate telephony system for each telephony provider and outbound dialer.
Options displayed depend on your Real-Time Third Party Telephony Recording (Multi-ACD) license definitions.
-
Click the app selector
 and select Admin.
 -
Go to Recording > Third Party System.
-
Click New System.
-
Enter the System Name.
-
Select the system Integration Type.
-
For a provider telephony system, select Avaya, Cisco, Genesys, or MS Teams.
-
For an outbound dialer system, select Alvaria or Avaya POM.
-
-
In the Description field, provide the details about the telephony system if needed.
-
Click Create.
After creating a telephony system, you can:
-
Change the name and description of the telephony system—select Edit System from the Action menu. You cannot change the type of the telephony system.
-
Upload and manage certificates for TLS CTI secure communication between NiCE CXone and the telephony system, when supported by the telephony system.
You must create the interfaces for the telephony system to connect and operate with third party telephony systems.
To delete a telephony system, select Delete System from the Action menu. The telephony system and all its devices, device groups, and interfaces are deleted.
Manage Certificates for Secure Communication
You can use TLS![]() Transport Layer Security. A protocol that provides end-to-end security for data sent between applications. for secure communication between NiCE CXone and an Ayaya telephony system. When you verify the Tlink for the TSAPI interface:
Transport Layer Security. A protocol that provides end-to-end security for data sent between applications. for secure communication between NiCE CXone and an Ayaya telephony system. When you verify the Tlink for the TSAPI interface:
-
Make sure the Tlink value for the server name is set as secured.
-
Generate and export the relevant certificate.
Upload the certificate after creating the telephony system in NiCE CXone. Make sure that the public certificate is not password-protected.
View the list of trusted Certificate Authorities (CAs) that can provide the required TLS certificate.
-
Select the telephony system from the list of available systems.
-
Choose Edit System from the Action menu.
-
To upload a certificate:
-
Click Upload.
-
In the file selection window, choose the required .cer file and click Open.
After the certificate is uploaded, the name of the certificate file is displayed.
-
-
To replace the existing certificate with a different one:
-
Click Upload.
-
In the file selection window, choose the required .cer file and click Open.
After the new certificate is uploaded, the current certificate is removed and the name of the new certificate file is displayed.
-
-
Save changes you made to the certificate settings.
Manage Device Groups
You can add and edit device groups in an existing telephony system. This procedure does not apply to Cisco or Microsoft Teams telephony systems.
To create a device group:
-
Select the Devices tab.
-
Click + New Device Group.
-
Enter a name for the device group.
-
Select the Type of device group.
-
Monitored: Devices assigned to the device group can be recorded and monitored.
-
Rejected: Devices assigned to the device group will not be recorded or monitored.
This option is mainly used for outbound dialers, for the long call part.
In a Cisco telephony system, this is the only available device group type.
-
-
Click Create.
To edit the name of an existing device group, select Edit Group in the device group's Actions menu. You cannot change the type of device group after creation.
To delete an existing device group, select Delete Group in the device group's Actions menu. All the device group assignments to devices and interfaces are removed.
Manage Interfaces
Add a New Interface
Add the CTI interface and media interfaces to the telephony system.
If an outbound dialer is used with the system, create and configure the dialer interface in a separate dialer telephony system.
-
Select the Interfaces tab.
-
Click + New Interface.
-
Enter a name for the interface and select its type. The list of available interface types varies according to the type of system.
-
(Optional) Assign the interface to one or more device groups. You can select one device group from each device group type.
-
Configure interface settings. The parameters vary according to the type of interface:
Before you start interface configuration make sure that you have the Excel file that was submitted after preparing the telephony environment. This file contains values for many of the required parameters.
-
Click Save.
Update an Existing Interface
To update the configuration of an existing interface, select Edit Interface in the interface's Actions menu.
-
You cannot change the interface type.
-
Saving changes disconnects and then reconnects the interface with the updated settings. Any calls and recordings in progress on the interface will be disconnected when you save changes.
To delete an existing interface, select Delete Interface in the interface's Actions menu. Calls on the deleted interface will not be recorded.
Verify the Interface Configuration
To verify the interface configuration, use the Test Connectivity feature.
This is a manual, on-demand action triggered by clicking the Test Connectivity button on a specific interface. It performs a live network connectivity check against all IP addresses defined for that interface.
It provides per-IP results where each defined IP within the interface reports its own connectivity status and specific failure reasons when a connection fails.
Not all interface types support Test Connectivity. For example, SIPREC and MS Teams interfaces are excluded.
Before running the test, make sure all required fields in the interface, authentication information, and any mandatory settings are completed and saved. Click Test Connectivity and wait for the test to finish. This test usually takes about one minute until complete. After the test runs a green pop-up message appears in the bottom-right corner and you may see:
-
Successful Test:A green icon appears next to each IP address.
-
Failed Test: A red icon appears next to each IP address. Hover over the icon to see the reason for the failure.
Common Failure Reasons
-
CONNECTION_TIMEOUT: The system could not reach the remote server in time. This often means traffic is being blocked by a firewall. -
CONNECTION_REFUSED: The remote host refused the connection. This often means nothing is listening on the target port. -
DESTINATION_UNROUTABLE: There is no network route to the destination. This can be caused by a bad network, wrong subnet or peering, missing default route, or a bad DNS entry for the host name. -
ACCESS_DENIED: The connection was blocked due to missing permissions. -
REQUEST_TIMEOUTorTIMEOUT: The request did not complete in time. -
INTERNAL_ERROR: An internal system error occurred while running the test. Try the test again. If it keeps failing with this reason, check the logs or contact your system administrator.
After reviewing the error details, update your configuration, and click Test Connectivity again.
-
-
Incomplete Test: If the system does not receive all expected results, no icons appear. Instead, a red pop‑up message appears with more information.
Test Connectivity checks network connectivity only. For application connectivity status, see Telephony Connectivity Status.
SIPREC domain configuration
Domain configuration helps NiCE CXone map each audio stream to the right channel![]() Various voice and digital communication mediums that facilitate customer interactions in a contact center. and participant. Depending on your telephony system type, you may not need SIPREC domain configuration. Check below for more details on the setting parameters for your interface type.
Various voice and digital communication mediums that facilitate customer interactions in a contact center. and participant. Depending on your telephony system type, you may not need SIPREC domain configuration. Check below for more details on the setting parameters for your interface type.
NiCE Recorder Expectations: Each recorded call must include one Internal and one External participant.
SIPREC INVITE XML Structure: The XML must include two different domains, one for each participant. These domains show whether each participant is Internal or External.
NiCE CXone Domain Configuration: You need to keep two separate domain lists in NiCE CXone:
- Internal domains
- External domains
Do not include the same domain in both lists.
These conditions can cause errors or recording loss:
-
Missing domains in NiCE CXone : If you skip domain setup, channel mapping may fail. The system may identify a contact as an agent, or an agent as a contact. These issues can also affect analytics.
-
Invalid SIPREC INVITE XML: If the XML shows both participants as the same type, the Recorder rejects the SIPREC call. This causes recording loss.
Work with a telephony expert who understands how your phone system routes calls. SIPREC vendors like Oracle, Ribbon, AudioCodes, and Avaya use similar XML formats. A typical section appears like this:
<participant id="[caller/callee ID]" session="0000-0000-0000-0000-0000">
<participant id="[caller/callee ID]" session
<nameID aor="[caller/callee ID]@123.123.123.123"></nameID>
</participant>
<participant id="[caller/callee ID]" session="0000-0000-0000-0000-0000">
<nameID aor="+[caller/callee ID]@10.10.10.10"></nameID>
</participant>
In this example, 123.123.123.123 and 10.10.10.10 represent participant domains. Your telephony expert should tell you which domains are Internal and which are External.
-
Remove old domains.
Delete all existing domain entries under the SIPREC interfaces in NiCE CXone.
-
Test call flows.
Test all call paths across your SBCs. Include PSTN and PBX trunks. Gather SBC logs for each test.
-
Check the SIPREC INVITE XML.
Confirm that each INVITE includes two participants with different domains. Update your SBC settings if needed.
-
Create a domain mapping table.
Review your SBC logs to find all domains. Mark each domain as Internal or External.
-
Update NiCE CXone.
Add your final Internal and External domain lists to the SIPREC interface.
-
Validate your setup.
Place test calls. Confirm that recordings appear and that the system maps channels correctly. Check that the contact and agent audio streams display in the right channels in the NiCE CXone Player.
Interface Settings for Avaya Telephony System
The values for these parameters can be found in the TSAPI tab of the Excel file that was submitted after preparing the Avaya environment.
|
Parameter |
Description |
Default |
|---|---|---|
|
SERVER NAME |
TLink value. The value is case sensitive and cannot contain spaces. |
|
|
AVAYA IP ADDRESS |
IP address of the AES server. |
|
| PORT |
Port number to connect to the AES server. |
For Avaya AES 8.1.3 and 10.1, use port 450 for both secured and non-secured communication. For Avaya AES 10.2, use port 453 for secured and port 450 for non-secured communication. |
|
LOGIN ID |
Login name. |
|
|
PASSWORD |
Password for the login name. |
|
|
USE WARM STANDBY |
Whether the warm standby feature is enabled. If you select True, the Secondary Server Name, Secondary Login, and Secondary Password parameters appear, and you must enter values for them. |
False |
|
SECONDARY SERVER NAME |
TLink value for secondary server. The value is case sensitive and cannot contain spaces. |
|
|
SECONDARY IP ADDRESS |
IP address of the secondary server. |
|
|
SECONDARY LOGIN ID |
Login name for the secondary server. |
|
|
SECONDARY PASSWORD |
Password for the secondary login name. |
|
|
MAX LEN OF INTERNAL DEVICE |
The maximum length (that is, the maximum number of digits) in an internal device. The maximum value allowed is 40. |
6 |
|
USE PHYSICAL EXTENSION |
Whether the driver sends the CTI information based on the physical device. When set to False, the driver sends the CTI information based on the line (regardless of the physical device). |
False |
The values for these parameters can be found in the DMCC tab of the Excel file that was submitted after preparing the Avaya environment.
|
Parameter |
Description |
Default |
|---|---|---|
|
SYMBOLIC NAME |
The name of the CM to connect to. | |
|
PRIMARY AES SERVER ADDRESS |
IP address of the Avaya Application Enablement Server (AES). | |
|
PRIMARY AES DMCC PORT |
DMCC port to connect to the AES (0-65536). | If Primary AES Secured Connection is set to false, default is 4721. Otherwise default is 4722. |
|
PRIMARY AES USER NAME |
User name to connect to AES. The name can be up to 32 characters. You can use uppercase and lowercase letters, numbers, dashes (-), and underscores (_). | |
|
PRIMARY AES PASSWORD |
Password to connect to AES. |
|
| PRIMARY AES SECURED CONNECTION | Whether the AES connection is TSL/SSL secured. The port number must be set accordingly. | False |
| USE AES WARM STANDBY FEATURE |
Whether a secondary connection is supported. When set to True, if the primary AES is unavailable, it will try to connect to the secondary server. If you select True, the secondary connection parameters appear, and you must enter values for them. |
False |
|
SECONDARY AES SERVER ADDRESS |
IP address of the secondary server. | |
| SECONDARY AES USER NAME | User name to connect to the secondary server. | |
|
SECONDARY AES PASSWORD |
Password to connect to the secondary server. | |
|
DEVICE PASSWORD |
Password used for each configured device during registration. |
1234 |
| CODEC |
Bitmask for the codecs that you want to use: G711A - 1; G711U - 2; G729 - 4; G729A - 8; G723 - 16 |
4 (G729) |
| ENCRYPTION ALGORITHM |
Bitmask for the encryption algorithm used for the connection: No encryption - 2; AES_128_HMAC - 4 |
2 (No encryption) |
The values for these parameters can be found in the SIPREC tab of the Excel file that was submitted after preparing the Avaya environment.
|
Parameter |
Description |
Default |
|---|---|---|
|
SBC VENDOR |
Values are Acme (Oracle), AudioCodes, or Avaya (SBCE). |
|
|
IDENTIFY PARTICIPANT |
Participants can be external (contact) or internal (agent). Identification of participants is based on participant domains. |
By domain |
|
DOMAINS |
Configure domains that identify external and internal participants. Enter at least one domain URL or IP address for an internal participant and for an external participant. You can add up to 10 domains for each. Review SIPREC domain configuration to prevent errors or recording loss. |
Interface Settings for Cisco Telephony System
The values for these parameters can be found in the JTAPI tab of the Excel file that was submitted after preparing the Cisco environment. You cannot remove the JTAPI interface from the telephony system.
|
Parameter |
Description |
Default |
|---|---|---|
|
CUCM APPLICATION USER ID |
The CUCM application user ID as configured in the CUCM. |
|
|
CUCM APPLICATION USER PASSWORD |
The password for the CUCM application user. |
|
|
CTI MANAGER SERVICE SERVER IP |
The IP addresses of the servers running the CTI Manager service. You can enter up to 6 IP addresses. Add a comma as a delimiter between each IP address. The interface will try to connect to each IP address in the order listed, starting with the first. |
The values for these parameters can be found in the Cisco CTI Server tab of the Excel file that was submitted after preparing the Cisco environment.
|
Parameter |
Description |
Default |
|---|---|---|
|
CTI SERVER A IP ADDRESS |
IP address of CTI Server A. This is the primary server that the interface will attempt to connect to first. |
|
|
CTI SERVER A PORT |
Port number of CTI Server A. |
|
|
CTI SERVER B IP ADDRESS |
IP address of the CTI Server B. This is the secondary server which will be used as a backup if the interface fails to connect to the primary server. |
|
|
CTI SERVER B PORT |
Port number of CTI Server B. If you entered an IP address for CTI server B, you must enter a port. | |
| LINK IS SECONDARY | The Cisco UCCE CTI server is always used as a secondary link. You cannot change the value. | Yes |
The values for these parameters can be found in the Cisco UCCX CTI Server tab of the Excel file that was submitted after preparing the Cisco environment.
|
Parameter |
Description |
Default |
|---|---|---|
|
USER NAME |
User name to connect to UCCX CTI Server. The name cannot contain spaces. |
|
| PASSWORD | Password to connect to UCCX CTI Server. | |
|
PRIMARY UCCX SERVER ADDRESS |
IP address of the primary UCCX CTI Server. This is the main server that the interface will attempt to connect to first. |
|
| UCCX PROTOCOL VERSION | Protocol version. Do not change the default value unless instructed otherwise. | 12 |
|
PRIMARY UCCX PORT |
Port number to connect to the primary UCCX CTI Server. |
12028 |
|
SECONDARY UCCX SERVER ADDRESS |
IP address of the secondary UCCX CTI Server. This server acts as a backup and will be used if the interface fails to connect to the primary server. | |
| SECONDARY UCCX PORT | Port number to connect to the secondary UCCX CTI Server. |
Interface Settings for Genesys Telephony System
The values for these parameters can be found in the Genesys T-Lib tab of the Excel file that was submitted after preparing the Genesys environment.
|
Parameter |
Description |
Default |
|---|---|---|
|
PRIMARY SERVER ADDRESS |
FQDN or IP address of the Genesys SIP Server | |
|
PORT ID |
Genesys SIP Server port ID | |
|
USE REDUNDANCY |
For Genesys redundancy configurations | False |
| SECONDARY SERVER ADDRESS |
If using redundancy FQDN or IP address of the secondary Genesys SIP Server |
|
| SECONDARY PORT ID |
If using redundancy Genesys SIP Server secondary port ID |
|
| APPLICATION NAME | Application name on the Genesys SIP Server | |
|
APPLICATION PASSWORD |
Connection password to Genesys SIP Server |
|
| USE SECURED CONNECTION |
Whether the Genesys SIP Server is configured for TLS |
False |
| CERTIFICATE THUMBPRINT |
If using Secured Connection
|
|
| Correlation Key | SIP Correlation Key | UUID |
| RTP Password | RTP Password used to access the RTP events and report calls | Empty |
The values for these parameters can be found in the SIPREC tab of the Excel file that was submitted after preparing the Genesys environment.
|
Parameter |
Description |
Default |
|---|---|---|
|
SBC VENDOR |
Value is AudioCodes | |
|
IDENTIFY PARTICIPANT |
Participants can be external (contact) or internal (agent). Identification of participants is based on participant domains. |
By domain |
|
DOMAINS |
Configure domains that identify external and internal participants. Enter at least one domain URL or IP address for an internal participant and for an external participant. You can add up to 10 domains for each. Review SIPREC domain configuration to prevent errors or recording loss. |
Interface Settings for Microsoft Teams Telephony System
The only required parameter for Microsoft Teams is the Microsoft Teams Tenant ID.
|
Parameter |
Description |
Default |
|---|---|---|
|
RECORDING TYPE |
Value is Mono or Stereo The recording type is automatically set based on the Microsoft Teams license selected in the Tenant Manager and cannot be changed manually in the interface (the field is disabled). |
|
|
TENANT ID |
UUID The unique identifier for the customer’s Microsoft Teams telephony tenant. This must be obtained directly from the customer. |
Interface Settings for Outbound Dialers
Create a separate telephony system for each outbound dialer.
The values for these parameters can be found in the ASPECT tab of the Excel file that was submitted after preparing the Avaya environment.
|
Parameter |
Description |
Default |
|---|---|---|
|
SERVER ADDRESS |
IP address of the Alvaria server. | |
|
PORT |
The port ID of the Alvaria server (1-65535). |
15160 |
|
PROTOCOL VERSION |
Protocol version using format x.y. | 1.2 |
|
COMMAND VERSION |
Command version using format x.y. |
2.0 |
|
SECONDARY SERVER ADDRESS |
IP address of the secondary Alvaria server. | |
|
SECONDARY PORT |
The port ID of the secondary Alvaria server (1-65535). If you entered a secondary server address, you must enter a secondary port. | 15160 |
| START CALL EVENT |
When there is a start call event, NiCE CXone starts recording if the selected value matches the StartCallEventName field defined for the CTI interface in the Alvaria Aspect dialer. |
StartCall |
| STOP CALL EVENT |
When there is a stop call event, NiCE CXone stops recording if the selected value matches the StopCallEventName field defined for the CTI interface in the Alvaria Aspect dialer. |
StopCall |
The values for these parameters can be found in the POM tab of the Excel file that was submitted after preparing the Avaya environment.
|
Parameter |
Description |
Default |
|---|---|---|
|
SERVER ADDRESS |
IP address of the Avaya POM server. | |
|
PORT |
The Avaya POM WFO port ID (1-65535). | 7999 |
|
USER NAME |
The Avaya POM server name. The name cannot contain spaces. | |
|
PASSWORD |
The Avaya POM server password. |
|
| ZONE |
The Avaya POM server zone, if used. |
Manage Devices
You can add communication devices to the telephony system manually or using bulk upload. This procedure does not apply to Cisco or Microsoft Teams telephony systems.
Add Devices Manually
-
Select the Devices tab.
-
Click + New Device.
-
Enter the extension for the device.
-
Assign the device to one or more device groups.
You can select one device group from each device group type.
-
Click Create.
To update the configuration of an existing device, select Edit Device in the device's Actions menu. You can change the device group assignment. You cannot change the device extension number.
To delete an existing device, select Delete Device in the device's Actions menu. Calls to the device will not be recorded.
Add Devices Using Bulk Upload
-
Click the app selector
and select Admin. -
Select Bulk Upload Portal.
-
Click Third Party Systems> Devices.
-
Click Download Template.
-
In the CSV template, enter details for each device. Save the file and return to the Bulk Upload Portal page in NiCE CXone.
Fields for device upload
Field
Details
Action
Required. One of the following: CREATE, UPDATE, DELETE. System
Required. Name of the telephony system as defined in NiCE CXone. Device Type
Required. Must be EXTENSION. Device Number
Required. Device number—enter 1 to 64 characters. UDI
Optional. Unique device identifier—enter 1 to 64 characters. Monitored Group
Optional. Name of assigned monitored device group as defined in the telephony system in NiCE CXone. Rejected Group
Optional. Name of assigned rejected device group as defined in the telephony system in NiCE CXone. -
Click Browse For Files and select the file you just saved. Alternatively, drag and drop the file to upload.
-
Click Upload Files. The Bulk Upload Portal page displays file upload progress.
-
Go to the Activity tab to view the upload status. The Activity tab lists the details of the various upload attempts.
-
If the file upload succeeds, the devices appear in the Devices tab for the corresponding telephony system.
-
If the file upload fails, try uploading the file again.
-
For additional information, see Bulk Upload Records.
Configure Expert Parameters
Only internal NiCE users can configure expert parameters for an existing third party telephony system and its interfaces. Contact your NiCE NiCE CXone account representative for assistance.
Expert parameters include advanced telephony parameters, such as, timeouts, retry duration, log level, and so on.
The Impersonate & Configure type of tenant impersonation is required to configure expert parameters.
Before you begin, create a json file with the required system parameter settings.
-
Click the app selector
and select Admin. -
Go to Recording > Third Party System.
-
Select the telephony system from the list of available systems.
-
Choose Edit System from the Action menu.
-
In the Expert tab, click Upload File.
-
In the file selection window, choose the required .json file and click Open.
The file contents appear in the view area.
-
Save changes.
Before you begin, create a json file with the required interface parameter settings.
-
Click the app selector
and select Admin. -
Go to Recording > Third Party System.
-
Select the telephony system from the list of available systems.
-
Select the interface to configure.
-
In the Expert Configuration field, click Upload File.
-
In the file selection window, choose the required .json file and click Open.
The file contents appear in the view area.
-
Save changes.
Telephony Connectivity Status
CXone monitors the health of each third-party telephony interface and updates the status indicator in real time. This lets you quickly confirm connectivity after changes and spot issues before they impact recording or routing.
Telephony System Health Status is a continuous, automatic application-level monitoring indicator that shows the real-time connectivity state of telephony systems and their interfaces in the Third Party Systems window. It gives administrators an always-on, at-a-glance view of whether their telephony systems and interfaces are connected and working.
It provides a status indicator at both the telephony system level and interface level.
Interface level Status Indicators
-
Green
 : Connected and functioning normally.
 -
Red
 : Disconnected or unavailable.
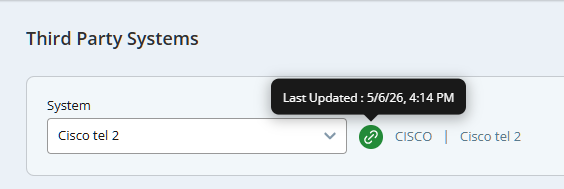
Telephony System Status Indicators
The telephony system status is derived from the statuses of all the interfaces together. It shows the last status change timestamp as a tooltip.
-
Green
: All the interfaces are connected. -
Red
: At least one interface is disconnected, or the system has no interfaces.
SIPREC and MS Teams interfaces are excluded from indicators entirely and don't affect system health calculations.
The Status Indicator shows real-time application connectivity status (between CXone and the third-party system). Test Connectivity shows network connectivity between configured IP addresses. As they are measuring two different connections, it is possible for Test Connectivity to pass successfully, even if the status indicator shows a failed connection. This means that the network connection is successful, but the CXone application is failing to connect to the customer system.
Similarly, it is possible for the status indicator to be green, indicating a successful connection between the applications, but Test Connectivity shows that some IPs have failed to connect. In this case, please reach out to the integrator or NiCE Professional services to fix the network connectivity issue.
Manage External Identifiers (Recording Accounts)
You can add up to 10 external identifiers to an employee account manually or using bulk upload. An external identifier associates an agent with a telephony system by extension number, agent ID, or UDI (Cisco shared line only).
Make sure agents are properly linked to their external identifiers. Otherwise, calls will not be recorded, but the call details will appear in the Search application without an agent name, labeled as Unmapped Agent. You can find these calls by searching for the Unmapped Agent label to quickly identify and resolve any issues with user definitions.
If you enter an extension that is not monitored by the TSAPI interface, NiCE CXone allows saving but displays a warning. Calls from this extension will not be recorded. To resolve, add the extension to the TSAPI monitored device group in Third-party Telephony.
In Avaya systems, calls may first pass through hunt groups![]() A set of extensions the phone system checks in order to send an incoming call to an available agent., VDNs, or other dialed‑in numbers before they reach an agent’s extension. These call entry points must also be added to the TSAPI monitored devices group, not just the agent extensions.
A set of extensions the phone system checks in order to send an incoming call to an available agent., VDNs, or other dialed‑in numbers before they reach an agent’s extension. These call entry points must also be added to the TSAPI monitored devices group, not just the agent extensions.
If a call comes in through a hunt group or VDN that is not TSAPI‑monitored, the interaction may:
-
Show in NiCE CXone as an unmapped agent, even if the agent’s extension is monitored.
-
Have missing or incomplete CTI data.
To prevent unmapped or partially mapped interactions, make sure the following setup steps are complete:
-
Configure TSAPI‑monitored devices.
Add all agent extensions used for recording. This includes hunt groups, VDNs, and any other inbound call entry points. Be sure each one is in the correct TSAPI‑monitored device group.
-
Add external identifiers and agent IDs.
Every agent you want to record must have an employee external identifier linked to their agent ID.
-
Assign a recording policy.
Each employee external identifier must be assigned to a recording policy. The policy should be set to record the interaction types you need (voice, screen, or both).
For additional information, see:
Add External Identifiers (Recording Account) Manually
-
Go to Admin > Employees.
-
Select an existing employee's account or select Create Employee.
-
Select the External Identifiers tab.
-
Configure recording accounts:
-
To add a recording account, click New Identifier.
-
Select the System the recording account is assigned to.
-
Select the Identifier Type:
-
For sites using fixed seating, select Extension.
-
For sites using free seating, it is recommended to select Agent ID.
-
(Cisco telephony system only) For sites using a shared line, select UDI (Unique Device Identifier).
-
For Cisco UDI accounts, enter the Device Name if the agent uses Cisco Jabber, or the MAC Address if the agent uses a physical desk phone.
-
-
-
In the Value field, enter a unique value per system for the recording account.
-
Add External Identifiers (Recording Accounts) Using Bulk Upload
-
Click the app selector
and select Admin. -
Select Bulk Upload Portal.
-
Click Third Party Systems> External Identifier.
-
Click Download Template.
-
In the CSV template, enter details for each device. Save the file and return to the Bulk Upload Portal page in NiCE CXone.
Fields for external identifiers upload
Field
Details
Action
Required. One of the following: CREATE, UPDATE, DELETE. User Name
Required only for CREATE action. Enter the user name in email format. System
Required. Name of the system as defined in NiCE CXone. Identifier Type
Required. One of the following: EXTENSION, AGENTID, UDI.
-
For sites using fixed seating, define an extension.
-
For sites using free seating, it is recommended to define agent ID.
-
(Cisco telephony system only) For sites using a shared line, define a Unique Device Identifier (UDI).
-
For Cisco UDI accounts, the value must be the Device Name (for Cisco Jabber) or the MAC Address (for a physical desk phone).
-
Value
Required. Enter the extension number, agent ID, or UDI (Cisco shared line only) as defined in the system.
Accepted input: 1 to 64 characters.
Updated Value
Required only for the UPDATE action. Enter the new unique extension number, agent ID, or UDI (Cisco shared line only).
Accepted input: 1 to 64 characters.
-
-
Click Browse For Files and select the file you just saved. Alternatively, drag and drop the file to upload.
-
Click Upload Files. The Bulk Upload Portal page displays file upload progress.
-
Go to the Activity tab to view the upload status. The Activity tab lists the details of the various upload attempts.
-
If the file upload succeeds, the recording accounts appear in the External Identifiers tab for the corresponding employees.
-
If the file upload fails, try uploading the file again.
-
Add Mobile Agents Mapping Using Bulk Upload
Only available for Cisco configuration with Real-Time Third Party Telephony Recording (Multi-ACD).
-
Click the app selector
and select Admin. -
Select Bulk Upload Portal.
-
Click Third Party Systems > External Identifiers.
-
Click Download Template.
-
In the CSV template, enter details for each device. Save the file and return to the Bulk Upload Portal page in NiCE CXone.
Fields for mobile agents mapping
Field
Details
Action
Required. Select one of the following: CREATE, UPDATE, DELETE.
System
Required. Name of the telephony system as defined in NiCE CXone.
Local Device Number
Required. Local device number — enter up to 64 characters, must be letters, numbers, and @ # *.
Remote Device Number
Required. Remote device number — enter up to 64 characters, must be letters, numbers, and @ # *.
-
Click Browse For Files and select the file you just saved. Alternatively, drag and drop the file to upload.
-
Click Upload Files. The Bulk Upload Portal page displays file upload progress.
-
Go to the Activity tab to view the upload status. The Activity tab lists the details of the various upload attempts.
-
If the file upload succeeds, the recording accounts appear in the Recording Accounts tab for the corresponding employees.
-
If the file upload fails, try uploading the file again.
-
Define Business Data for Real-Time Third Party Telephony Recording (Multi-ACD)
Business data fields from a customer's third party telephony system need to be defined manually in NiCE CXone.
-
Click the app selector
and select Admin. -
Go to Recording > Business Data.
-
Click New Field.
-
Enter the Business Data Name as used in the customer's third party telephony system. The business data name is not displayed in NiCE CXone.
-
Enter the Display Name, as it should appear in NiCE CXone. This field can be up to 128 characters.
-
Select a Field Type. The field type must match the field type in your third party telephony system.
Define the Field Type as text if it will be used in a quality plan, or if you want the contents of the field to be searchable in the Interactions application.
When the Field Type is text, the character limit for the business data value is 4000 characters.
-
Click Save.